Introduction
- how-to
The Couchbase Power BI Connector provides data visualization for the Couchbase platform, using Microsoft’s data visualization software.
The Couchbase Power BI Connector integrates:
Couchbase Analytics tabular views.
For self-managed CBAS, the Power BI connector requires Couchbase Server 7.2.4 or newer. Capella Columnar instances
or Capella provisioned services
With Microsoft’s Power BI interactive data visualization platform.
Prerequisites
You can integrate the Power BI platform with Couchbase Capella or an instance of the self-managed Couchbase Server. You should also run the Couchbase Analytics service on the target node.
Install Power BI
Before you start, ensure you have a supported version of Microsoft Power BI Desktop installed. The Couchbase Power BI Connector requires Power BI Desktop version March 2017 or later.
If necessary, download Power BI Desktop from the Microsoft downloads page.
| Power BI is only available for the Microsoft Windows platform; for other platforms, consider our Tableau connector. |
Install the Couchbase ODBC Driver
-
Download the
couchbase-odbc-1.1-win64.msifile from https://packages.couchbase.com/releases/couchbase-odbc-driver/1.1/couchbase-odbc-1.1-win64.msi — see the release notes page for more details. -
Double-click the file to open the Couchbase ODBC Setup Wizard.
-
Install the ODBC drivers from the downloaded file. This installation provides both ANSI and Unicode drivers.
| Make sure that you have installed the 64-bit versions of the ODBC drivers. |
Install OpenSSL
The connection between a Couchbase Analytics instance or a Capella columnar database and Power BI requires a Couchbase ODBC driver. OpenSSL is a required dependency for the driver.
-
Download
Win64 OpenSSL v3.3.1 Lightfrom the Shining Light Productions site. -
Install OpenSSL from the downloaded file.
-
Verify that Windows has installed SSL and registered the path of the binary. Open the command prompt (
cmd), and enter the following:openssl version -
If the output indicates OpenSSL is not installed, rather than returning the version that you installed, then you need to add the OpenSSL binary’s location to the
PATHenvironment:-
Check the
C:\Program Filesor useFindto locate the SSL binary — usually the path will be something like:C:\Program Files\OpenSSL-Win64\bin -
Add this path to the environmental variables list, found in .
-
Now verify that Windows has registered the path of the binary. Once again, open the command prompt (
cmd) — it must be a fresh command prompt, as the earlier one will not have loaded the newly added environmental variables — and enter the following:openssl version
-
Install the Couchbase Power BI Connector
You will need to install the connector that allows Power BI to communicate with Couchbase, through ODBC.
-
Download
couchbase-powerbi-connector-1.0.mezfrom https://packages.couchbase.com/releases/couchbase-powerbi-connector/1.0/couchbase-powerbi-connector-1.0.mez — see the release notes page for more details. -
Follow Microsoft’s guide on configuring a custom connector.
Verify the Connector is Loaded Successfully:
-
Open Power BI.
-
Go to .
-
Use the search box to find Couchbase Connector.
Setting up a Secure Connection
Couchbase strongly recommends that you secure your ODBC connection using SSL. This ensures encryption of the communication between Power BI and the Couchbase server/Capella.
-
Capella Operational
-
Capella Columnar
-
Self-Managed Couchbase Server
You will need to get a connection string for your database and generate an API key to plug into the ODBC connector.
To obtain the connection string.
-
Sign in to your Capella instance as an Administrator.
-
Select the Connect item from the top-level menu.
-
Make a copy of the
public connection string.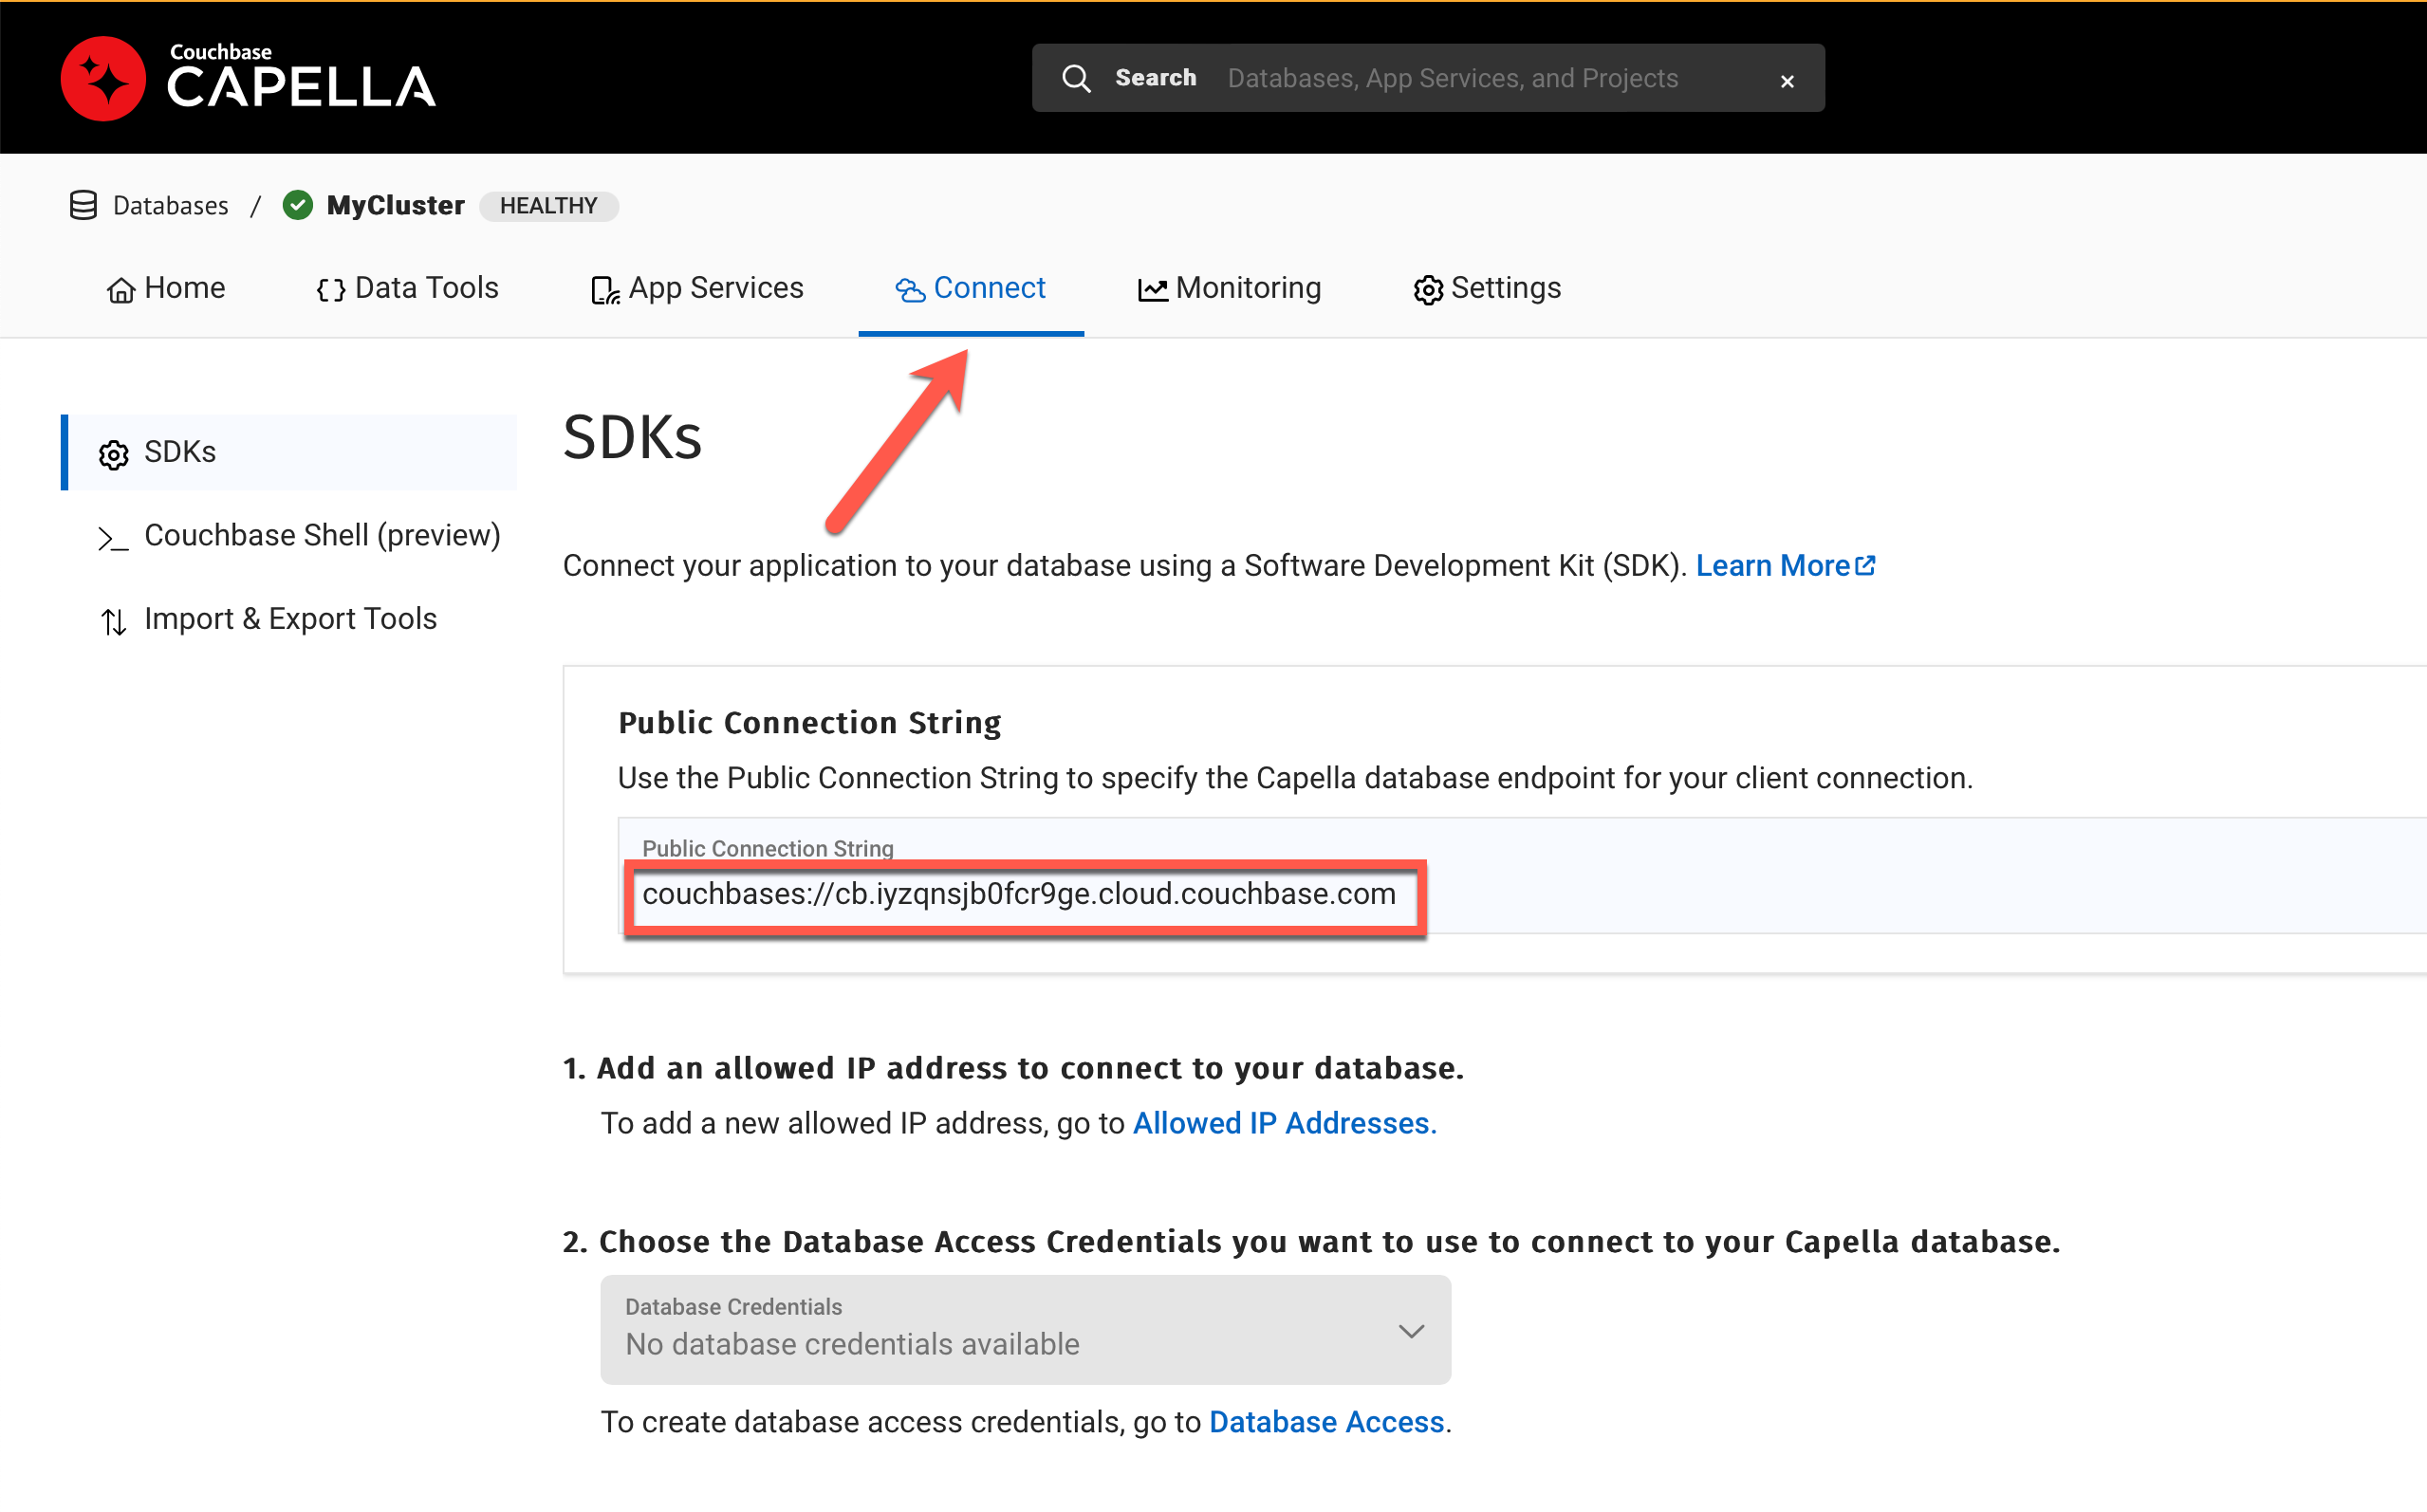
-
In the next section of the page, you will find the link to create a list of Allowed IP Addresses. Click on the link to create an entry for the IP address of the machine from which you’re running Power BI.

You can use the Add Current IP Address button to fill in the address of the machine currently running the web console. -
Return to the Connect screen and click on the Database Access link. Create a new database access entry, setting values for
bucket, andscopes.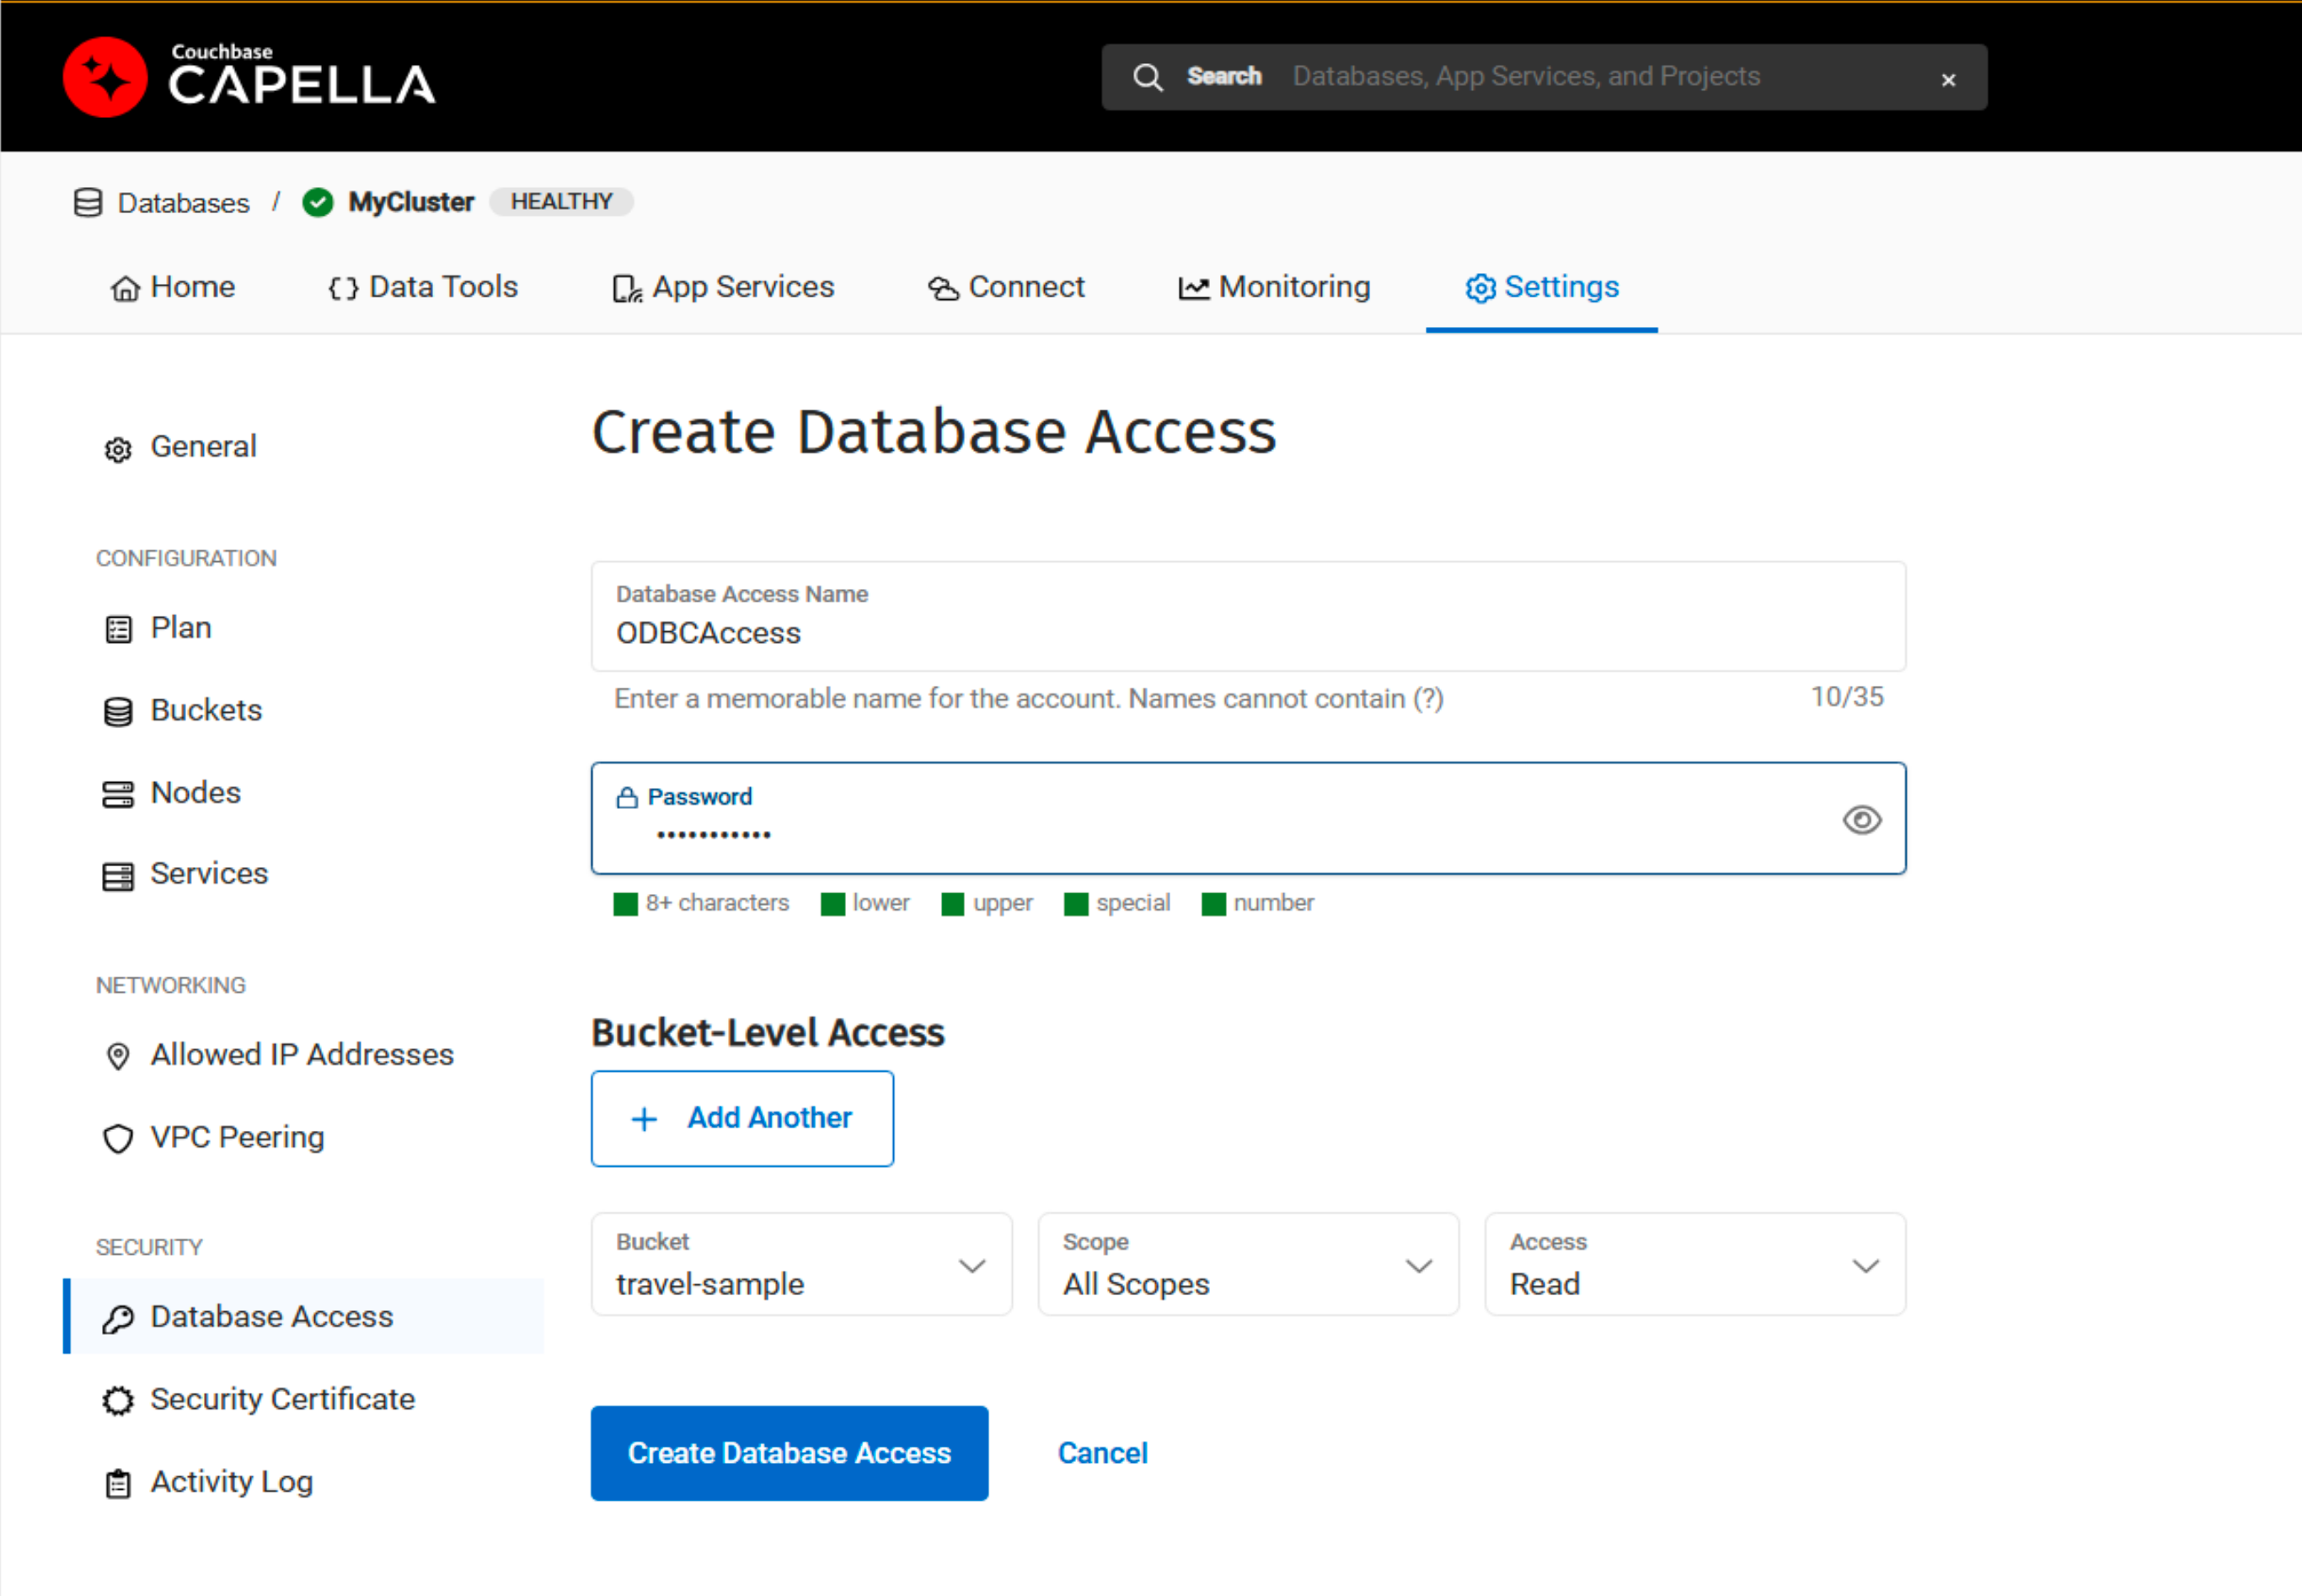
-
To set up a secure connection, you will need to retrieve the root certificate for your Capella instance.
-
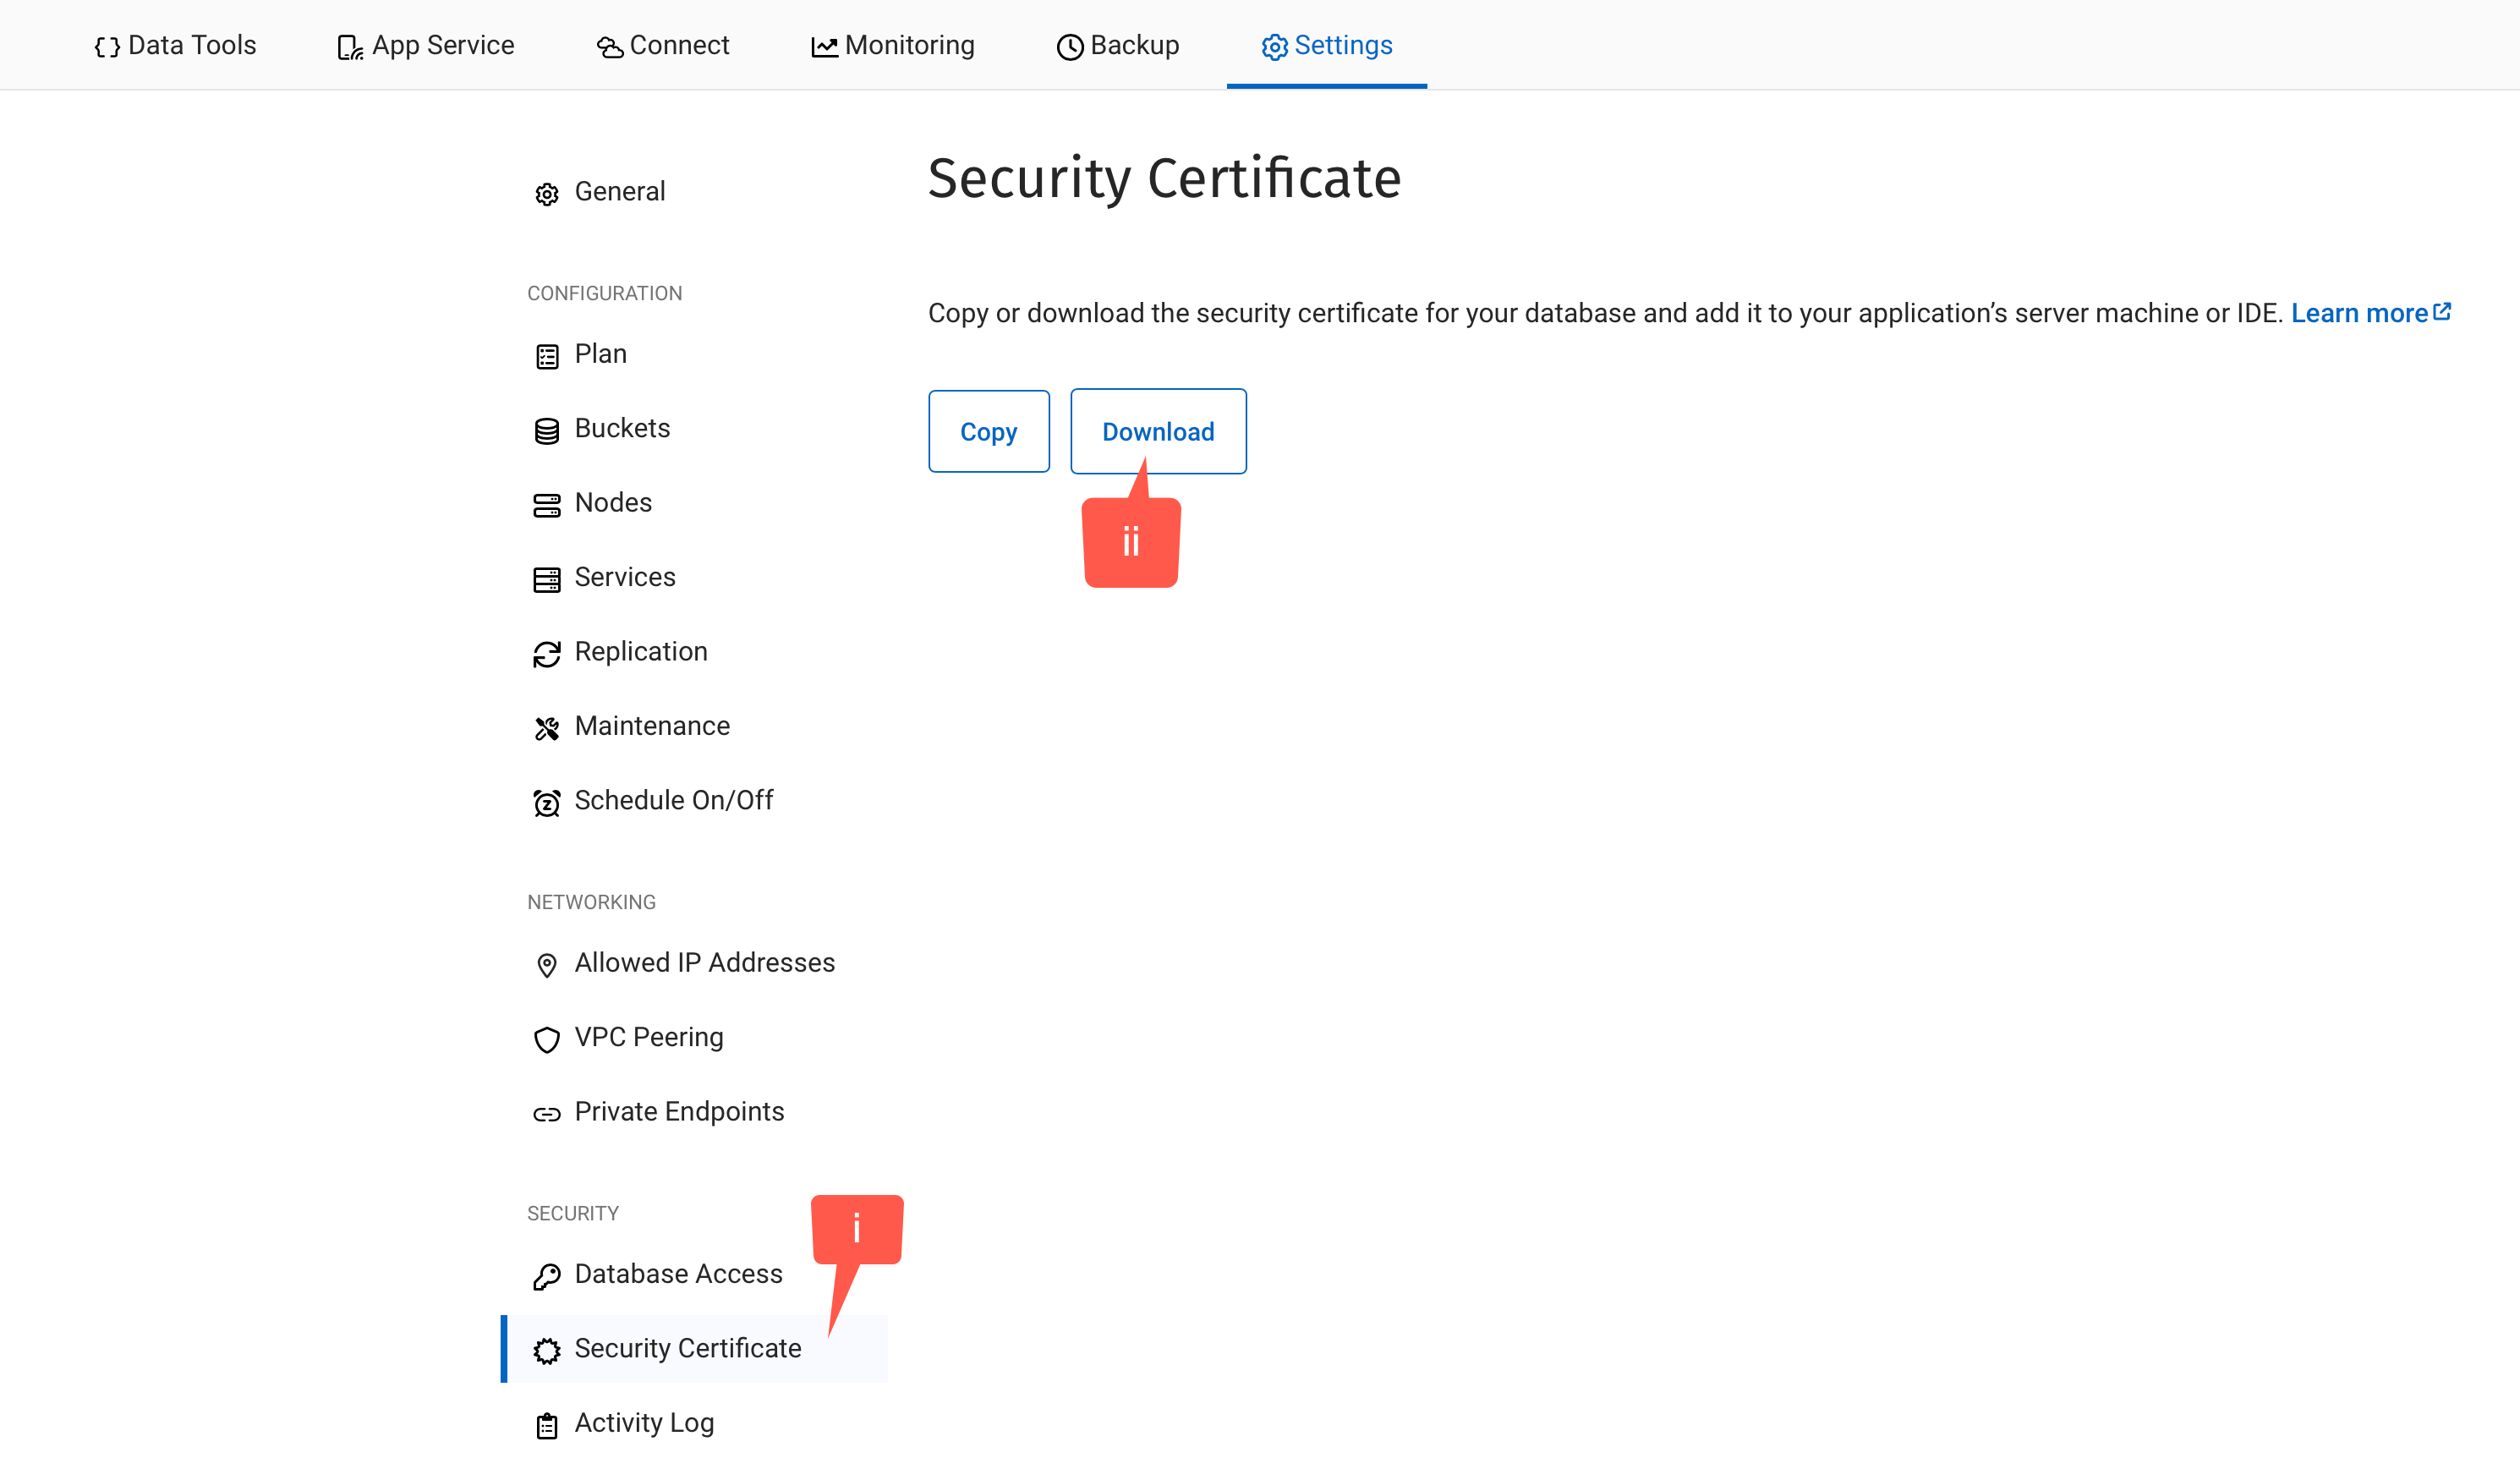
Click on Security Certificate in the left menu.
-
Click on Download to transfer a copy of the root certificate to your local machine.
-
For details on creating a Capella Columnar instance, first see Creating a Capella Columnar Cluster.
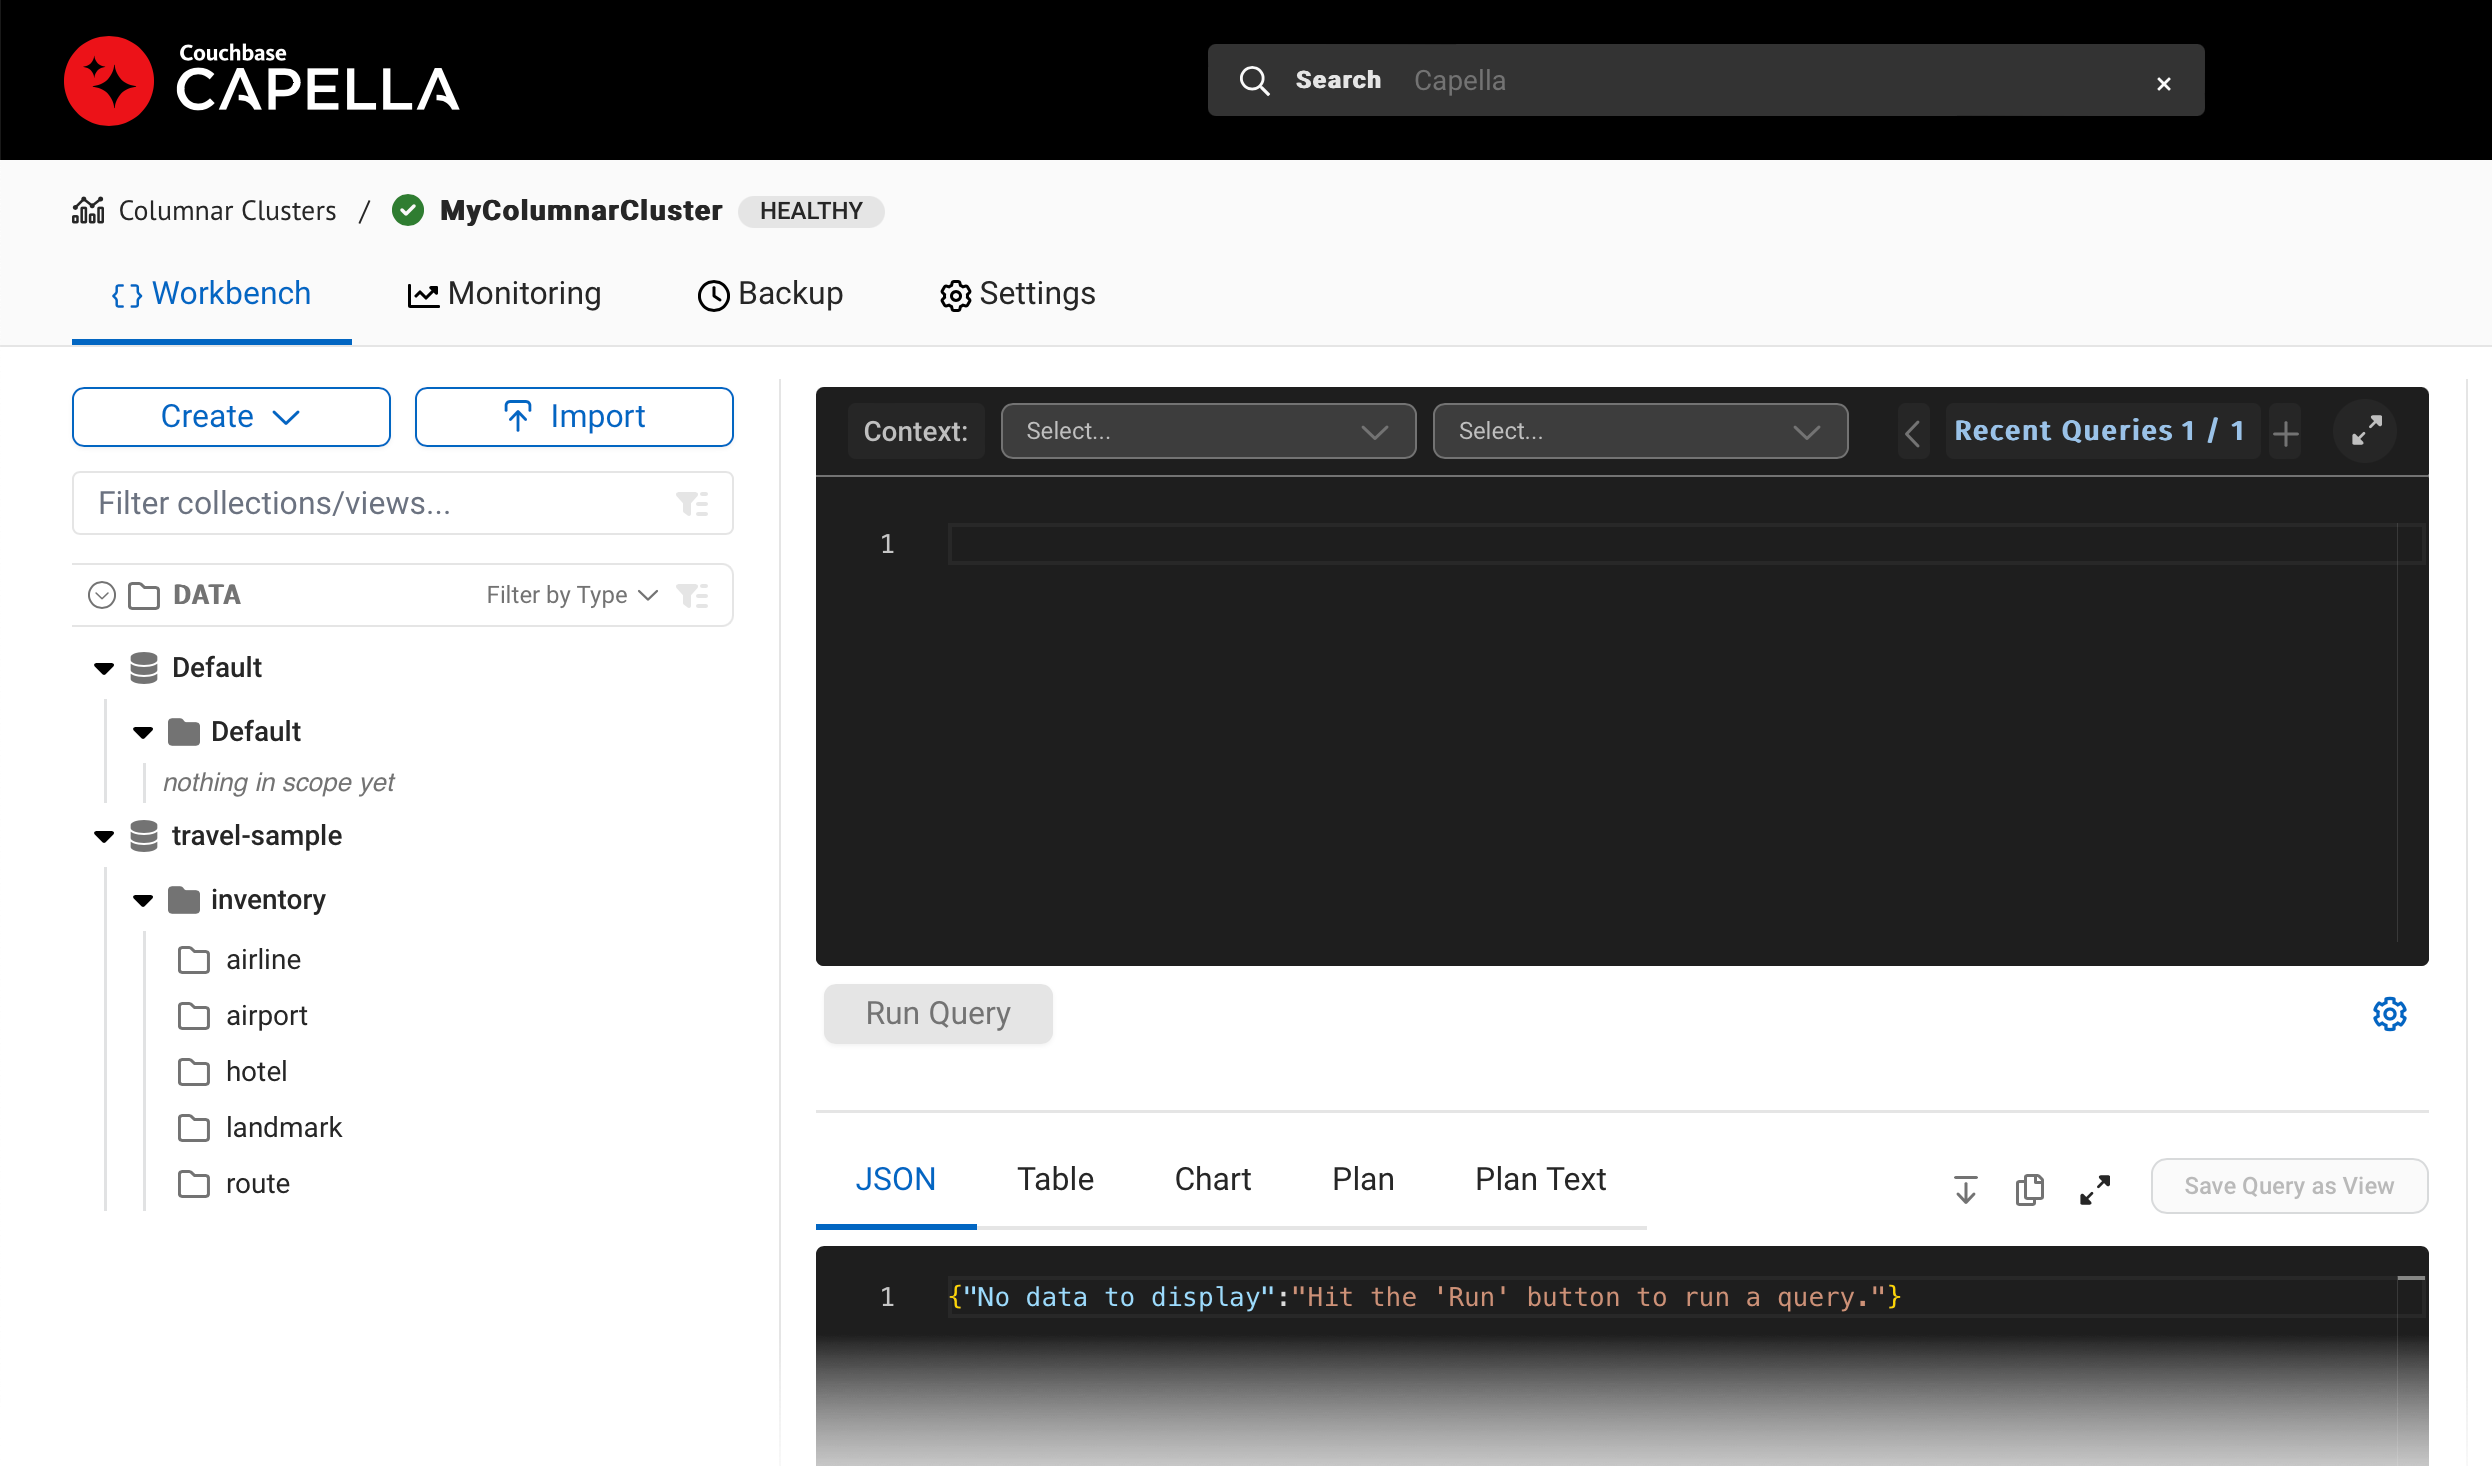
You will need to access the Capella administration console to get the connection string for your columnar database.
-
Sign in to your Capella instance as an
Organization ownerorProject owner. -
Select Columnar from the top-level page menu.
-
Select your Columnar cluster from the list.
-
Select Settings from the top-level page menu.
-
Select Connection String from the left-hand menu.

-
Make a note of the connection string.
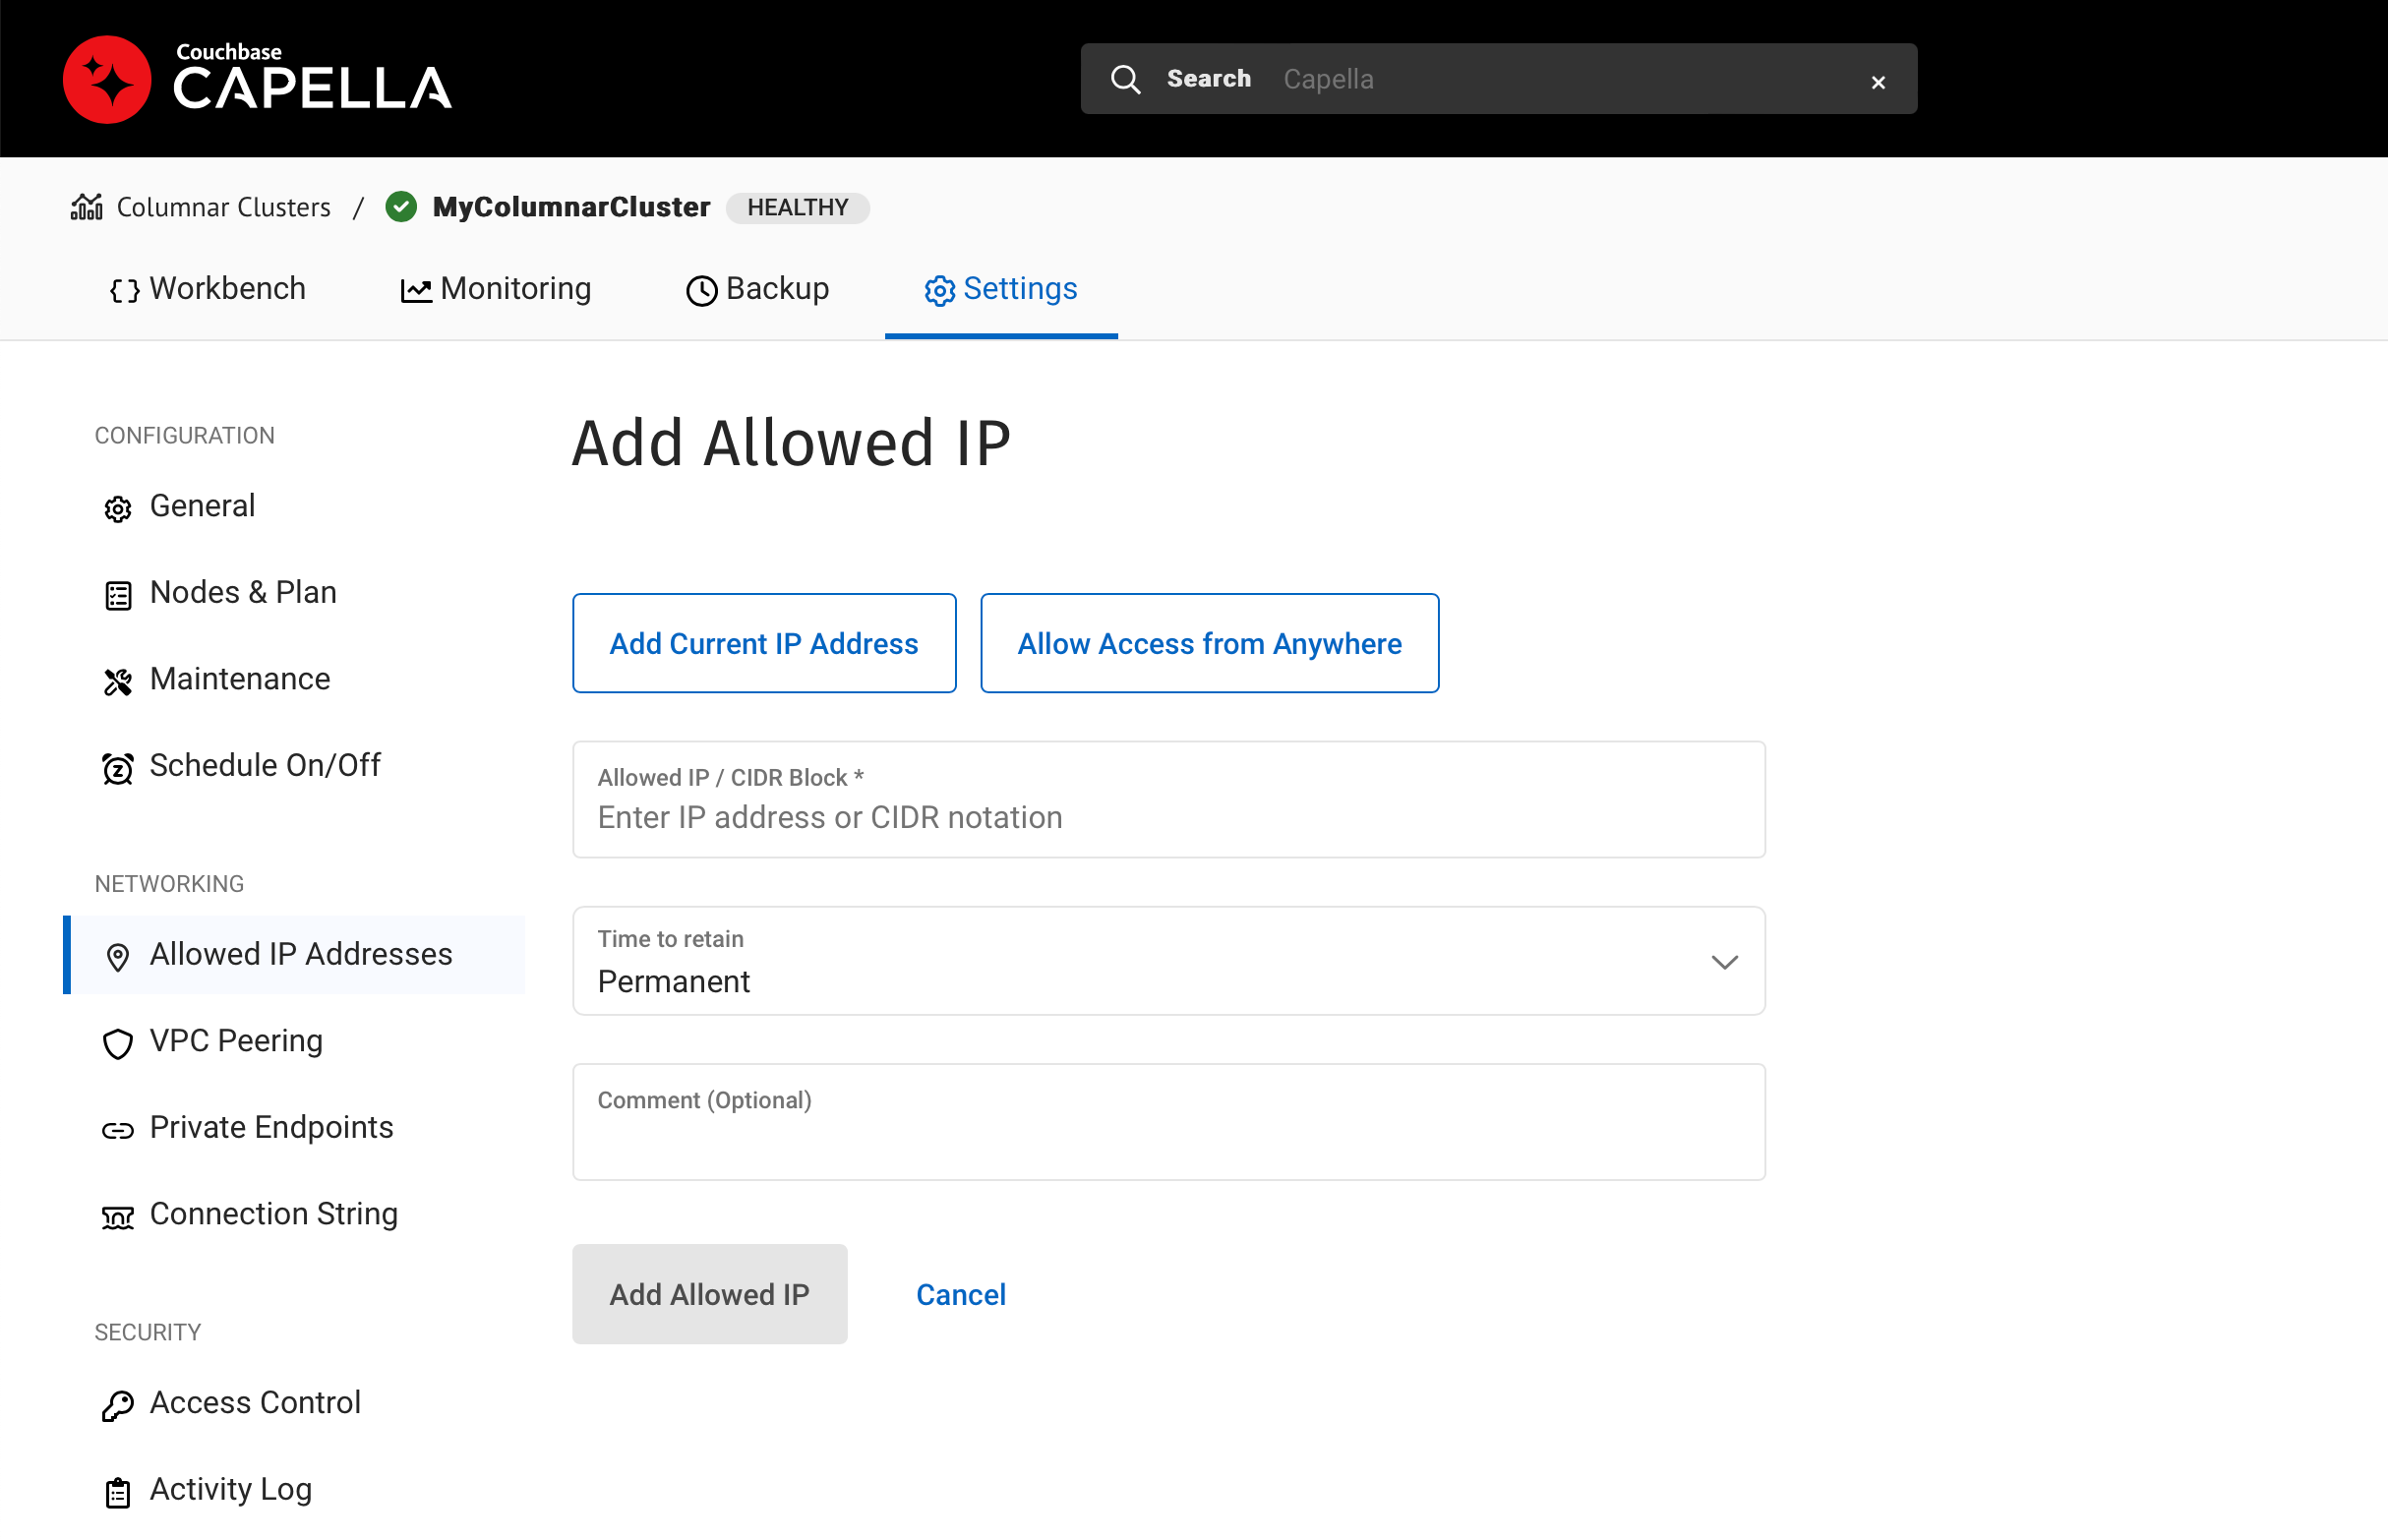
Next, you need to add the IP address of the machine from which you are running Power BI, so that Capella will allow the machine to access the columnar data.
-
Click on Allowed IP Addresses in the left-hand menu.
-
Click the Add Allowed IP button.
-
Enter the IP address of the Power BI host machine.
You can use the Add Current IP Address button to fill in the address of the machine currently running the web console.
Now, you will need to create a user account for Power BI to access the columnar data.
-
Return to the Settings page, then click on Access Control in the left-hand menu.
-
Click on Create Account.
-
Add a
usernameandpasswordfor the new account. -
Make sure you set assign
sys_view_readerto the list of roles.
-
Click Create Account to finish setting up the user account.
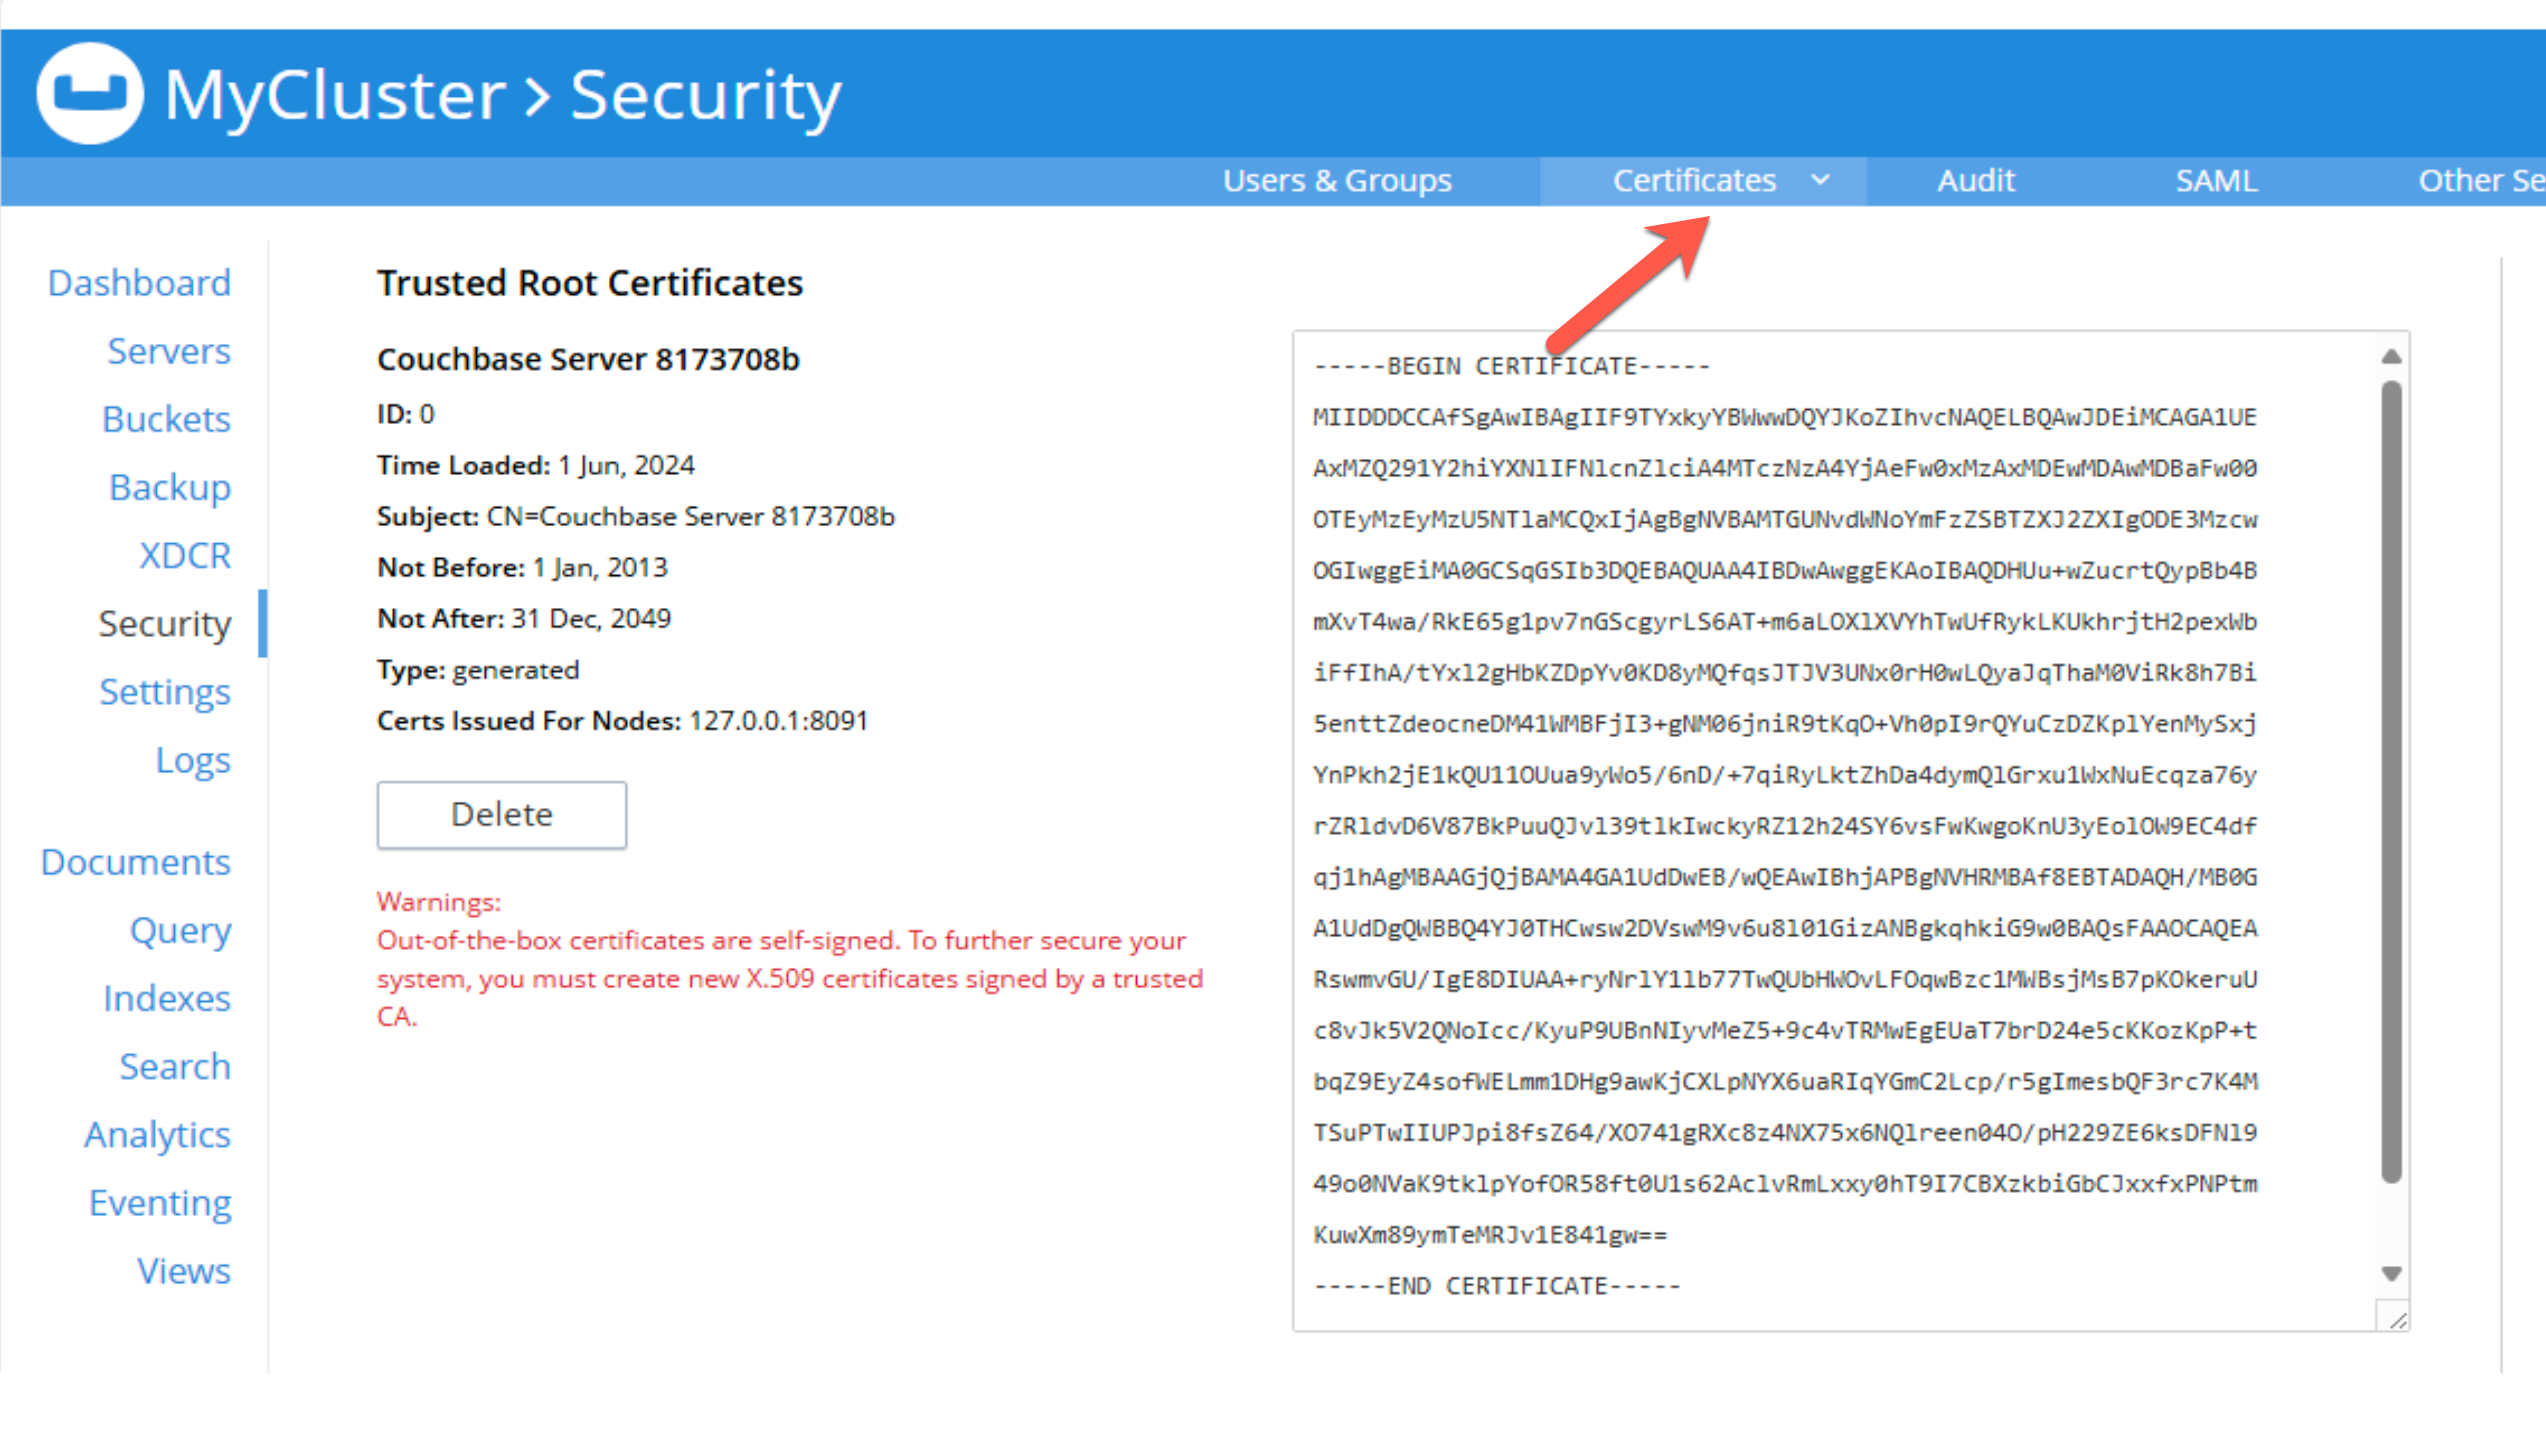
To create a secure connection to a self-managed Couchbase Server instance, you need to get the root certificate from the Administrator’s Console.
-
Use your web browser to access the Admin console and log in as an Administrator.
-
Use the left-hand menu to access the Security settings.
-
From the top menu, select Certificates. This will take you to the page from which you can view the server’s security certificates:
-
Copy all the text in the Trusted Root Certificates section (start from
BEGIN CERTIFICATEand includeEND CERTIFICATE), and save the text to an accessiblePEMfile. E.g.,C:\Users\user\certificate.pem).You will use this file later when you create the ODBC connection.
Configure an ODBC Data Source
You configure an ODBC data source name (DSN) for each CBAS scope or Capella columnar database you want to use in Power BI.
| Be careful to use the ODBC Data Source Administrator (64 bit); there is an ODBC Data Source Administrator (32 bit) available, but this will not work with the connector. |
-
Capella Operational
-
Capella Columnar
-
Self-Managed Couchbase Server
-
Open the ODBC Administration tool.
-
Create a new ODBC connection using one of the Couchbase drivers (either
ANSIorUnicode), then select Finish -
On the next window, select Couchbase Analytics.
-
Depending on whether you are connecting to Couchbase Capella or a self-managed Couchbase Server instance, fill in the parameters from the choices below:
Name: Enter an identifying name for the data source.
Description: Enter an optional description.
Host: Fill in the connection string you copied here.
Remove the
couchbase:prefix from the string when you enter it.For example, if the connection string is:
couchbases://cb.test.customsubdomain.couchbase.comThen use:
cb.test.customsubdomain.couchbase.comFor the connection.
Port: Use
11207for a secure connection.Scope Name of the scope from which the data is being extracted. If a two-part scope — such as
travel-sample.inventory— then the two parts must be separated by a/—travel-sample/inventory.SSLMode: Fill in
requirefor SSL.User: Enter the username that you created in the Database Access section of Capella.
Password Enter the password you created in the Database Access section of Capella.
CertificateFile Path: Fill in the location of the file you downloaded here.
When entering the certificate path, use double slashes (
\\) for the path separators.E.g.,
C:\\Users\\user\\certificate.txt
-
Open the ODBC Administration tool.
-
Create a new ODBC connection using one of the Couchbase drivers (either
ANSIorUnicode), then select Finish -
On the next window, select Capella.
-
Enter the following details in the ODBC configuration dialog:
Name: Enter an identifying name for the data source.
Description: Enter an optional description.
URL: Enter the connection string exactly as copied here.
Database Name of the database from which the data is being extracted.
If a two-part scope — such astravel-sample.inventory— then the two parts must be separated by a/—travel-sample/inventory.User Enter the username you created in the User Account section
Password Enter the password you allocated to the user here.
-
Open the ODBC Administration tool.
-
Create a new ODBC connection using one of the Couchbase drivers (either
ANSIorUnicode), then select Finish -
On the next window, select Couchbase Analytics.
-
Depending on whether you are connecting to Couchbase Capella or a self-managed Couchbase Server instance, fill in the parameters from the choices below:
Name: Enter an identifying name for the data source.
Description: Enter an optional description.
Host: Enter the IP address of the Data (KV) node in the Couchbase cluster.
Port: Set to
11207for an SSL connection.Scope: Name of the scope from which the data is being extracted. If a two-part scope — such as
travel-sample.inventory— then the two parts must be separated by a/—travel-sample/inventory.Ensure that you do not include extraneous spaces or tabs when you enter the scope name. SSLMode: Fill in
requirefor SSL.User: You can use the Administrator user set up during installation for testing purposes, but a user restricted to only CBAS permissions — Cluster Admin Role — should be used for deployment.
Password: Enter the cluster password.
CertificateFile Path: Fill in the location of the file you downloaded here.
When entering the certificate path, use double slashes (
\\) for the path separators.E.g.,
C:\\Users\\user\\certificate.txt
For information about adding an ODBC data source, see the Microsoft support documentation.
Use the Couchbase Power BI Connector
Business information tools rely on data organized into relational databases. To use the Power BI connector, you must create tabular analytics views of your JSON documents. For self-managed CBAS, see the workbench docs or tabular views.
After you prepare tabular views and define DSNs in Power BI, you use the Couchbase Power BI Connector to load data into Power BI.
Use the Connector to Add Data to Power BI
To add data from Capella columnar or CBAS to Power BI, follow the instructions to Connect to data sources in Power BI desktop in the Microsoft documentation.
Couchbase Connector appears on the Get Data list of data sources. When prompted for Username and Password, supply the account username and password you created for Capella Operational or Capella Columnar. If you are running a Self-Managed Couchbase Server, then supply a set of credentials with the correct data access permissions.
| The user account credentials for Capella Operational or Capella Columnar will always match the username and password attached to the ODBC DSN. |
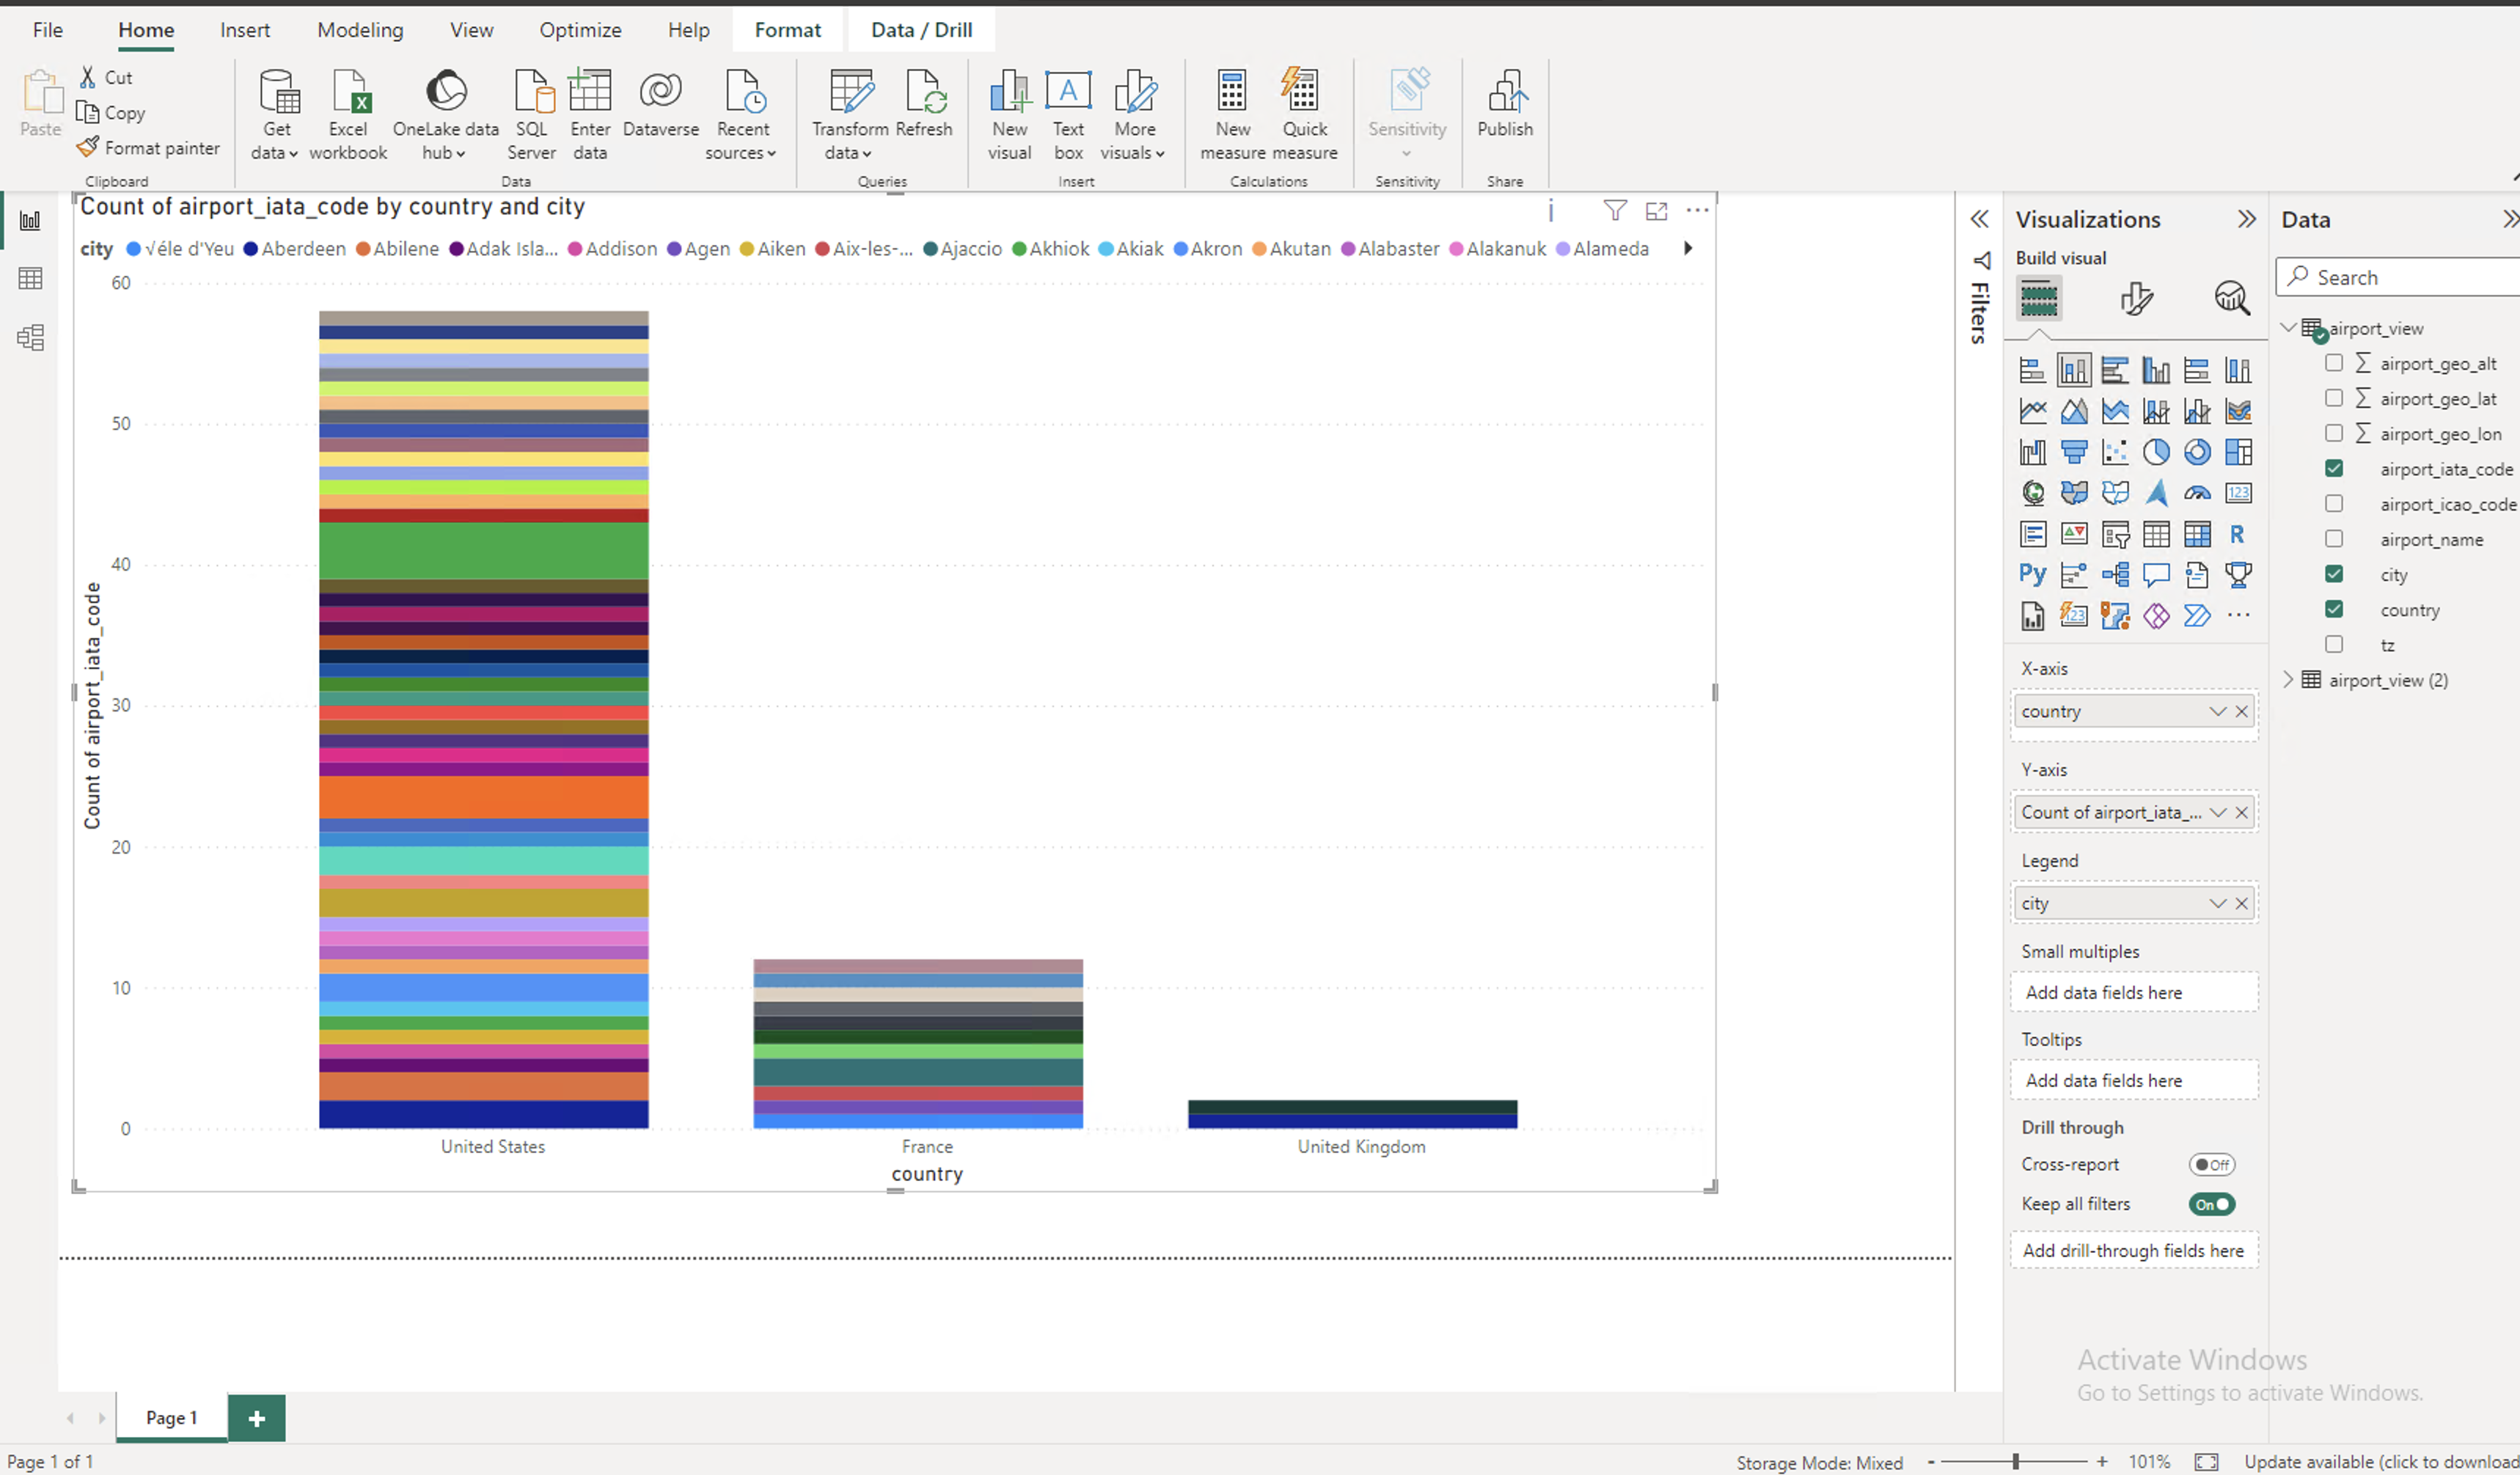
After you connect, a list of the tabular views in the database specified by the DSN appears. Load a view to use Power BI options.
An example image of the travel-sample airport_view follows.