Manage Backup and Restore
Couchbase Server allows one or more buckets, and selected subsets of their data, to be backed up, restored, and archived.
Understanding Backup and Restore
The data on a Couchbase-Server cluster can be backed up, restored, and archived by means of either of the following:
-
The Backup Service. This can be configured by means of the Backup UI provided by Couchbase Server Web Console.
-
The cbbackupmgr CLI utility.
The technology that underlies the Backup Service includes that provided by cbbackupmgr: note, however, that cbbackupmgr and the Backup Service differ, in terms of the features they offer (as described below, in The Backup Service and cbbackupmgr).
Detailed information on cbbackupmgr is provided in cbbackupmgr.
An overview of the Backup Service is provided in Backup Service.
The Backup Service and cbbackupmgr
Both the Backup Service and cbbackupmgr are included in Couchbase Server Enterprise Edition.
From version 7.0, cbbackupmgr is also available in Couchbase Server Community Edition, but without support for merge, cloud backup, or collection-level restore.
The following paragraphs summarize the similarities and differences between the Backup Service and cbbackupmgr as provided by Enterprise Edition.
For use of the Backup Service, the Full Admin role must have been assigned.
For use of cbbackupmgr, the Full Admin or the Data Backup & Restore role must have been assigned.
The Backup Service — which can be configured by means of the Backup facility of Couchbase Web Console, the Couchbase CLI, and the REST API — allows backup, restore, and archiving to be configured for the local cluster; and also permits restore to be configured for a remote cluster.
By contrast, cbbackupmgr allows backup, restore, and archiving each to be configured either for the local or for a remote cluster: all available options are listed in Version Compatibility.
Whereas cbbackupmgr performs a specific backup or merge when executed, the Backup Service can be scheduled so that backups and periodic merges are ongoing.
The Backup Service therefore supports additional and modified parameters, to allow scheduling to be configured.
Both the Backup Service and cbbackupmgr allow full and incremental backups.
Unlike the Backup Service, cbbackupmgr requires a new repository to be created for each new, full backup (successive cbbackupmgr backups to the same repository being incremental).
Both allow incremental backups, once created, to be merged, and their data deduplicated.
Both use the same backup archive structure; allow the contents of backups to be listed; and allow specific documents to be searched for.
Both the Backup Service and cbbackupmgr support use of AWS S3 storage.
The cbbackupmgr tool is available in both Couchbase Server 7.0 Enterprise Edition (EE) and Couchbase Server Community Edition (CE).
However, whereas in EE, cbbackupmgr allows backup and restore to be performed with reference to buckets, scopes, and collections; in CE, cbbackupmgr allows backup and restore to be performed with reference to buckets only.
For detailed information about how cbbackupmgr works (including a detailed description of incremental backup), see the Discussion provided on the page for cbbackupmgr.
The page for cbbackupmgr also provides a synopsis of the command, and a description of its basic options.
The remainder of the current page describes how to configure and use the Backup Service, using Couchbase Web Console.
Assign and Run the Backup Service
For backup, restore, and other related tasks to be scheduled and performed, the Backup Service must be running on an assigned node.
The service (as is the case with all other Couchbase services) can be assigned either when a node is initially provisioned as a one-node cluster (as described in Create a Cluster), or when a node is added to an existing cluster (as described in Add a Node and Rebalance).
Provided that at least one node runs the Backup Service, data for the entire cluster can be backed up, restored, and archived.
Locations to be used for saving data must be accessible to all cluster-nodes that are running the Backup Service.
Note also that Couchbase Server must have read and write access to the location.
On Linux, therefore, for a filesystem location, use the chgrp command to set the group ID of the folder to couchbase; unless a non-root installation has been performed, in which case set the group ID either to the username of the current user, or to a group of which the current user is a member — see Non-Root Install and Upgrade, for more information.
Access the Backup Service UI
To access the Backup Service UI, proceed as follows:
-
On Couchbase Web Console, click the Backup tab, in the vertical navigation bar:
This brings up the Backup screen. The initial appearance is as follows:
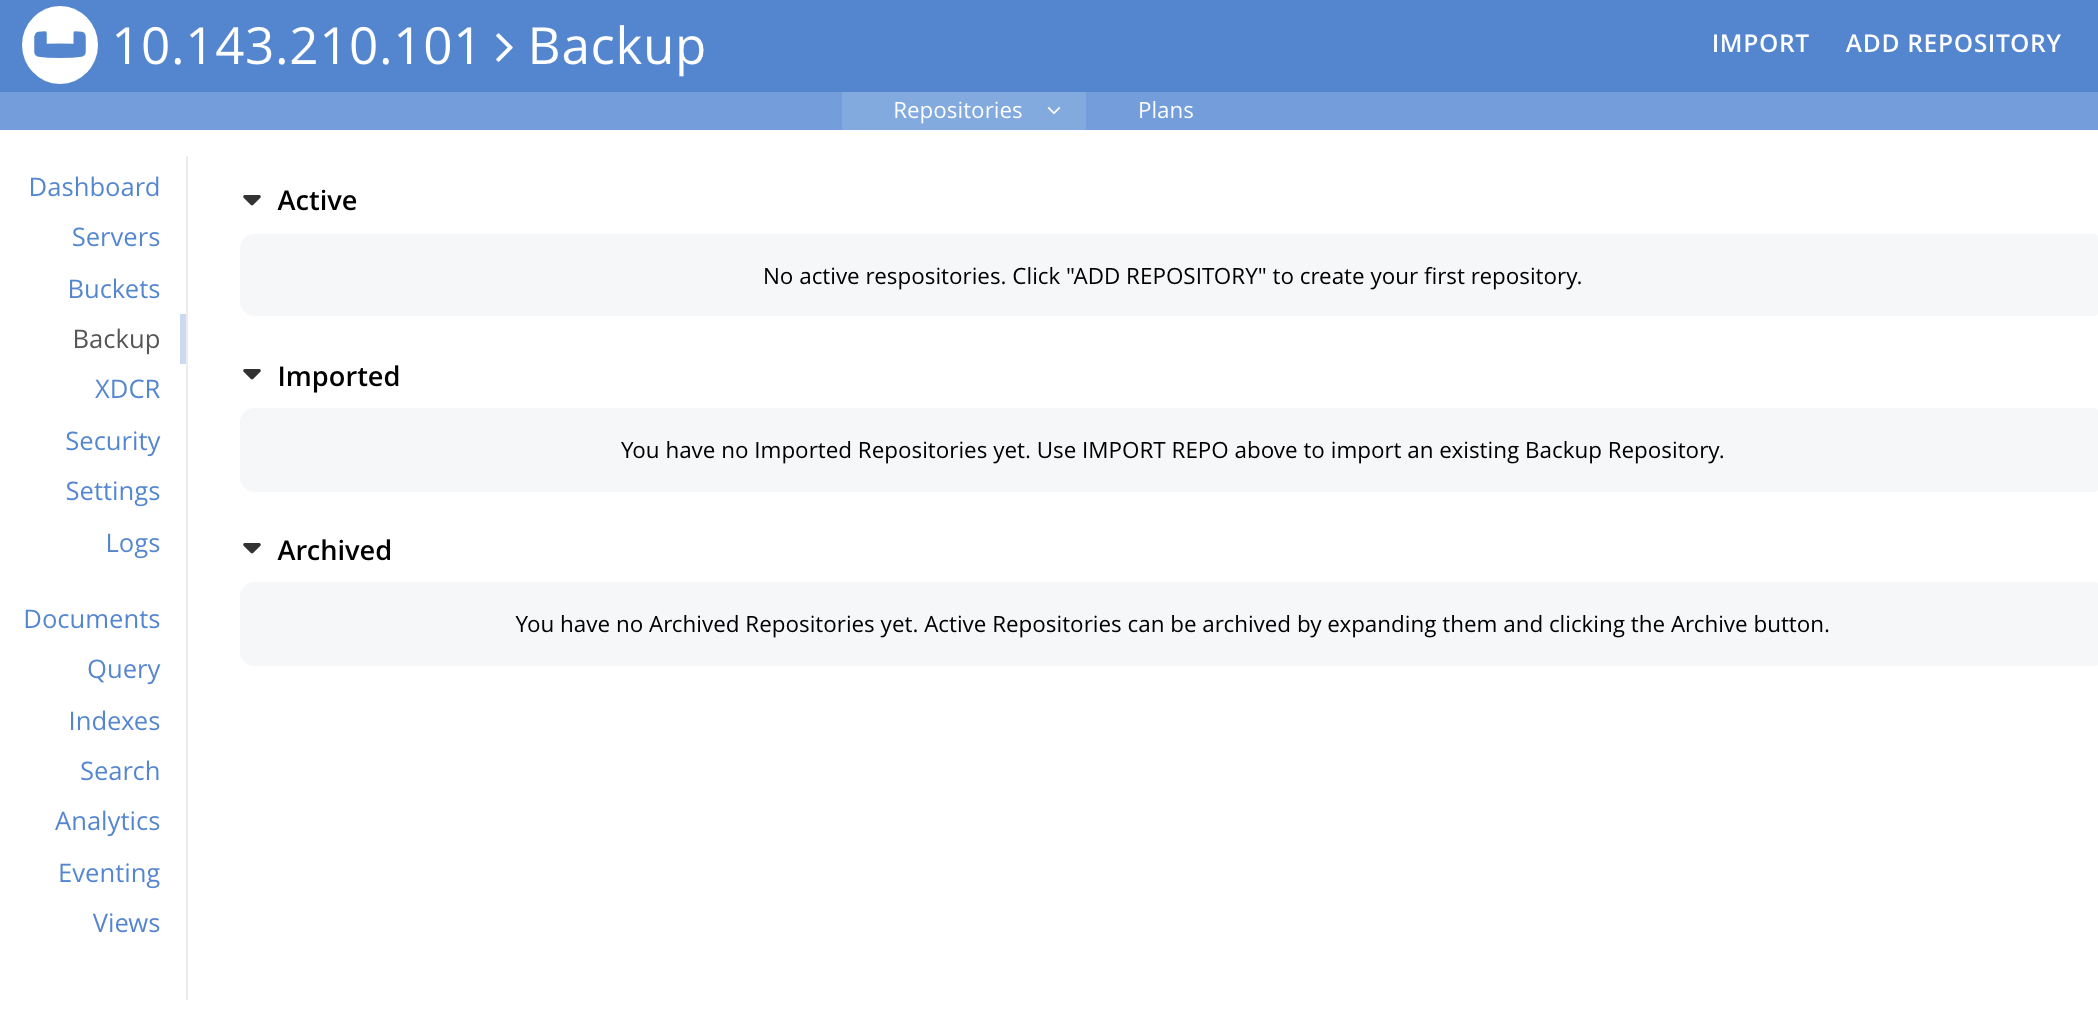
The Backup screen features two tabs, located on the upper, horizontal navigation bar: these are Repositories and Plans. By default, the Repositories tab is selected: the corresponding, Repositories view features three panels, for Active, Imported, and Archived repositories respectively. Currently, all panels are blank.
Schedule Backups
The Backup Service allows backups (and merges) to be scheduled, as tasks. This section describes how task-definition and scheduling can be accomplished. For any given repository, the Backup Service performs one task at a time; with each task maintaining a lock on the repository. Therefore, the administrator-defined interval between tasks should always be sufficient to allow each task to run to completion. If a new task is scheduled to start while a previously started task is still running, the new task cannot run. For information, see Avoiding Task Overlap.
To schedule one or more backups, proceed as follows:
-
Choose to add a repository. When fully defined, the repository will combine the definitions of one or more backup and related activities, scheduled for one or more buckets, targeted at a storage location accessible to all nodes on the cluster. Each repository must have a name unique among repositories on the cluster.
To add a repository, click the ADD REPOSITORY tab, at the upper right of the screen:

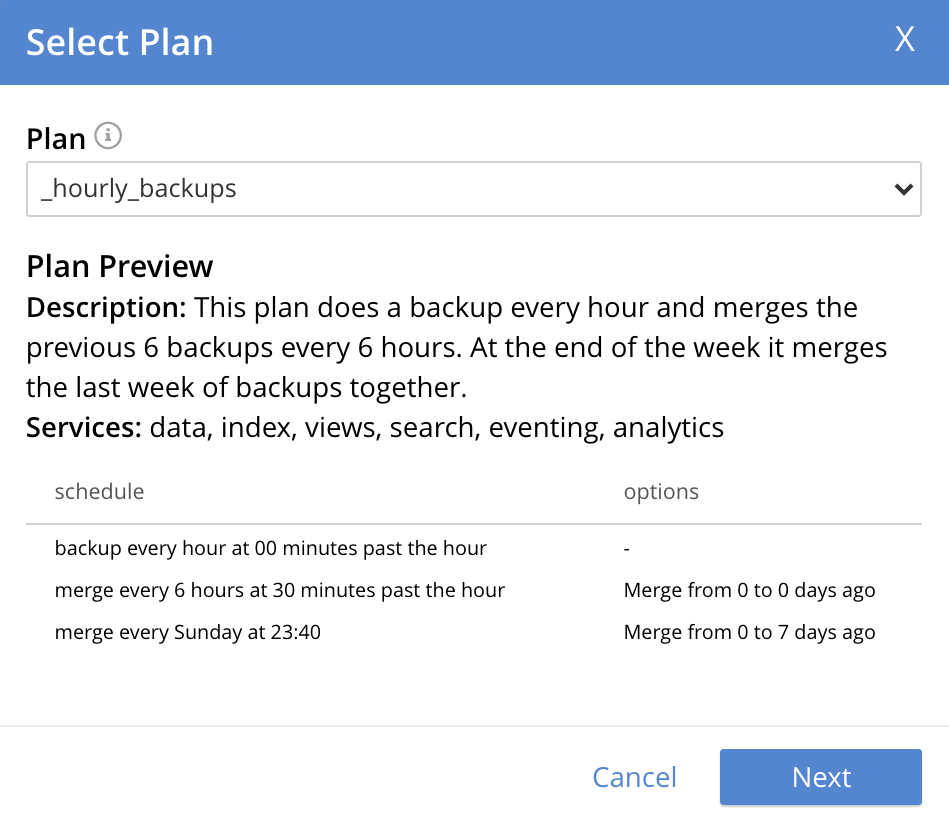
This opens the Select Plan dialog which initially appears as follows:
-
Specify whether to use a default or a custom plan. A plan determines what kind of backup is to occur, affecting what data, and on what schedule. Predefined plans are provided, named _hourly_backups and _daily_backups: as their names indicate, these provide backups that are respectively hourly and daily. The _hourly_backups plan appears as the default selection.
(For more information, see Default Plans, below.)
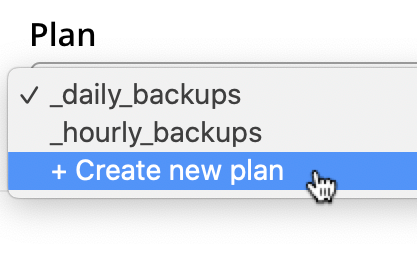
Click the control that appears at the right-hand side of the Select plan dialog’s interactive text-field. A pull-down menu appears, as follows:
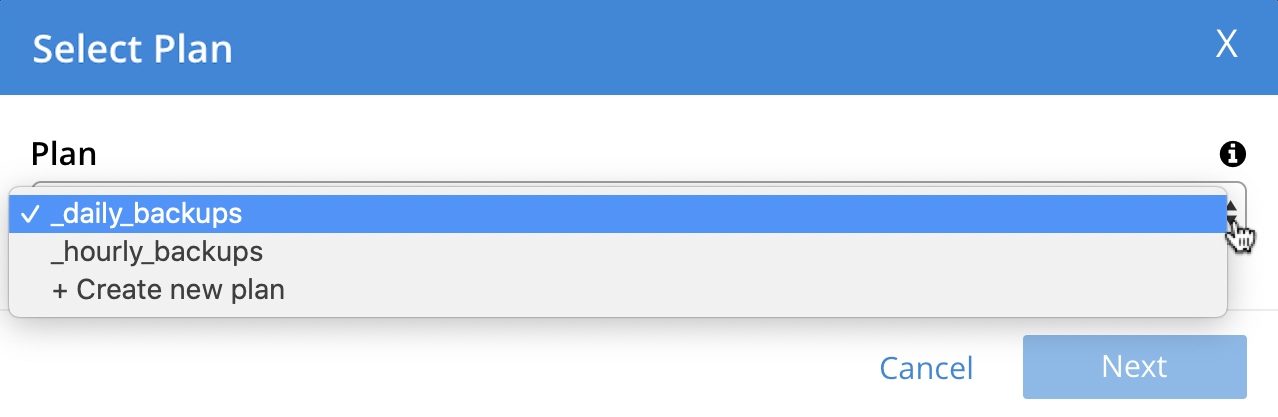
Three options are provided. The first two are _daily_backups and _hourly_backups. The third option is + Create new plan: select this option:
This establishes the string + Create new plan within the interactive text field; and modifies the Select Plan dialog to appear as follows:
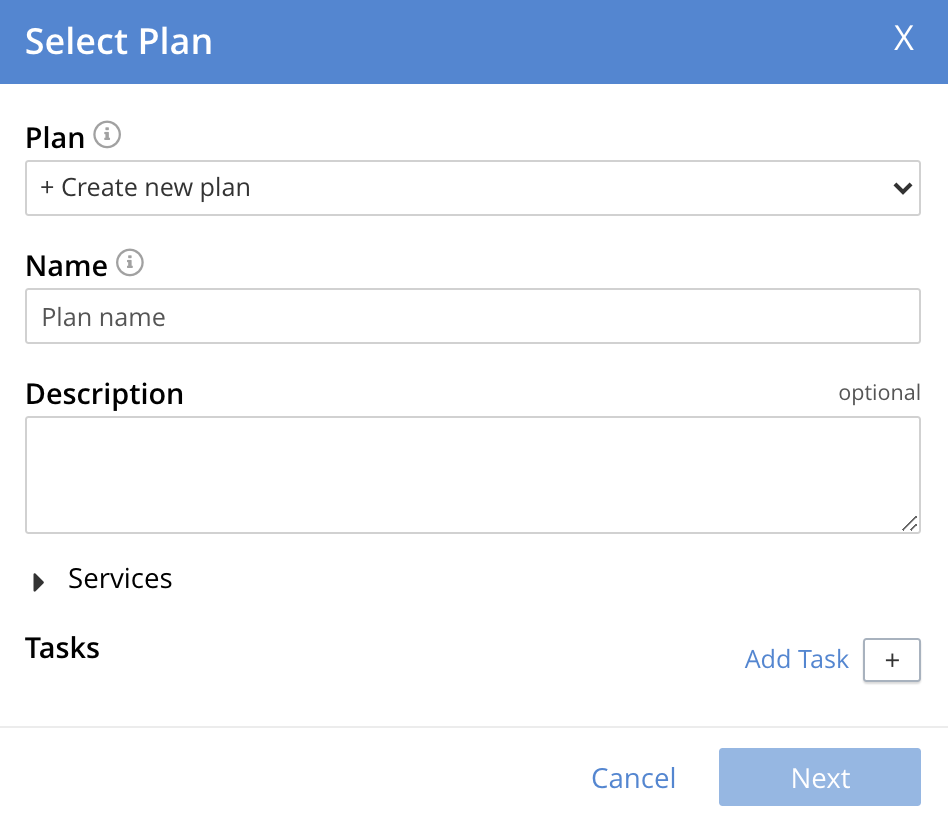
-
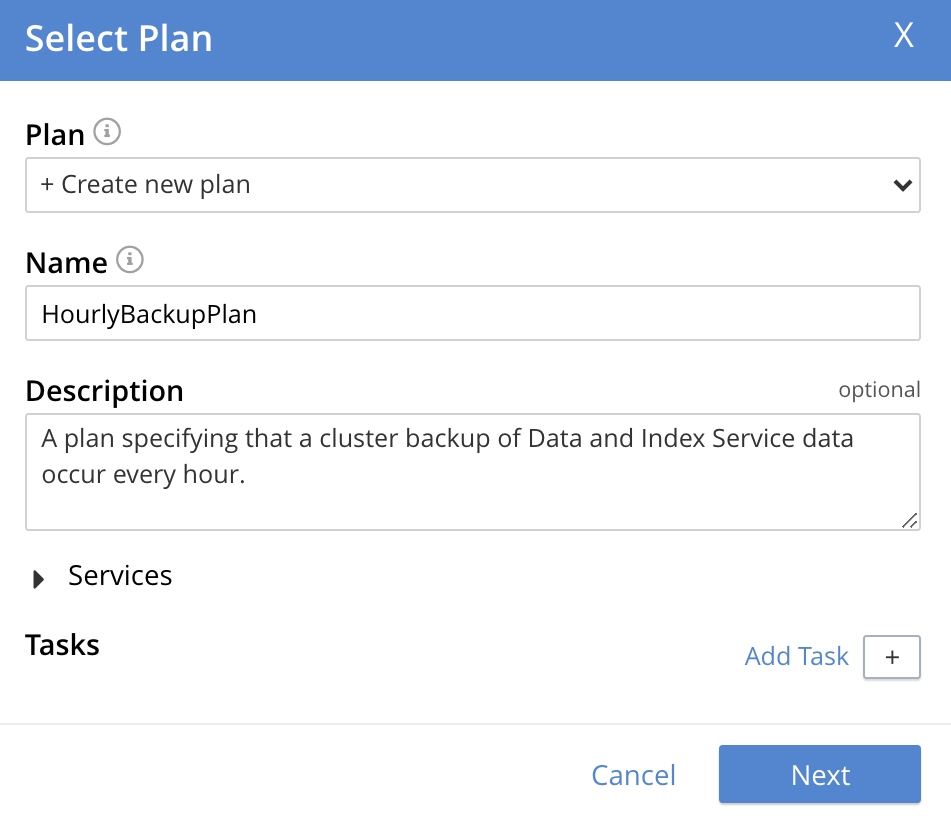
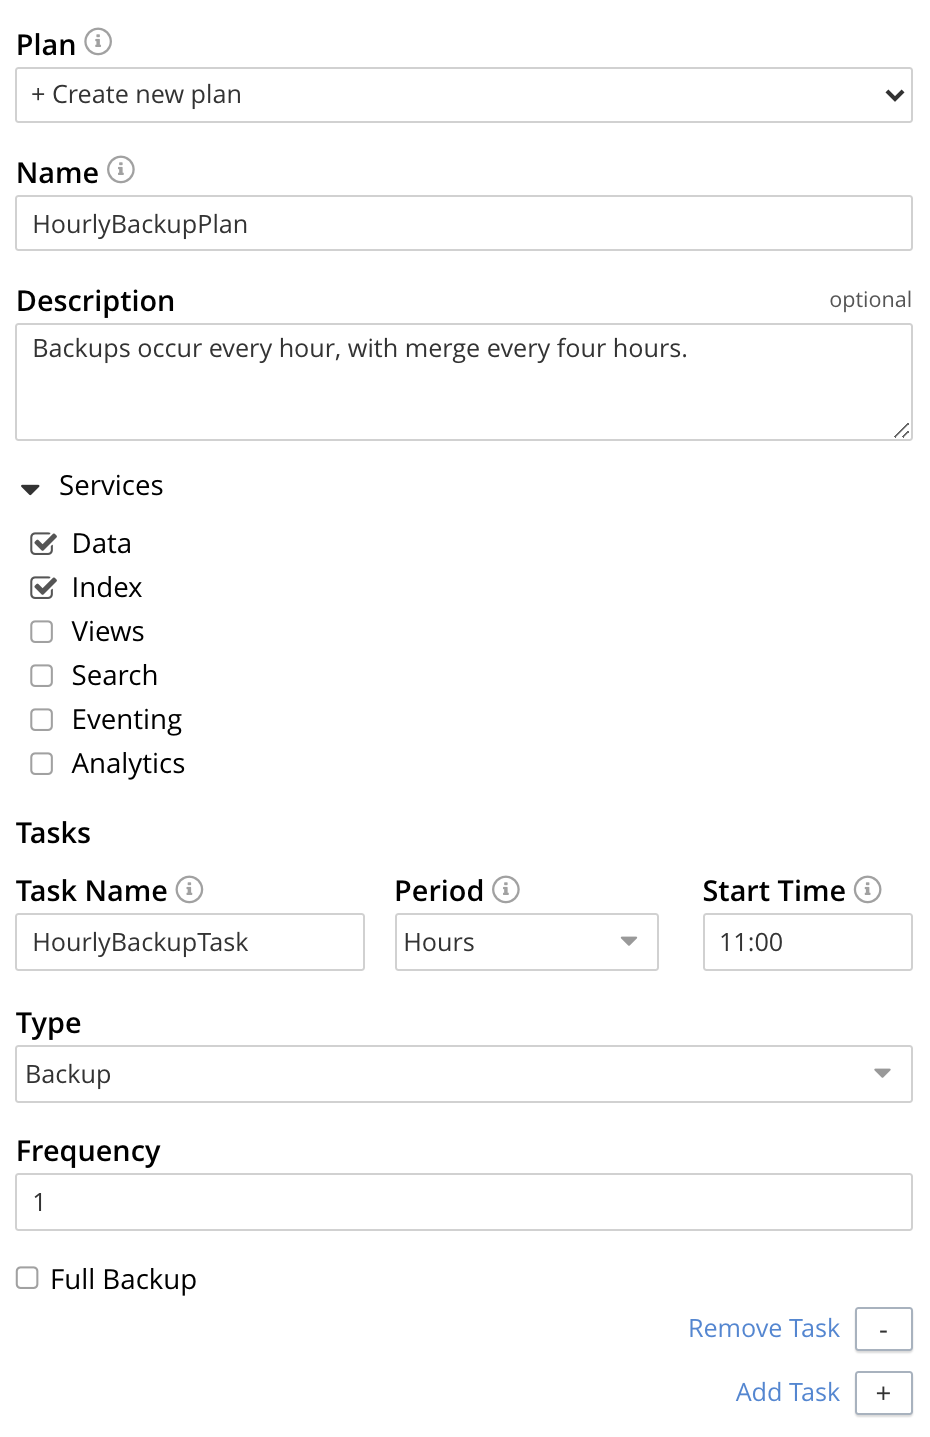
Create a custom plan. In the Name field of the Select Plan dialog, enter a name for the plan that’s to be created. The name must be unique across the cluster, can only use the characters
[,],AtoZ,atoz,_and-; and must not start with either_or-.Then, optionally, add a description for the plan in the Description field: the description can be up to 140 characters in length. For example, to specify a plan for hourly backups, the following might be entered:
Next, specify the services for which data will be backed up. Click Services to display the list of Couchbase Services.
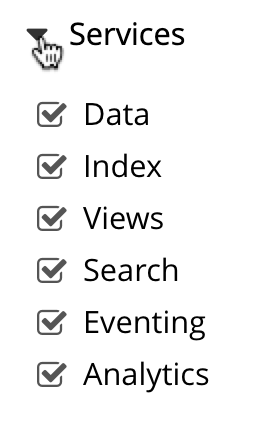
To specify that only data for the Data and Index Services should be backed up, clear the boxes for all the other services.
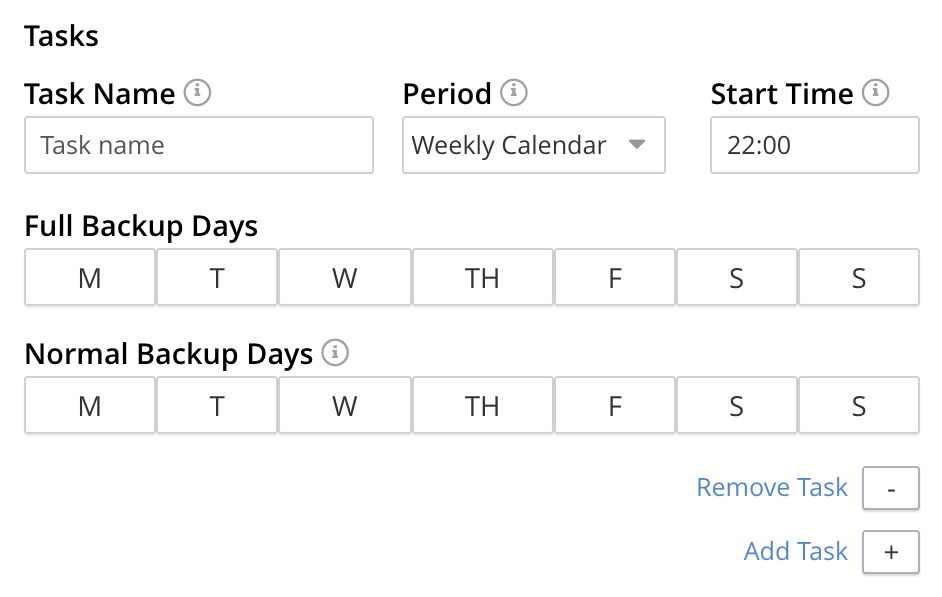
Next, to specify precise details of what should occur when the backup is run, click the Add Task control. The dialog now expands, to reveal the following fields:
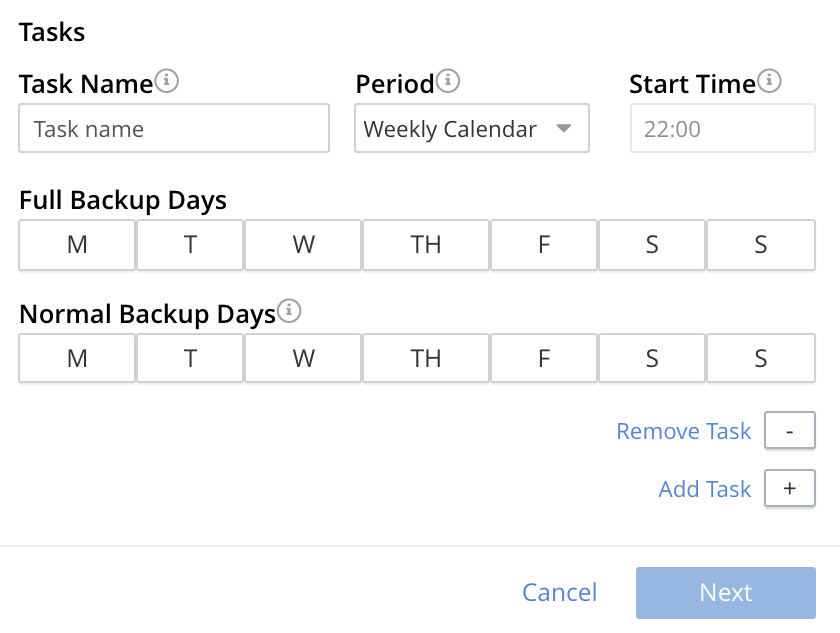
The fields permit the input of data to specify the details of a particular task. The dialog permits multiple tasks to be added by click the Add Task control. It also allows you to remove tasks by click the Remove Task control.
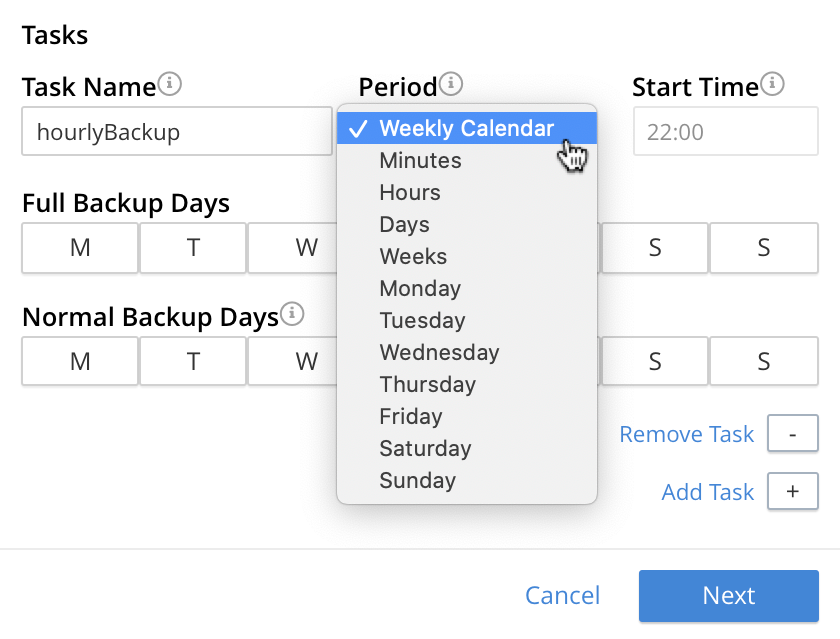
In the Name field, enter an appropriate name for the task: for example, hourlyBackup.
The Period field allows specification of the frequency of the task. If the default selection, Weekly Calendar, is chosen, this specifies a daily backup according to details added lower in the panel for the task. Alternatively, to choose a specific frequency, access the control at the right-hand of the Period field. A pull-down menu appears:
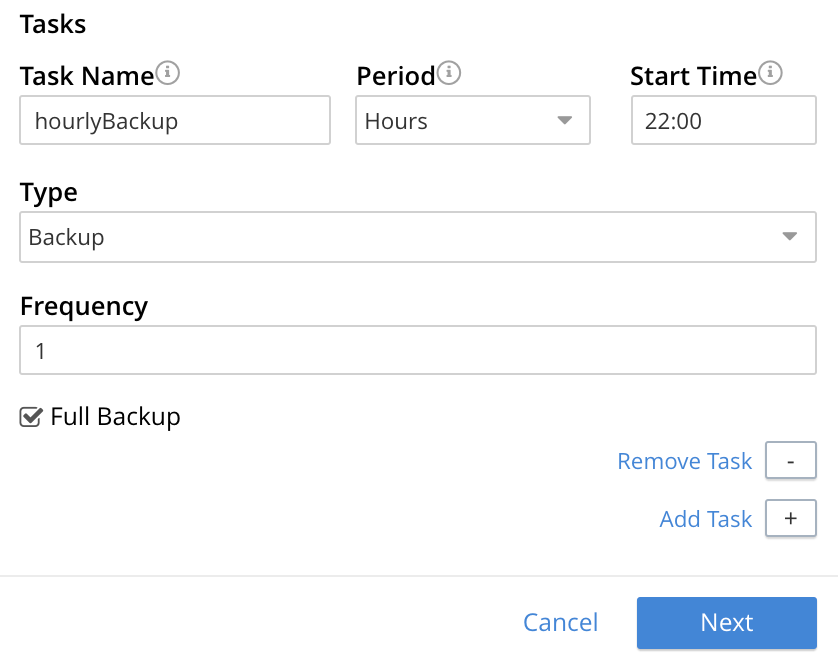
From the pull-down menu, select Hours, to set the frequency is in units of hours. This removes from the dialog the day-specification controls associated with Weekly Calendar.
In the Start Time field, specify a time of day at which the task is to be run. The time of day must be specified as hours and minutes, separated by a colon. When the frequency-unit specified is Minutes, this field takes no input. When the frequency-unit specified is Hours (as is the case in the current example), only the numbers signifying minutes (those after the colon) are used. To make sure that the hourly task is performed on the hour, leave these numbers as 00.
In the Type field, specify the task to be performed, by accessing the control at the right-hand side of the field. This displays the following pull-down menu:

Select Backup, from the pull-down menu. Then, in the Frequency field, specify the frequency with which the task should be performed. The field only accepts integers: these must be between 1 and 200 inclusive. To specify that the task be performed hourly, enter 1.
See Review Scheduling Options for an overview of all task-scheduling options.
To complete specification of the task, determine whether the backup to be performed is Full or Incremental. If it’s to be Full, select Full Backup. If it’s to be Incremental (as should be the case in the current example), leave Full Backup cleared*.
The dialog now appears as follows:
At this stage, if another task is to be specified, the Add Task control should be clicked on: this expands the dialog further, and provides another set of task-specification fields. If the task already added is to be removed, left-click on the Cancel button: this discards the data that has been added for the task, and closes the task-panel. If the specification of the plan is to be abandoned, left-click on the Cancel tab, at the lower right. If the specification for the task is to be retained and used, and no other task is to be specified (as is the case in the current example), left-click on the Next button:

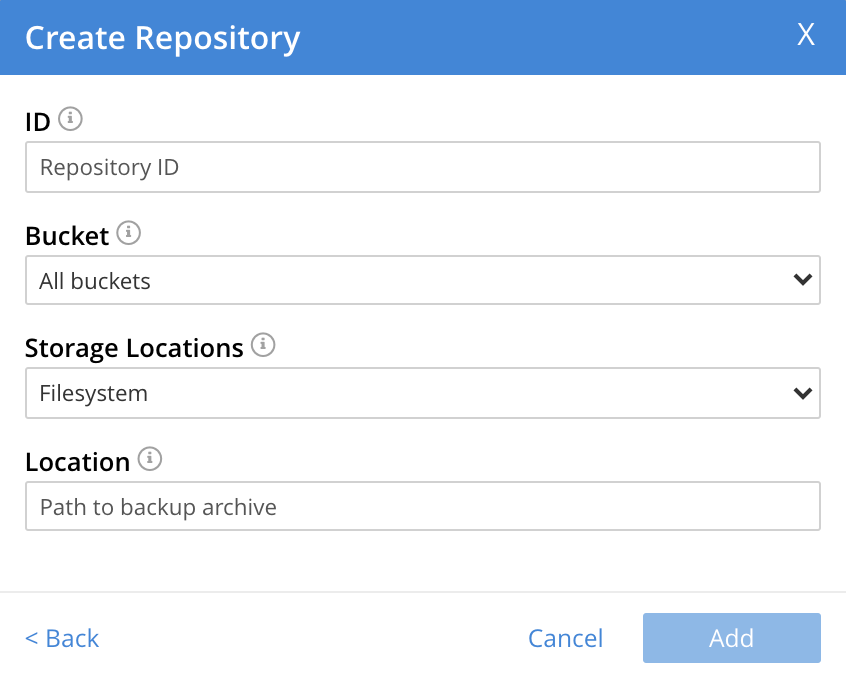
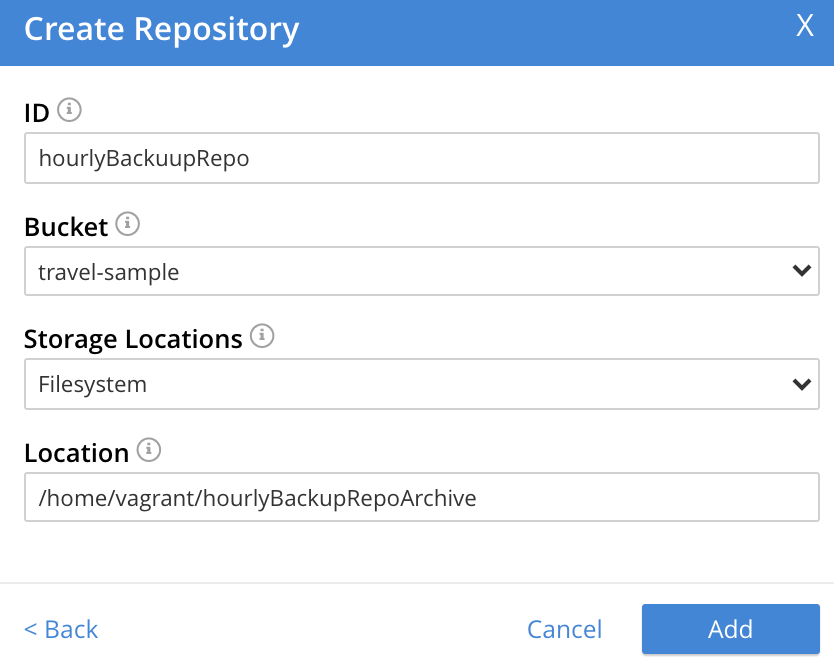
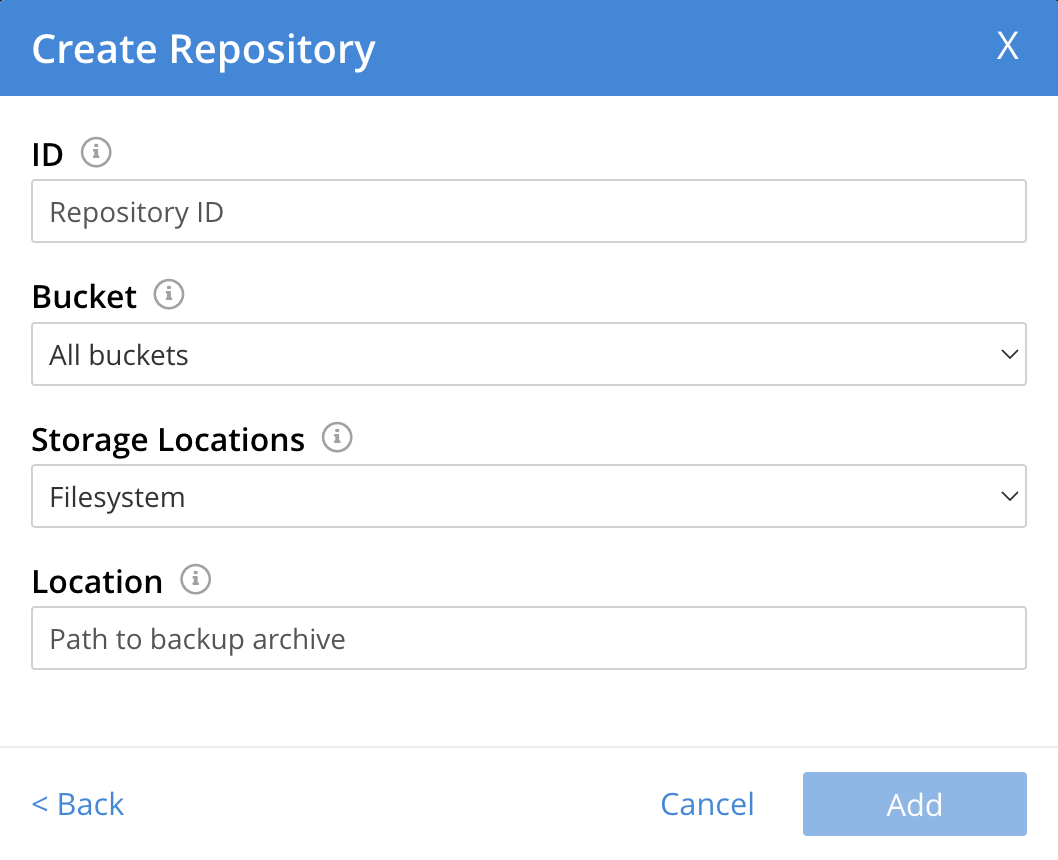
This brings up the Create Repository dialog, which appears as follows:
-
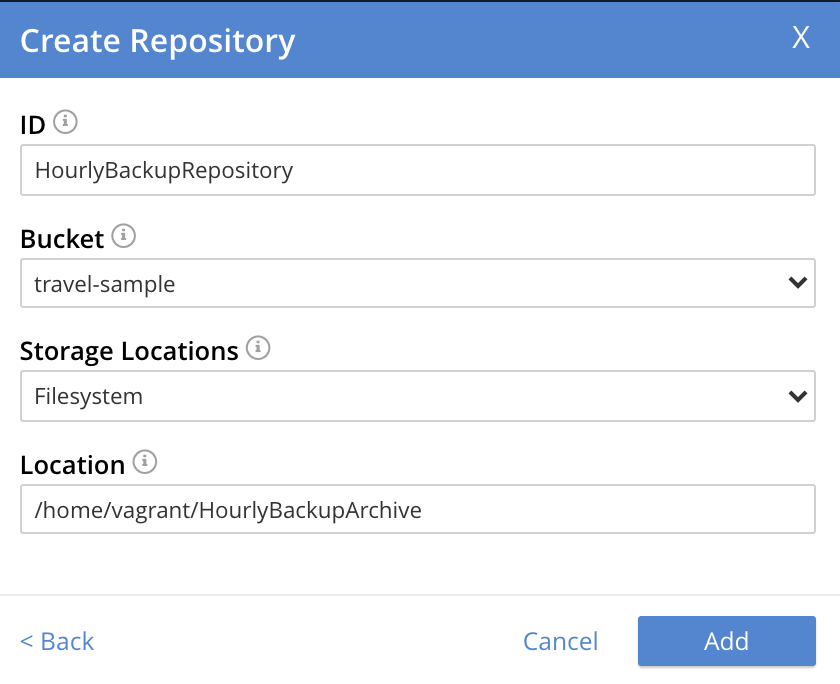
Create a repository. Enter data into the Create Repository dialog.
The ID should be a name for the repository. The name must be unique across the cluster, can only use the characters
[,],AtoZ,atoz,_and-; and must not start with either_,-,[, or]. For example,hourlyBackupRepo.The Bucket should be the name of either a Couchbase or an Ephemeral bucket, whose data is to be backed up. Selection can be made with a pull-down menu, accessed by means of the control at the right of the field. If a bucket-name is selected, only data from this bucket is backed up. If the default selection, All buckets, is used, data from all buckets on the cluster (including all Couchbase and all Ephemeral buckets) is backed up.
Use the control at the right-hand side of the field, to select a bucket. For the current example, the sample bucket
travel-sampleis assumed to have been installed (see Sample Buckets); and will be specified in this field.The value for Storage Locations can be specified as Filesystem (the default) or Cloud. For the current example, Filesystem will be used. If Cloud is selected, allowing AWS S3 storage to be used, the dialog expands, and displays additional options: these are described below, in Use Cloud Storage.
The Location should be the location of the storage-based archive for the repository. If on the local filesystem, this location must be a pathname accessible to all nodes within the cluster that are running the Backup Service: which is to say, reads from and writes to the location are shared through an NFS mount (or through some other type of shared-folder technology, such as Samba). Couchbase Server must have read and write access to the location. On Linux, therefore, for a filesystem location, use the
chgrpcommand to set the group ID of the folder tocouchbase; unless a non-root installation has been performed, in which case set the group ID either to the username of the current user, or to a group of which the current user is a member.A location should be used for only one repository: when multiple repositories are to be archived, a different location should be used for each. If appropriate, locations may be specified as subdirectories, within a top-level directory.
When complete, the dialog may look as follows:
To confirm, left-click on the Add button:

This concludes the process for creating repository and plan. The Backup screen now appears as follows:
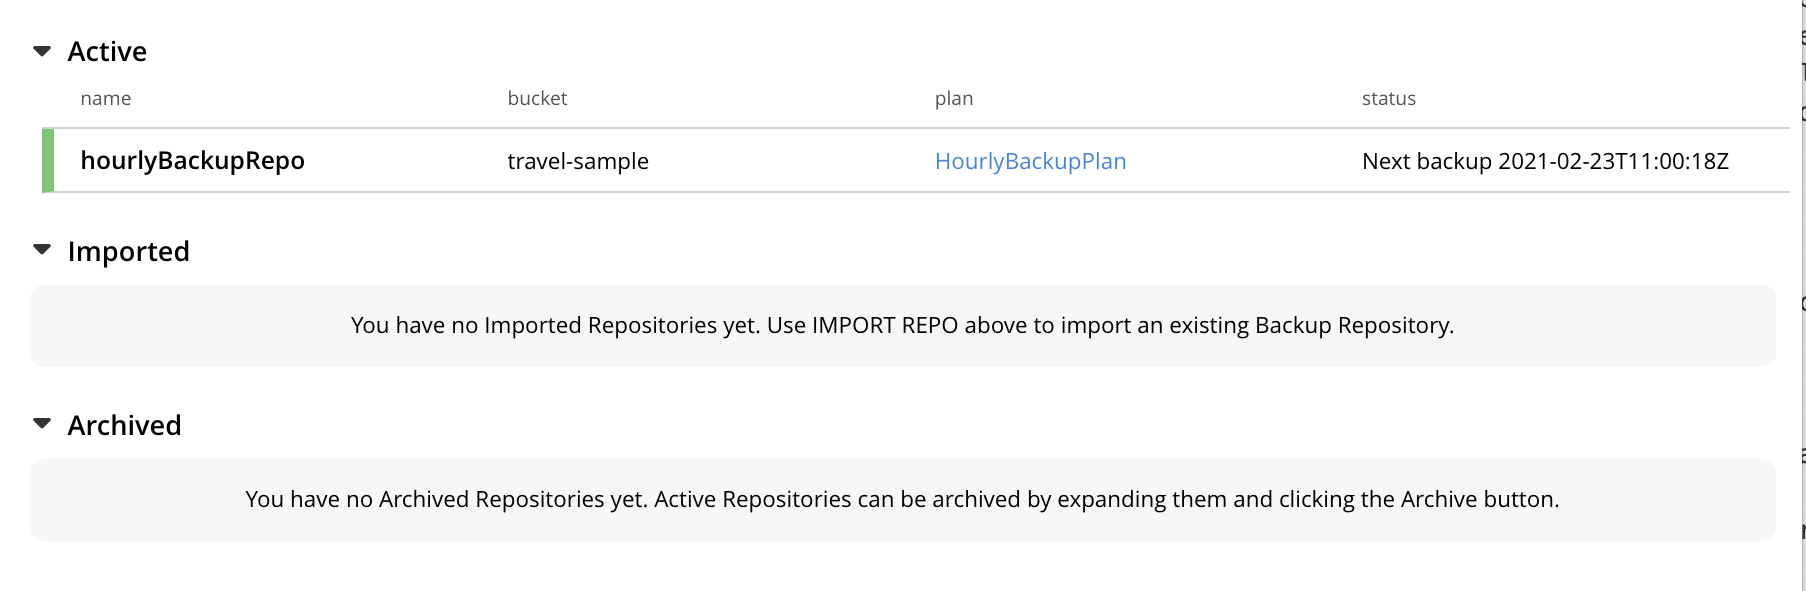
The newly created repository, hourlyBackupRepo, is displayed with its associated plan, HourlyBackupPlan, with the affected bucket (travel-sample) and the next scheduled backup displayed.
Data Service and Index Service data for travel-sample will now be backed up to the specified location on the specified schedule.
A repository whose plan is being executed (with data thereby backed up repeatedly, on schedule) is referred to as an active repository.
Run an Immediate Backup
By means of the Backup Service, an immediate backup can be run: this eliminates the need to wait for a scheduled backup to run at an appointed time. To run an immediate backup, access the Backup screen, and left-click on the row for an already-defined, active repository. For example:

This causes the row to expand vertically, as follows:

A number of buttons now appear, arranged horizontally across the bottom of the row, permitting a variety of actions. To perform an immediate backup, left-click on the Run Backup button:
This displays the Trigger Backup dialog, which appears as follows:
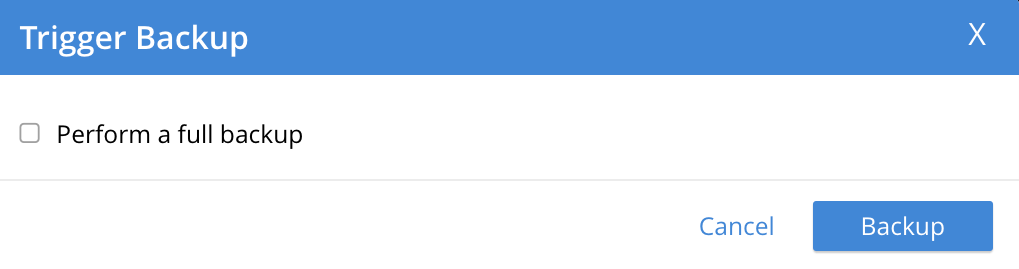
The immediate backup to be performed will be incremental by default. To perform a full backup, select Perform a full backup.
Click the Backup button, at the lower right of the dialog. The dialog disappears, and a notification is displayed at the lower left of the console:

This duly indicates that an immediate backup has been triggered.
Inspect Backups
Using Couchbase Web Console, the history of backups to a specified repository can be reviewed. Left-click on the row of a repository, to expand it vertically. Then, left-click on the Inspect Backups button:
This displays the Backup facility’s Repository screen, which appears as follows:
The screen provides two possible views, which are Inspect Backups and Task History : these can be selected by means of the buttons at the upper right:

The Inspect Backups view is selected by default. (Note the left-clicking the Task History button displays the Tasks History view: this is the same display as that accessed by means of the Task History button, from the expanded row on the *Repositories view of the Backup screen; and is described in Inspect Tasks, below.)
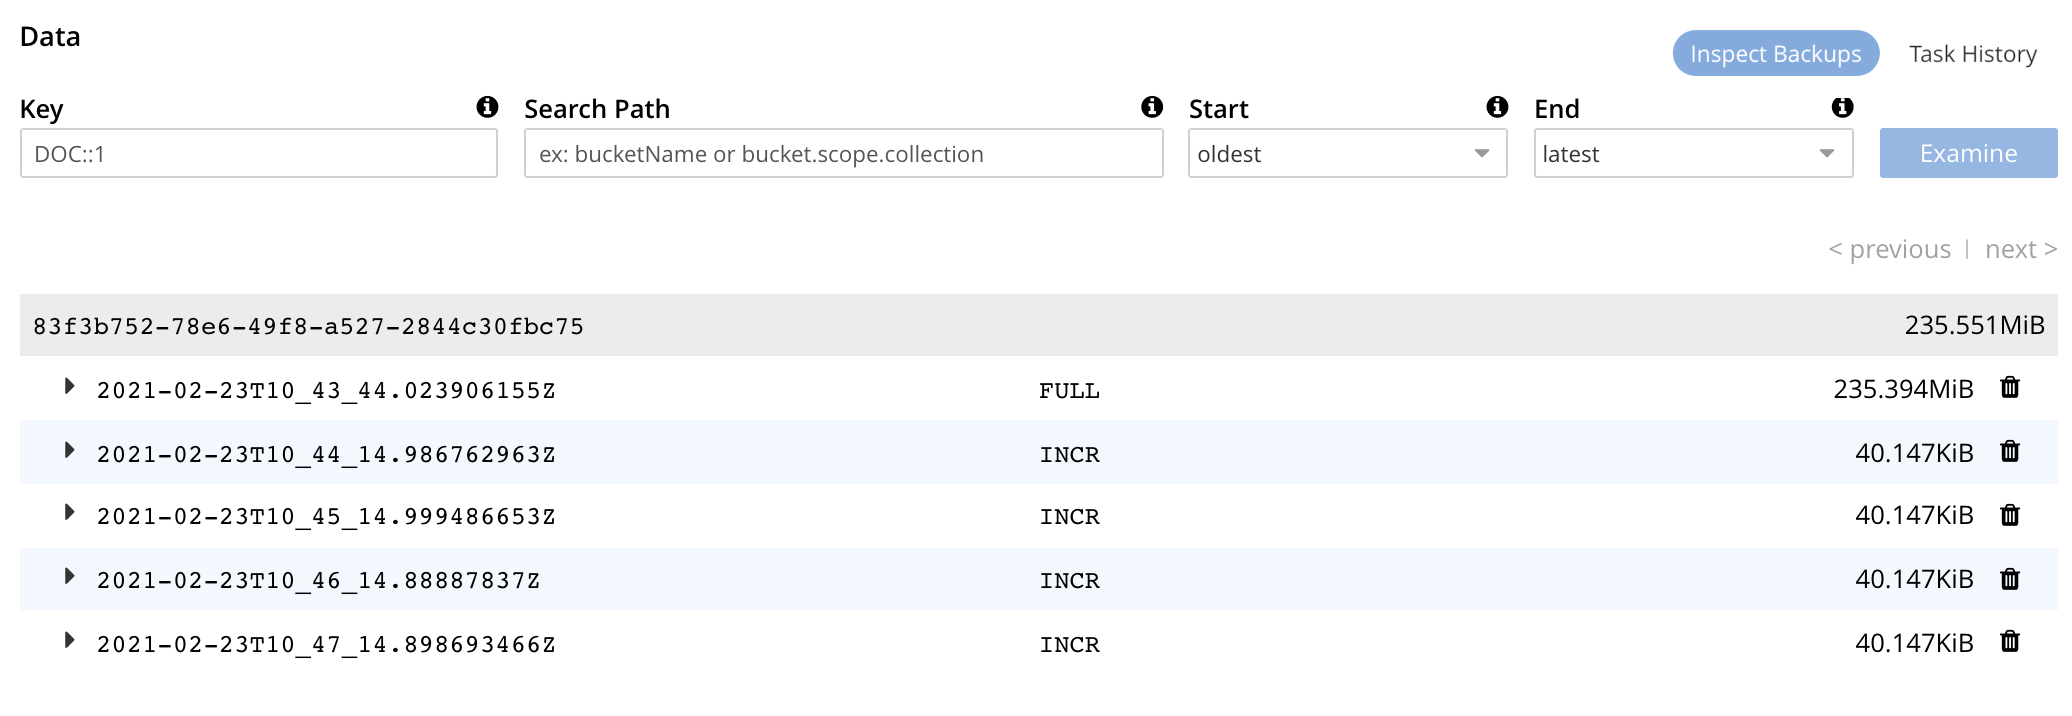
The main, lower panel of the Backups view provides the ID of the repository (in this case, 83f3b752-78e6-49f8-a527-2844c30fbc75) and its size (here, 235.551MiB); and also provides a vertically arranged list of all backups that have occurred, with the earliest at the top.
Each backup has its own row; with its start-time, type (full or incremental), and size.
To inspect a particular backup in detail, click the control at the left-hand side of the row:
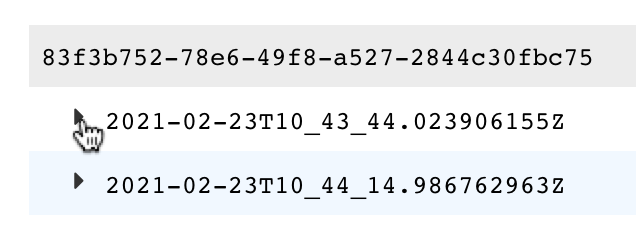
This causes the row to expand vertically:
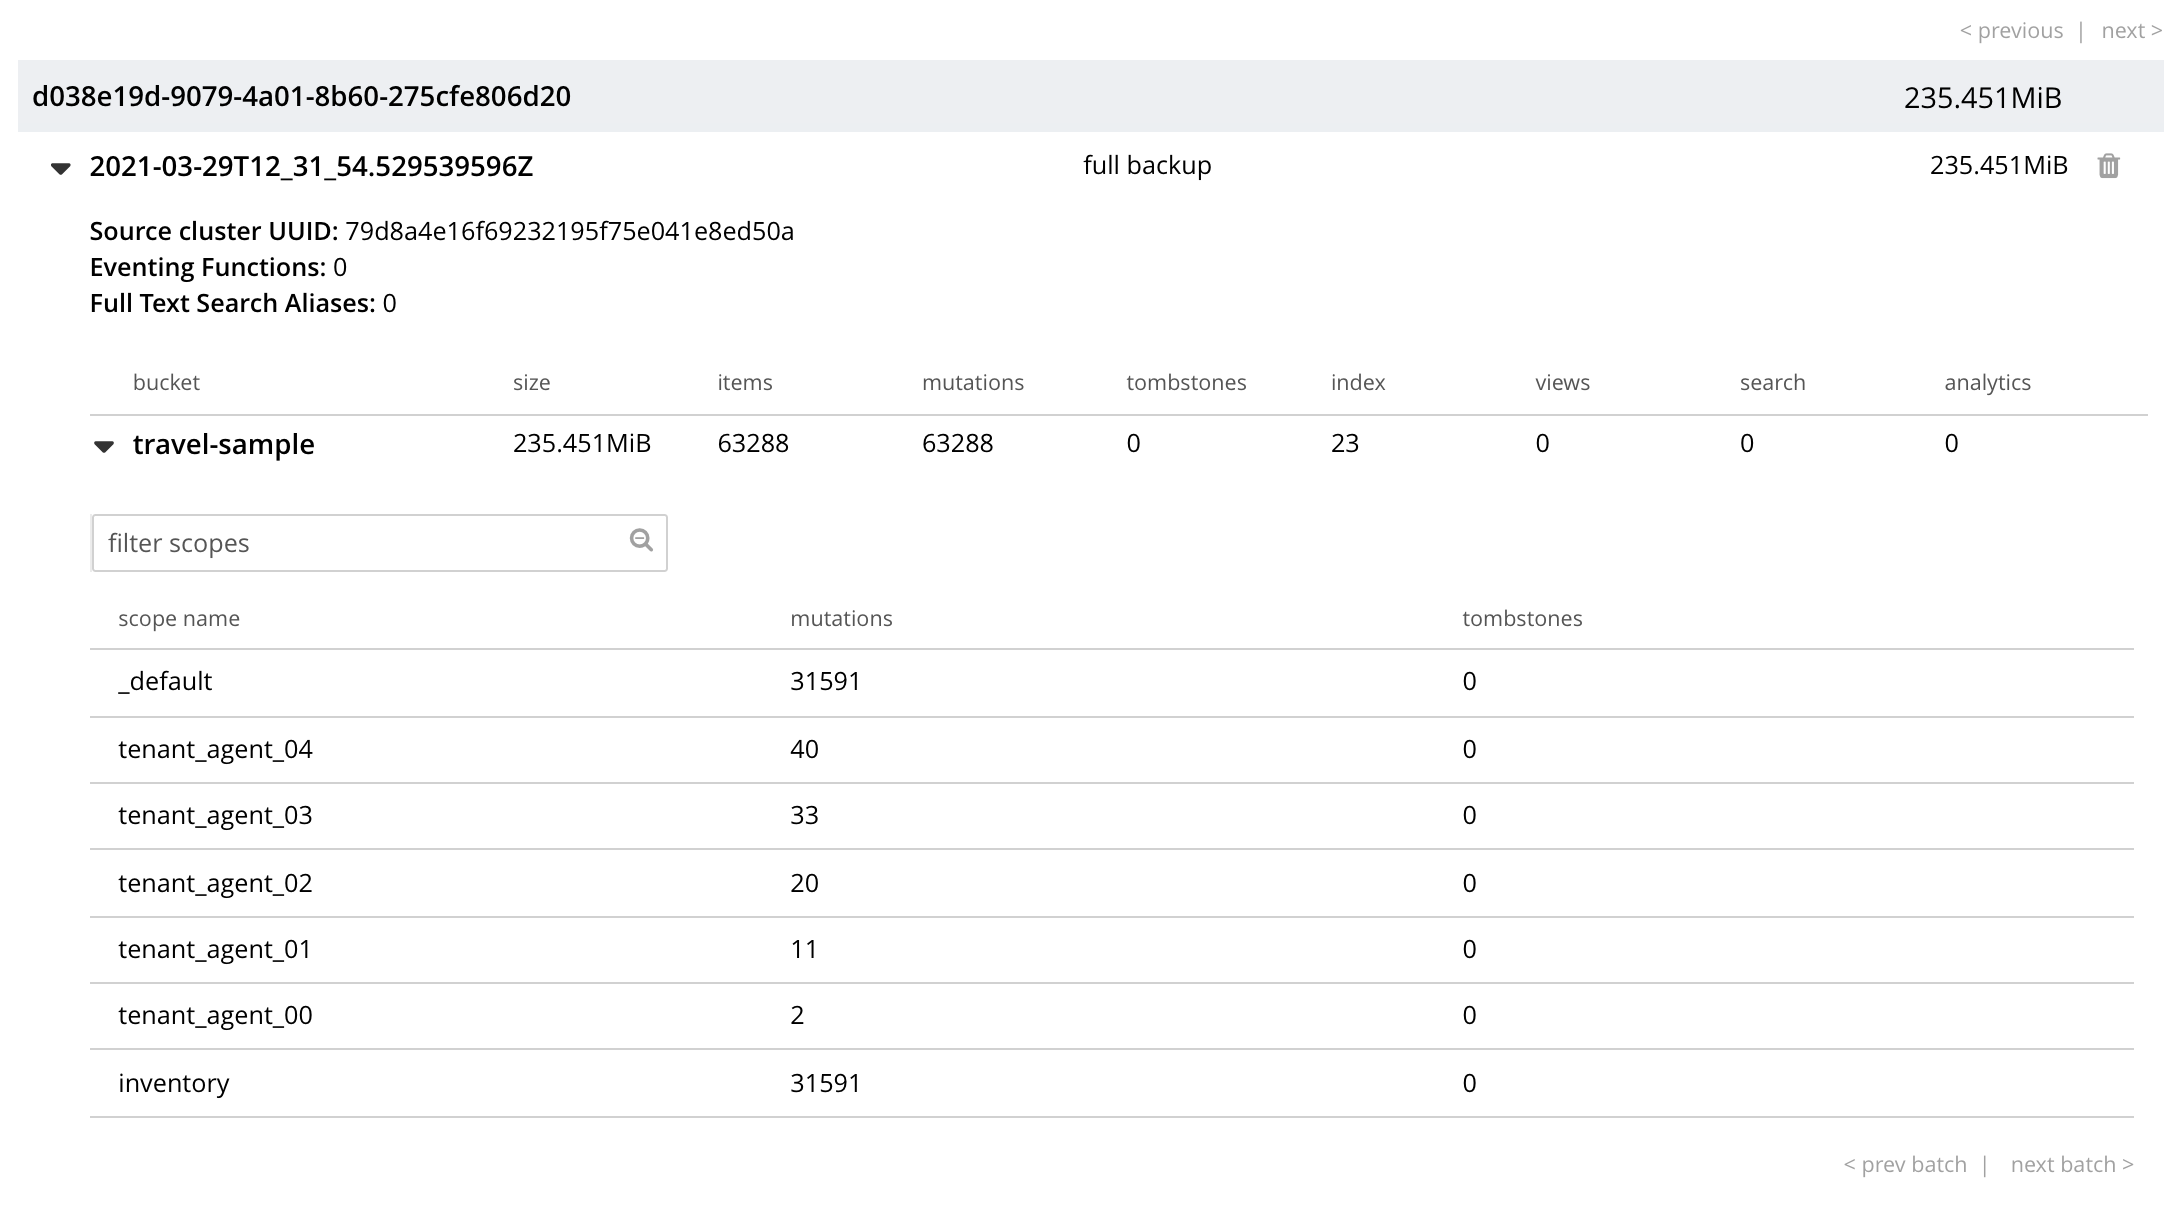
The displayed data includes the UUID for the source cluster. Also specified are the numbers of Eventing Functions written for the Eventing Service, and the number of Full Text Search Aliases for the Search Service (here, the numbers are both zero).
Each backed-up bucket appears on a table showing its size and the number of items, mutations, and tombstones that have been included in the backup. The row also lists the numbers of backed up indexes for the Index, Search, and Analytics Services plus the number of backed up Views. A searchable sub-panel lists each scope that the bucket contains along with the number of mutations and tombstones they contain.
To inspect the individual collections within a displayed scope, click the row for the scope. The row expands vertically, as follows:
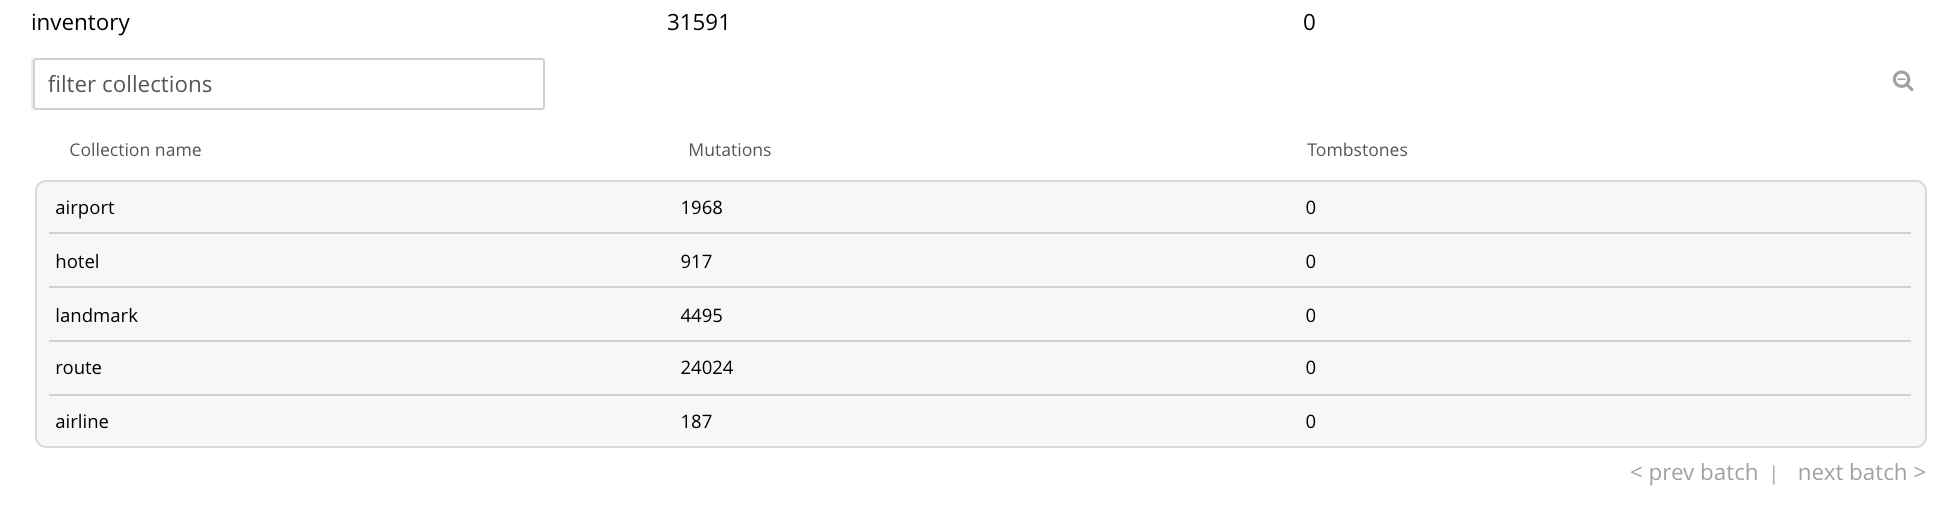
Clicking on the row for the inventory scope displays the individual collections within the scope with the mutations and tombstones for each collection.
Collections can be searched for, based on strings entered into the filter collections field, which is located to the upper right of the collections panel.
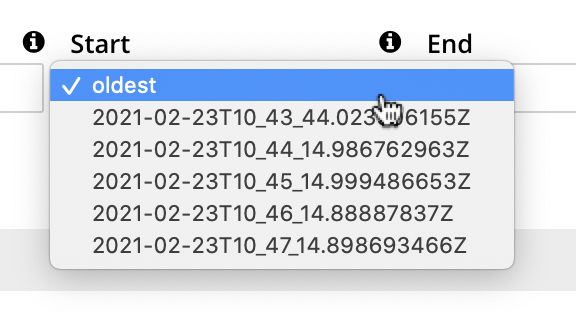
The upper panel of the Data screen provides interactive fields labelled Key and Search Path. These can be used to search for a specific document within the repository. Optionally, the subset of backups within the repository can be specified, by means of the Start and End fields. For example, by accessing the control at the left-hand side of the Start field, a pull-down menu is displayed: this lists backups any one of which can be used as the starting point for the search:
For example, type a known document key into the Key field — such as airline_10.
Then, enter the bucket name into the Search Path field.
You must explicitly specify both the scope and collection unless you’re using the default scope and collection. In that case, explicit;y setting the defaults is optional.
For example, travel-sample._default._default.
When a search is expressed to include all backups of the bucket for the inventory scope and airline collection, the panels appear as follows:

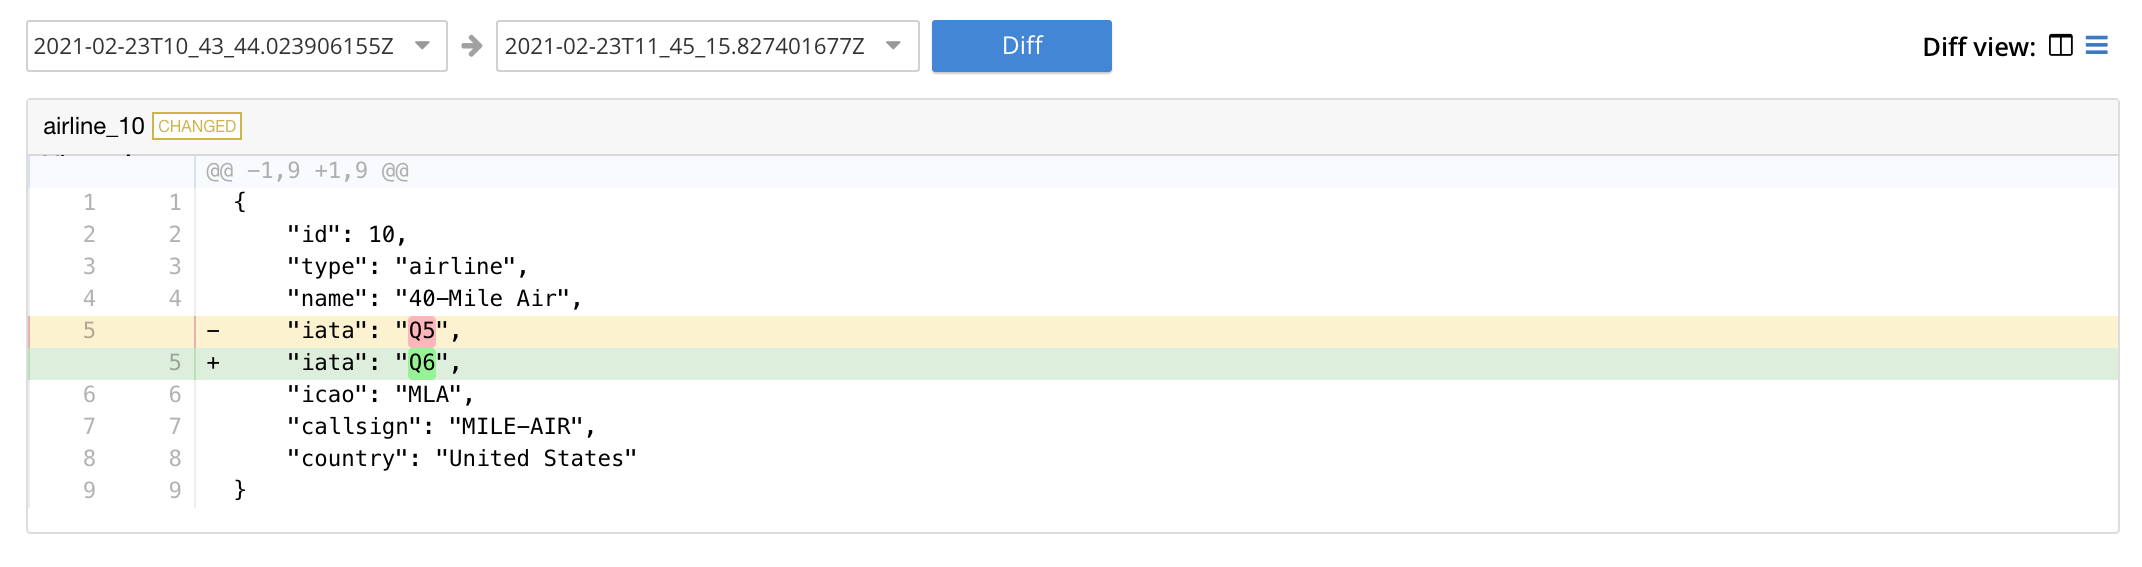
To run the search, left-click on the Examine button. The Examine screen is now displayed:
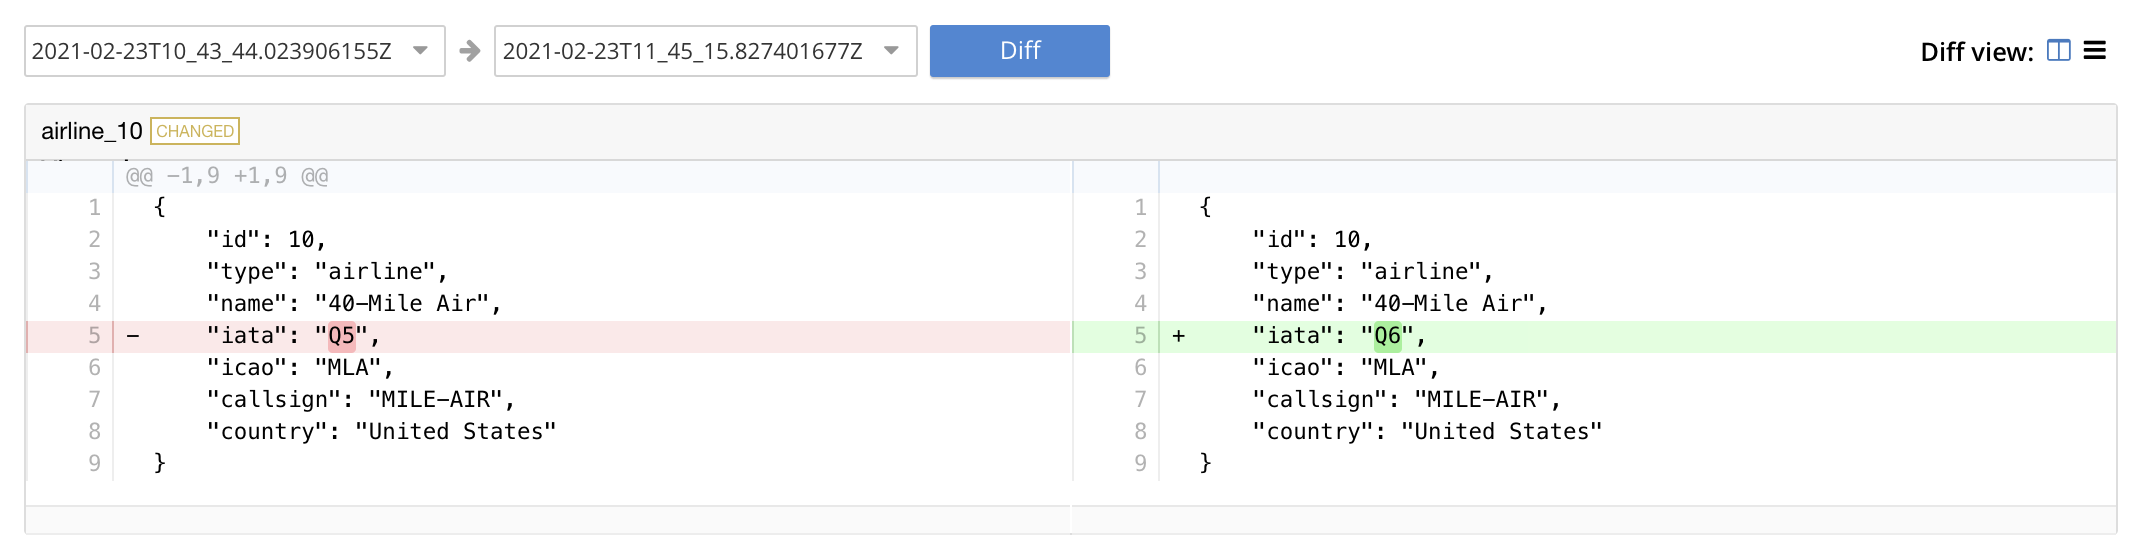
The controls adjacent to the Diff button, near the top of the screen, allow different backups to be selected, so that the differences between the document-versions they contain can be individually examined:

The specified document is thereby shown, in the left and right-hand panels of the main display, in versions that respectively correspond to the backups selected. When a field has changed, the earlier version appears shaded red, the later shaded green.
By default, a Side-by-Side Diff view of the specified document is shown. To display an Inline Diff view, access the control at the upper right of the screen:
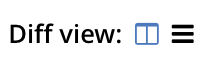
The Inline Diff view is now provided:
Delete Backups
By means of the Backup facility’s Data screen, individual backups can be deleted. At the extreme right of the row for each listed backup, a garbage-can icon appears:

Left-click on this icon to delete the backup described on the row. The Delete Backup dialog appears, requesting confirmation:
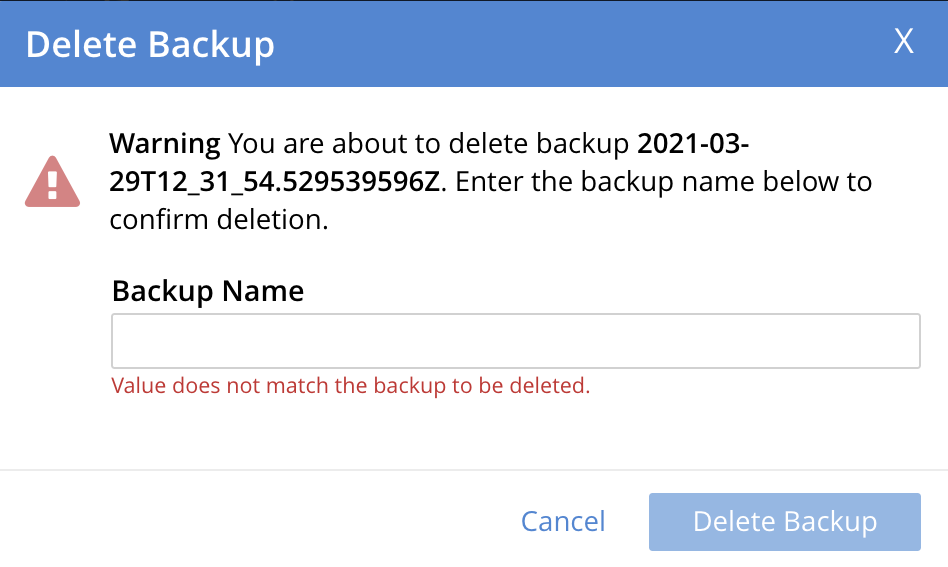
Enter the backup name into the interactive text field, and left-click on Delete, to continue with deletion. The backup is deleted. Once it has been deleted, it cannot be restored.
Inspect Tasks
To inspect currently defined tasks, do either of the following:
-
Left-click on the Task History button that appears on the expanded row for a repository, on the Repositories view of the Backup screen.
-
Left-click on the Task History tab that appears at the upper-right of the Backup screen, which has been accessed by means of the Inspect Backups button that appears on the expanded row for a repository, on the Backup screen.
The Tasks screen appears as follows:
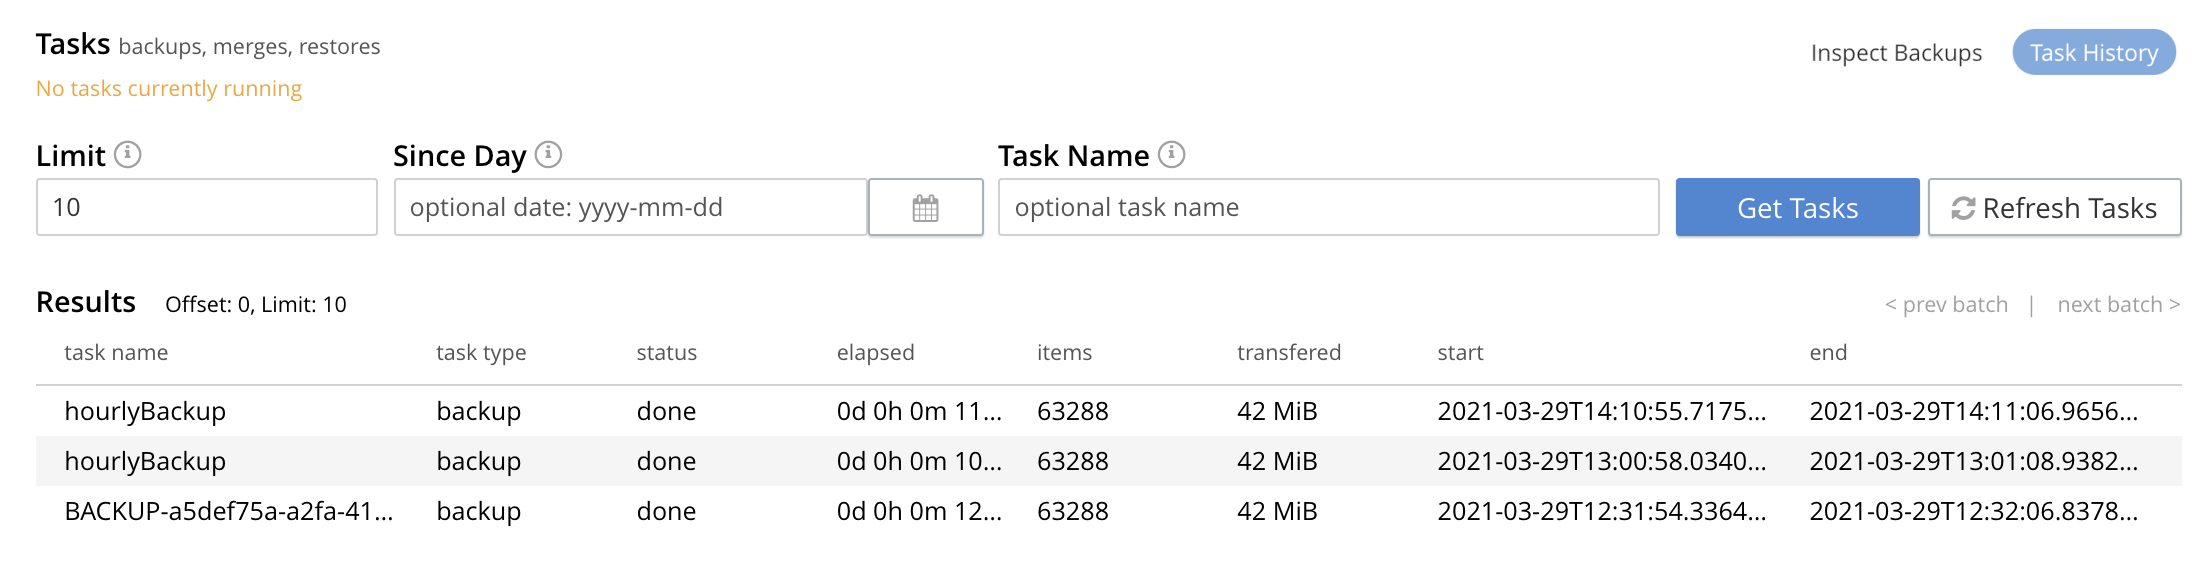
The Get Tasks button allows specific tasks to be identified by search, and displayed. The earliest date for the task can be specified in the Since Day field; and the name of the task in the Task Name field, so as to narrow the search. A limit on the number of tasks displayed can be specified as an integer, between 1 and 100 inclusive, in the Limit field.
The Refresh Tasks button causes the main list of tasks, in the lower panel, to be refreshed. The list has an Offset figure displayed at its head: this indicates the position in the list of the first displayed task; and changes when the prev batch and next batch controls, at the right-hand side, are left-clicked on. The task list is presented as a table, which shows, for each task that has been executed, the Task name, Task type (such as Backup or Merge), status (such as done or running), the Elapsed time for the task, the number of Items and size of data that was Transferred by the task, and the Start and End times for the task.
To inspect a particular task in detail, left-click on the row for the task. For example:
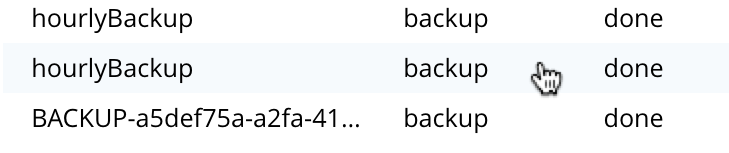
The selected row is expanded vertically, as follows:
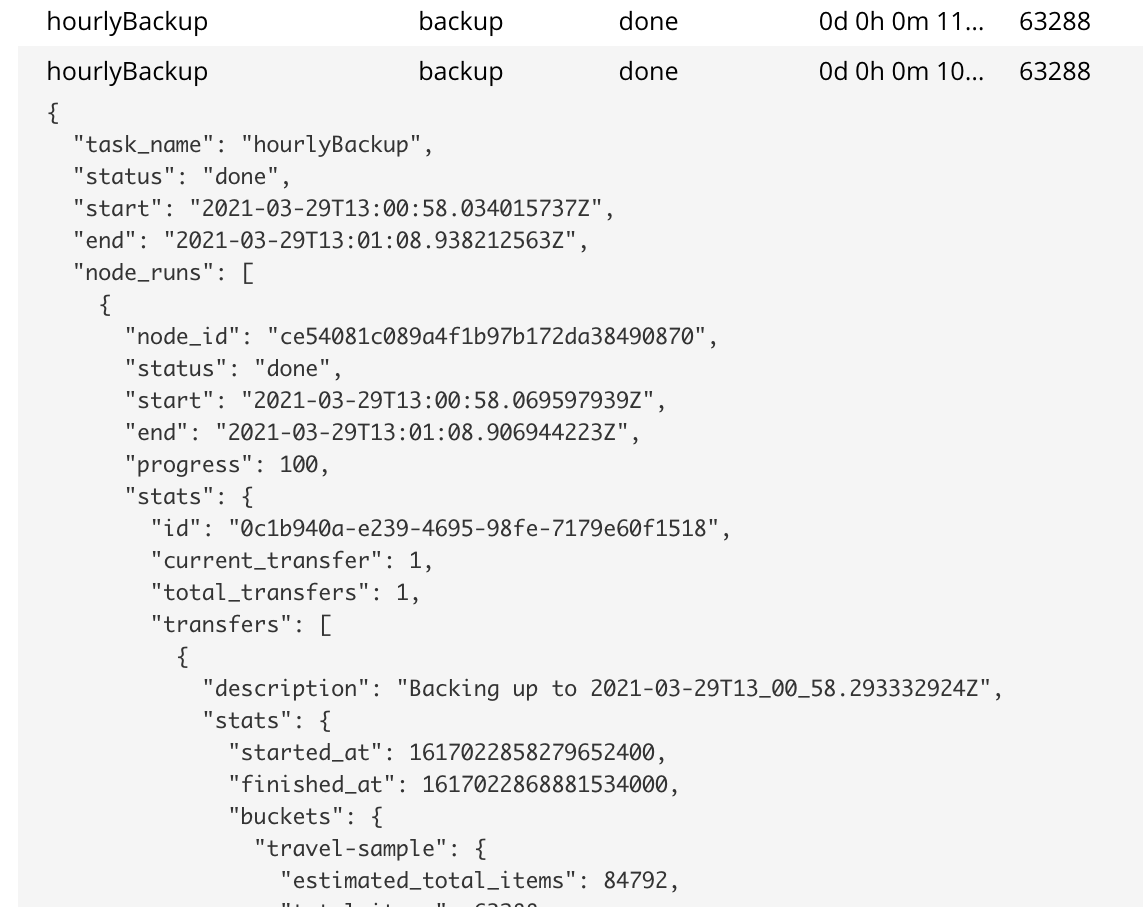
The details of the task are displayed as a JSON document.
The details include counts of items, vBuckets, and bytes received from the operation.
The node_runs subdocument provides information specific to each node in the cluster.
Schedule Merges
A merge allows multiple backups to be combined as one; with deduplication occurring.
Merges are supported for filesystem-based repositories: however, merges are not supported for cloud-based repositories. If a merge is scheduled for a cloud-based repository, the Backup Service skips the task. An immediate merge cannot be triggered for a cloud-based repository.
Merges can be scheduled as tasks, to be applied to backed up data within a defined repository. This section describes how task-definition and scheduling for merges can be accomplished. For any given repository, the Backup Service performs one task at a time; with each task maintaining a lock on the repository. Therefore, the administrator-defined interval between tasks should always be sufficient to allow each task to run to completion. If a new task is scheduled to start while a previously started task is still running, the new task cannot run. For information, see Avoiding Task Overlap.
Proceed as follows, noting that the initial steps (for adding a repository, creating a new plan, and adding a backup task to the plan) are the same as those described in Schedule Backups, above.
-
Access the Backup screen, and left-click on ADD REPOSITORY. When the Select Plan dialog is displayed, choose + Create new plan.
-
In the redisplayed Select Plan dialog, specify a Name and a Description for the plan. Then, specify the Services whose data should be backed up.
A merge can only be scheduled as part of a plan that also schedules backup: the merge will be applied to backups within the defined repository.
-
Left-click on Add Task, and add a Backup task. For example:
This task calls for a backup to occur every hour. Next, left-click on the Add Task control. When the fields for defining an additional task appear, specify the task to be of type Merge, with a frequency of four hours; and to start on the half-hour (to allow time for each backup task, itself run on the hour, to complete). For example:
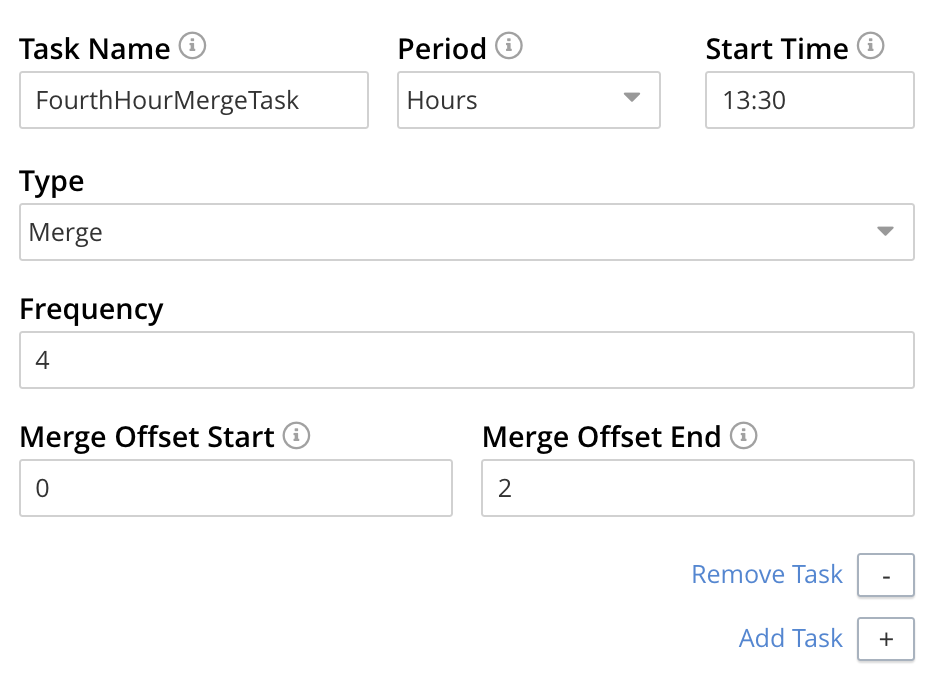
The Type of the task MergeTask has been specified as Merge, with a frequency of four hours. Note the fields Merge Offset Start and Merge Offset End, which respectively specify the relative start and end points of each merge that will be performed. An offset start of 0 indicates that each merge will start with backups made on the current day, if such backups exist. An offset end of 2 indicates that each merge will end with backups that were made 2 days before the specified start-day, if such backups exist. If backups were not made every day during the specified period, as many as can be found will be merged.
A detailed, diagrammatic explanation of Merge Offset Start and Merge Offset End is provided in Specifying Merge Offsets.
Left-click on the Next button:
-
When the Create Repository dialog appears, enter the ID of the repository you’re creating, the name of the Bucket that is being backed up, the appropriate value of Storage Locations (here, Filesystem), and the on-disk location of the repository-archive. (Note that this on-disk location must be accessible to all Backup Service nodes in the cluster.) For example:
Left-click on the Add button. The new repository now appears in the Repositories view of the Backup screen:
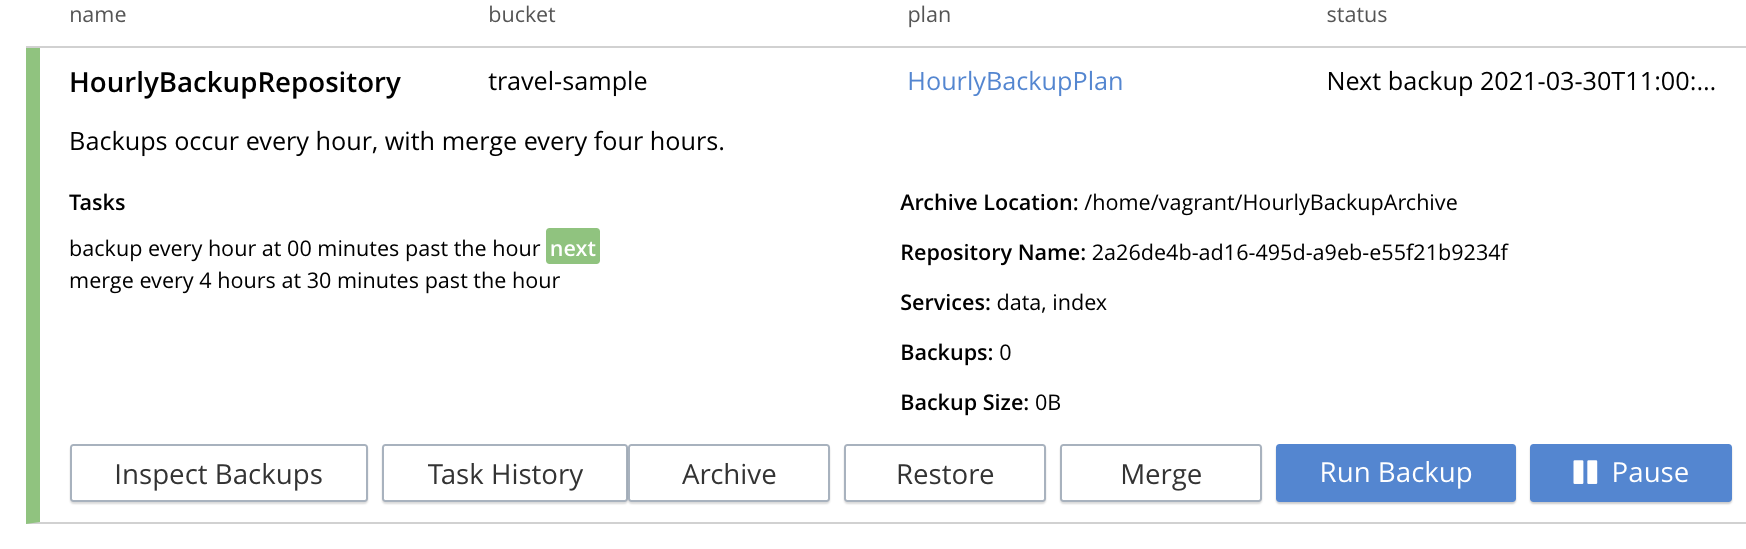
The defined backups and merges will now occur, on the specified schedule. This can eventally be seen by left-clicking on the row for the new repository, and then left-clicking on Inspect Backups.
Perform an Immediate Merge
By accessing a vertically expanded repository-display in the Repositories view of the Backup screen, an immediate merge can be manually triggered. The repository does not need to have scheduled merges in its plan; but must already contain multiple backups, so that some or all of these can be merged.
Note that merges are supported for filesystem-based repositories only: they are not supported for cloud-based repositories.
Proceed as follows:
-
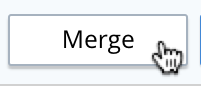
In the Repositories view of the Backup screen, select a repository that contains multiple backups, by left-clicking on the row for the repository. When the row has expanded vertically, left-click on the Merge button:
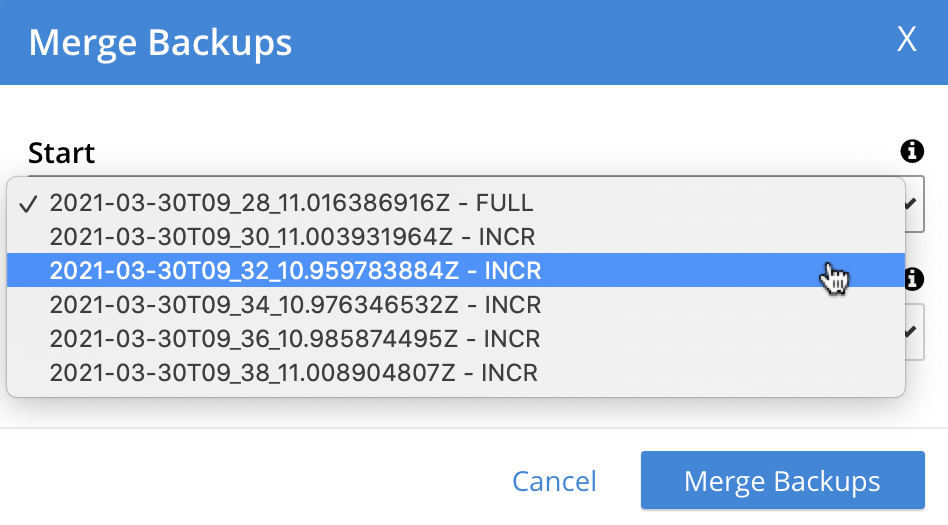
The Merge Backups dialog is now displayed:

The dialog allows determination of which backups should be merged, based on specification of the first and the last: these backups, and all backups that occurred between them, will be merged.
-
To specify the first backup, access the interactive control at the right-hand side of the Start field. This produces a pull-down menu that displays all available backups for this repository:
-
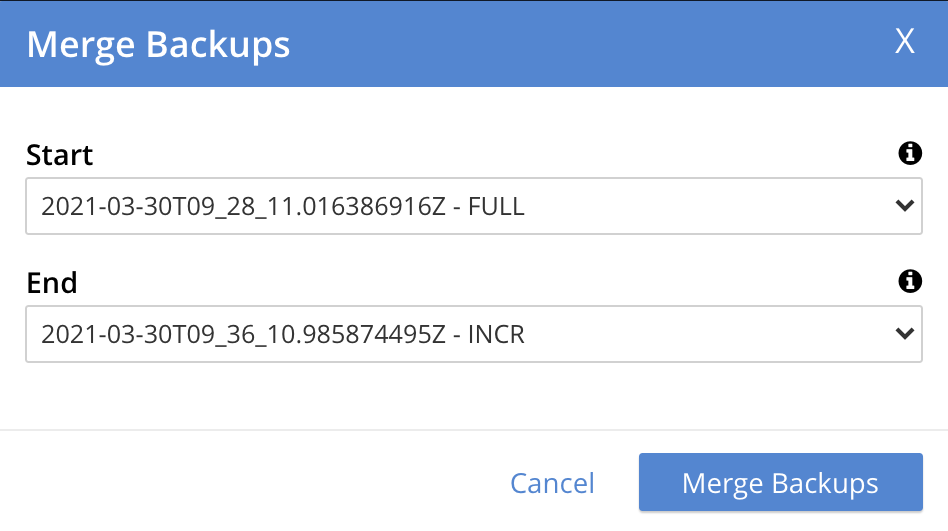
Select a backup that will be the starting backup for the merge. Then, access the control at the right-hand side of the End field, and select, from its pull-down menu, a backup that will be the ending backup for the merge. The dialog now appears as follows:
-
Left-click on the Merge Backups button, at the lower right of the dialog. The dialog now disappears, and the following notification appears, at the lower left of the console:

The specified merge has now been triggered.
-
To check the results, in the Repositories view of the Backup screen, left-click on the Inspect Backups button, on the expanded row for the selected repository. This displays the history of backups and merges for the repository. (It may be necessary to scroll through multiple screens of information, to find the merge that has been created.)
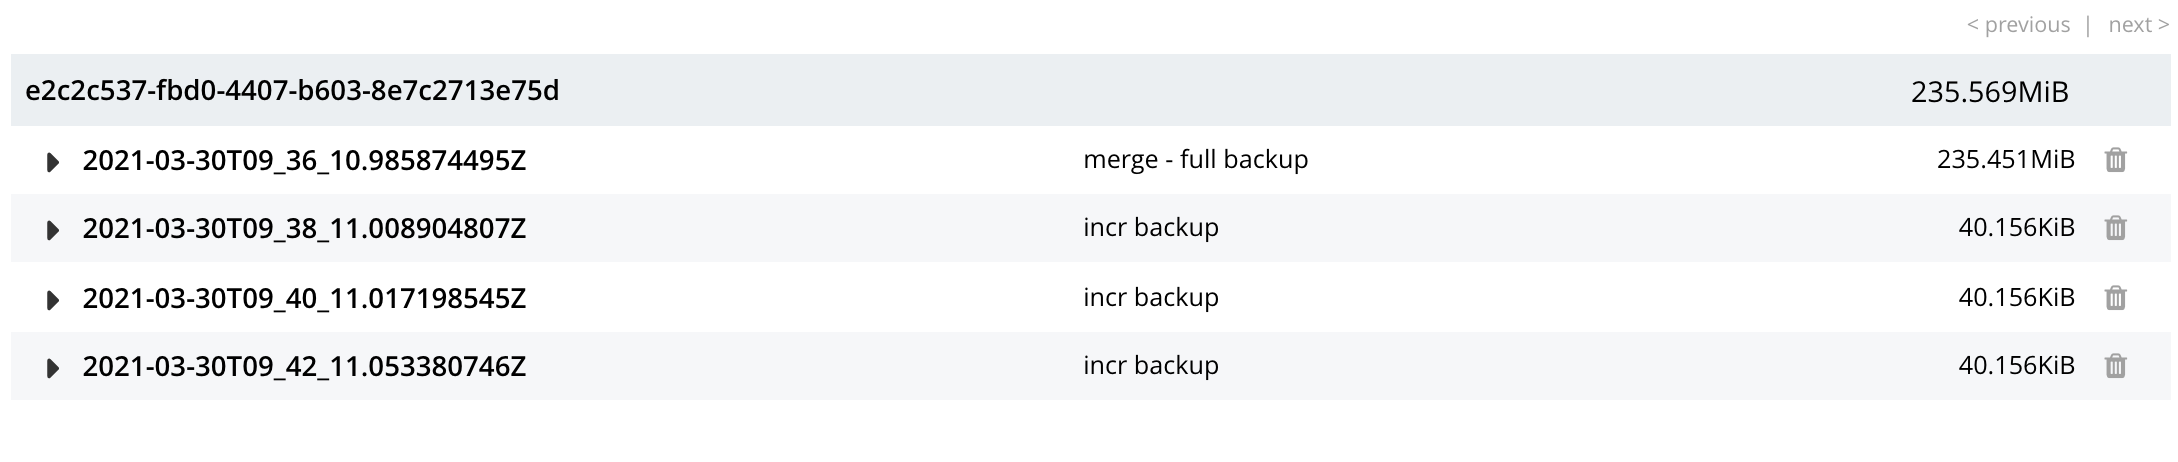
Here, the merge of incremental builds just performed is clearly indicated; as
merge - full backup. To obtain further specifics, left-click on the row for the merge. The row expands vertically, as follows:
The details in the expanded row confirm that five backups were merged by the operation just performed.
Restore Backups
You can restore a backup to the same bucket or buckets that you originally backed up or to a different set of buckets. You can also restore a backup to a different cluster. The buckets you restore data to do not have to use the same storage engine as the original buckets. You can restore a backup of data from a bucket using the Couchstore storage engine to one using Magma. You can also restore a Magma-backed bucket backup to a Couchstore bucket.
To restore a backup:
-
Select then expand the repository containing the data you want to restore.
-
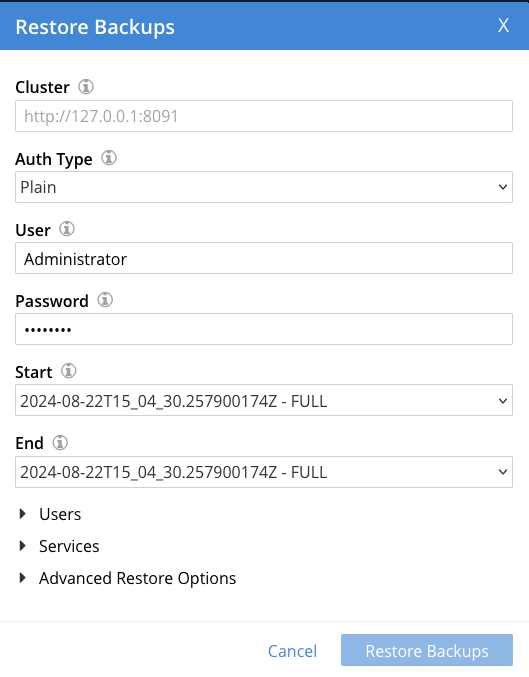
Click Restore. The Restore dialog opens:
-
In the Cluster field, enter the URL of a node in the cluster where you want to restore the data. Include the REST API port—by default, 8091 for unencrypted HTTP and 18901 for secure HTTPS connections.
-
Choose the method you want to use to authenticate with the target cluster. You can use either Plain (a username and password) or a client certificate and key. After making your choice, supply the credentials for the target cluster.
-
In the Start and End fields, choose the start and end range of backups you want to restore.
-
If you want to restore users and groups, expand Users and click Restore users and User Groups. Also choose whether the backed-up users and groups overwrite any identically named existing ones.
-
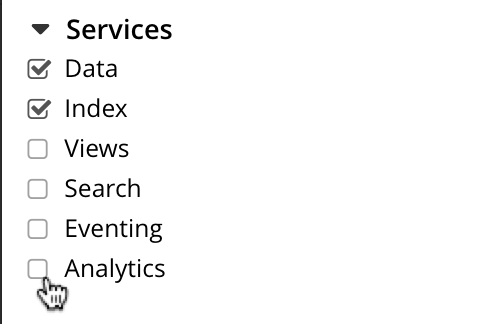
If you want to select which service’s data gets restored, expand the Services section and select or clear services you want. For example:
-
Expand the Advanced Restore Options if you want to:
-
Filter what data Couchbase Server restores.
-
Restore a bucket’s data to a different bucket.
-
Control how the restore handles expiration TTL values.
-
Configure details about the bucket and collections being restored.
All the fields in this section are optional. See Advanced Restore Options for more information.
-
-
Click Restore to start the restore process. A green pop-up briefly appears to verify that the restore task has started.
To monitor an ongoing restore, click the Task History button in the repository’s entry in the Repositories tab. The active restore task appears under the Tasks section.

After the restore tasks finishes, you can see whether it succeeded or failed under the Results section.
| If the restore task completes while you’re viewing Task History, it does not appear under the Results section until you click Refresh Tasks. |
To learn how to restore a backup using the command line, see cbbackupmgr restore.
Advanced Restore Options
Expanding the Restore dialog’s Advanced Restore Options section shows you fields where you can control:
-
Data filtering
-
How TTL values are interpreted
-
Whether the restore creates missing buckets or removes some scopes or collections.
Once you expand the Advanced Restore Options section, a set of fields appears:
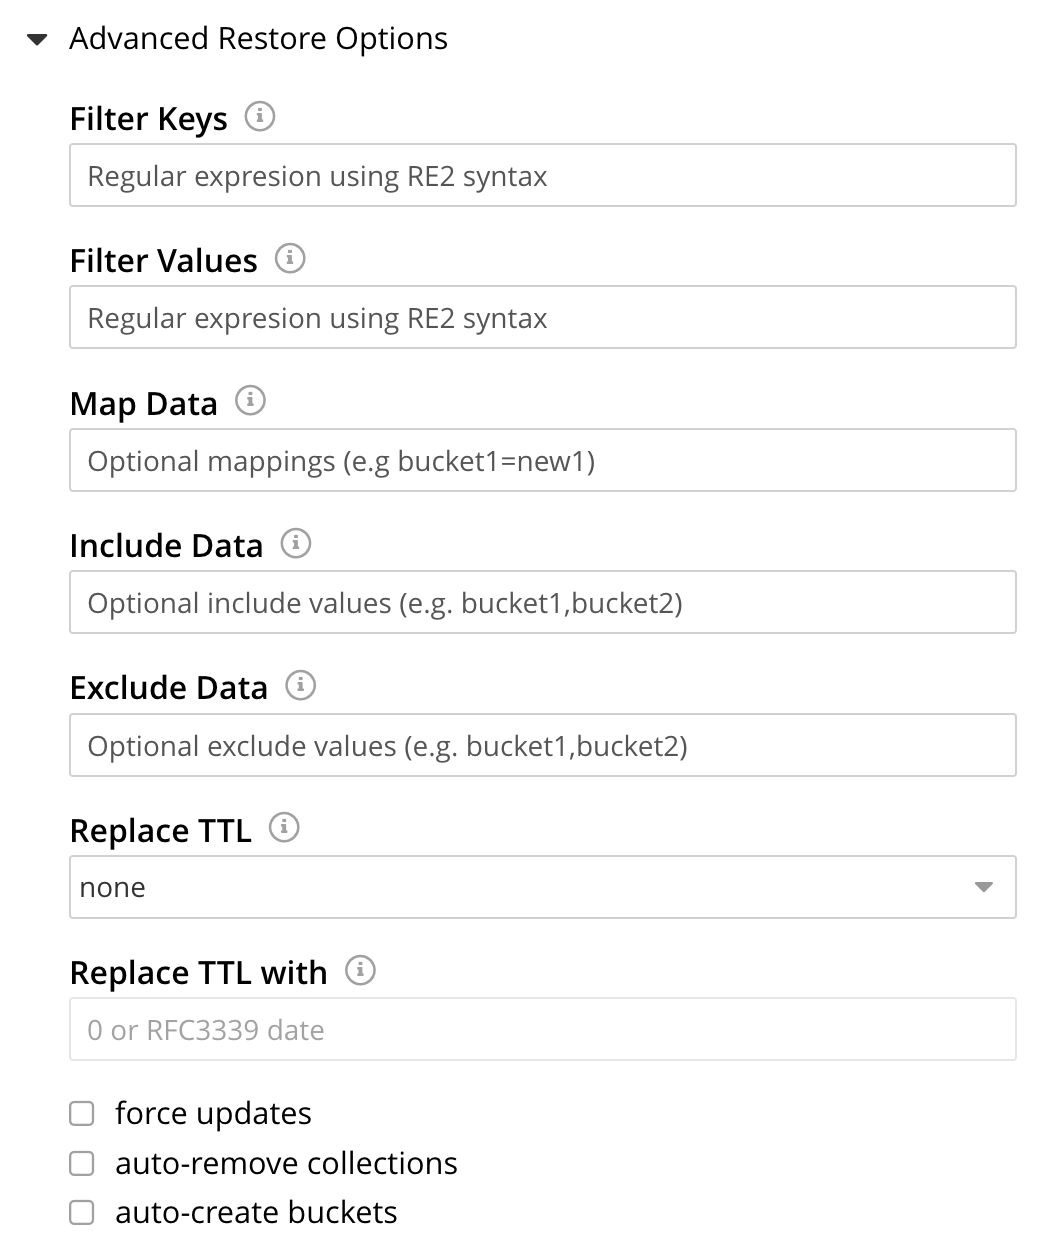
The fields in this section are:
- Filter Keys
-
Lets you enter a regular expression the restore task uses to filter the key values. The restore task only restores a document if its key matches the regular expression.
For example, if you enter
^airlinein this field, then the restore task only restores documents whose key begins with the stringairline. - Filter Values
-
Lets you enter a regular expression the restore task uses to filter documents based on their data. The restore task only restores a document if one of its values matches the regular expression.
For example, if you enter
MIL*in this field, the restore task only restores a document if has a value that contains the stringMILfollowed by zero of more characters. - Map Data
-
Lets you have the restore task restore a backed-up bucket’s data to a different bucket. If you leave this field blank, the restore task restores data into same bucket from which it was backed up.
If you want a bucket’s data to be saved in a bucket of a different name, enter the original bucket’s name, an equal sign (
=) and the target bucket’s name. For example to restore all data backed up from thetravel-samplebucket into a bucket namedts, entertravel-sample=tsinto the Map Data field.The target bucket must exist on the target cluster or you must enable Auto-create Buckets.
- Include Data
- Exclude Data
-
These fields let you limit the restoration to a subset of the buckets, scopes, and collections in the backup. The Include Data has the restore task restore just the buckets, collections, and scopes that you list in this field. The Exclude Data field restores all data in the backup except the buckets or collections you list in this field.
To include or exclude buckets, add their names in a comma-separated list to the Include Data or Exclude Data fields. For example, suppose the backups you’re restoring contain four buckets named
bucket1,bucket2,bucket3, andbucket4. Then enteringbucket1,bucket4in the Include Data field has the restore task restore just the data frombucket1andbucket4. In this case, you could instead enterbucket2,bucket3in the Exclude Data field to get the same result.You can specify a scope to be included in or excluded from the restore by listing its bucket name, followed by a period, and then the scope name. Similarly, to include or exclude a collection, specify the name of its bucket, scope, and its collection name joined by periods. For example, to exclude the
routecollection in thetravel-samplebucket’sinventoryscope, entertravel-sample.inventory.routein Exclude Data.See Scopes and Collections for an overview of scopes and collections.
- Replace TTL
- Replace TTL with
-
These fields let you choose how the restore task handles time to live (TTL) values in the documents it’s restoring. The Replace TTL list controls when the restore task applies the date you enter into the Replace TTL with field to the documents it’s restoring. The settings in this list are:
-
none: The restore task does not change the TTL value in the value in the backup. If the document’s expiration time is in the past, Couchbase Server marks it as deleted soon after the restore task restores it.
-
expired: If a document being restored has an expiration date in the past, the restore task sets its TTL to the value you supply in Replace TTL with.
-
all: The restore task applies the new TTL you supply in Replace TTL with to all documents it restores. It even applies the new value to restored documents that had a TTL of
0(no expiration) in the backup.The value you supply in Replace TTL with field must be either:
-
0: No TTL value is set for the document. The document does not expire unless the bucket or collection containing it has a non-zeromaxTTLvalue. See Expiration. -
A string containing an RFC3339 time stamp. All documents to which the restore task applies this value will expire when on the date and time you set.
The Replace TTL with field does not prevent you from entering a timestamp in the past. Entering a date in the past results in any documents that the restore task applies the field’s value to being deleted by Couchbase Server soon after restoration.
-
- Force Updates
-
By default, the restore task does not overwrite an existing document that has a more recent modification time than its backed up version. Select Force Updates to have the restore task always overwrite existing documents with the version in the backup even if the existing document is more recent.
- Auto-remove Collections
-
When checked, the restore task drops scopes and collections that currently exist in buckets but had been dropped prior to the backup’s creation. The restore task knows which scopes and collections have been dropped because the backup contains the tombstones of these dropped objects. For a scope or collection to be dropped when you enable Auto-remove Collections, its ID must match the ID of a dropped scope or collection as well as matching its name. Just matching the name of a deleted scope or collection is not enough to have the restore task drop it.
This option is only useful for situations where you’re dropping and recreating buckets. For example, suppose you make a backup of a bucket where you had dropped scopes or collections. Then, later, you drop the bucket and recreate it and its scopes and collections (including the ones you had previously deleted) in precisely the same order that you had created them in the original bucket. In this case, the scopes and collections will have the same IDs that they had in the original bucket and therefore in the backup. Finally, if you restore the backup to the bucket with Auto-remove Collections selected, the restore task deletes scopes and collections that match the IDs of deleted ones in the backup.
- Auto-create Buckets
-
By default, the restore task exits with an error message if a bucket being restored from the backup does not currently exist in the cluster. Selecting Auto-create Buckets has the restore task create any missing buckets.
Pause Backups
The Backup Service allows scheduled backups to be paused, indefinitely. This may be useful when a cluster is undergoing maintenance, or when buckets are otherwise not available. Once a pause is executed by the administrator, no scheduled task for the repository is executed. Then, when a resume is subsequently executed by the administrator, the task-schedule is resumed at the earliest, planned opportunity: thus, if backups are hourly, and a pause is executed at 9:50 am, if a resume occurs at 9:58 am, the next backup occurs at 10:00 am; but if the resume occurs at 10:02 am, then the next backup occurs at 11:00 am.
To pause a backup, access the Repositories view of the Backup screen, and left-click on the row for the repository to be paused. This expands the row vertically, and displays the Pause button. Left-click on this, to pause backups:

The button now changes into a Resume button. Left-click on this whenever backups are to be resumed:

Archive Repositories
When a repository should no longer receive fresh backups, the repository can be archived. This means that it remains available, with all its data; but no longer receives modifications. To archive a repository, proceed as follows;
-
Access the repository that is to be archived in the Repositories view of the Backup screen, and expand the row for the repository by left-clicking on the repository’s row. When the row has expanded, left-click on the Archive button:
This brings up the Archive Repository dialog, which appears as follows:
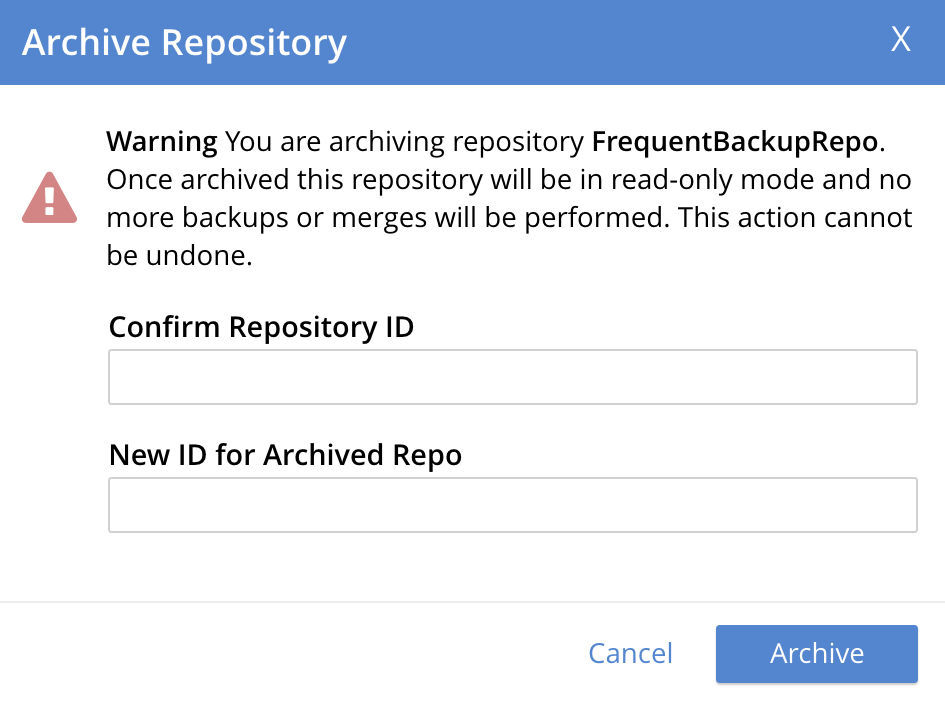
The dialog contains a notification, warning that no further backups or merges will be possible to the repository, once it has been archived.
-
Confirm the repository to be archived. Enter its name into the Confirm repository ID to archive field. Then, enter the intended name of the archived version of the repository into the New ID field. The dialog now appears as follows:
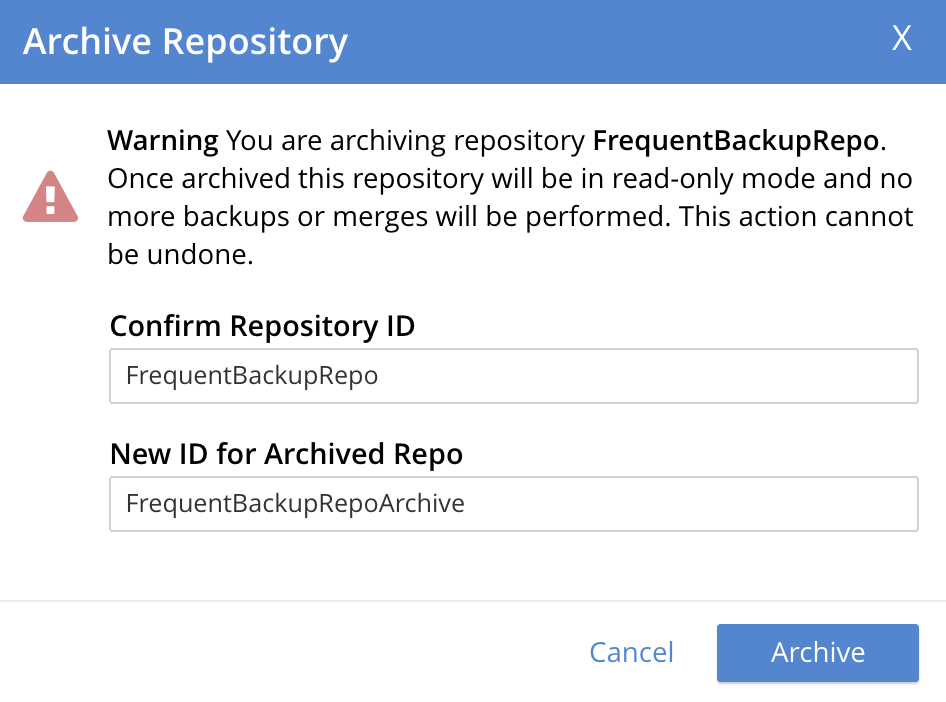
Left-click on Archive, to confirm. The dialog now disappears.
-
Check the archived repository, in the Repositories view of the Backup screen, in the Archived panel. This now appears as follows:

Left-click on the row for the archived repository, to expand the row, and reveal details and options:
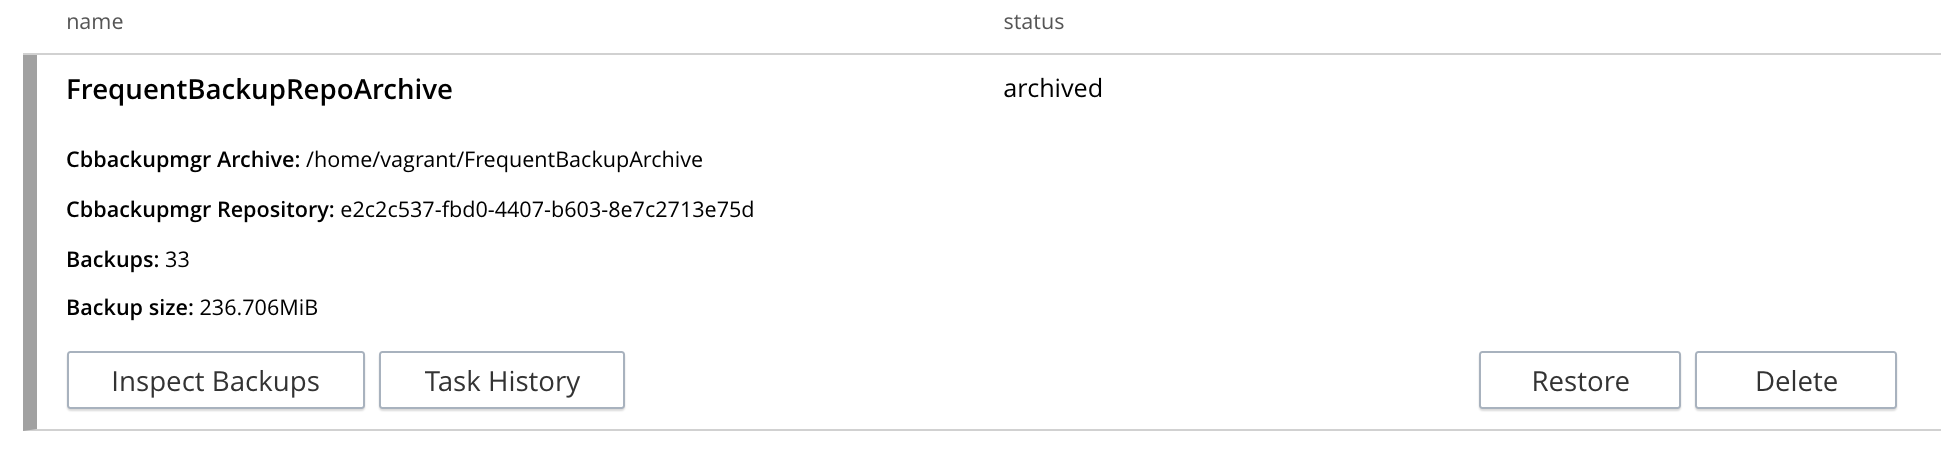
The backups within and tasks used for the repository can be examined by means of the Inspect Backups and Tasks buttons. The Restore button brings up the same dialog as described above, in Restore Backups. The Delete button is described immediately below, in Delete Repositories.
Delete Repositories
Repositories can be deleted. However, no repository can be deleted until it has been archived, as described above, in Archive Repositories.
Therefore, to delete a repository, and the backups it contains, proceed as follows:
-
Archive the repository, as described in Archive Repositories.
-
Access the archived repository, in the Archived Repositories panel that appears in the Repositories view of the Backup screen, and open the row for the repository, by left-clicking on it.
-
Left-click on the Delete button. The Delete Repositories dialog now appears:
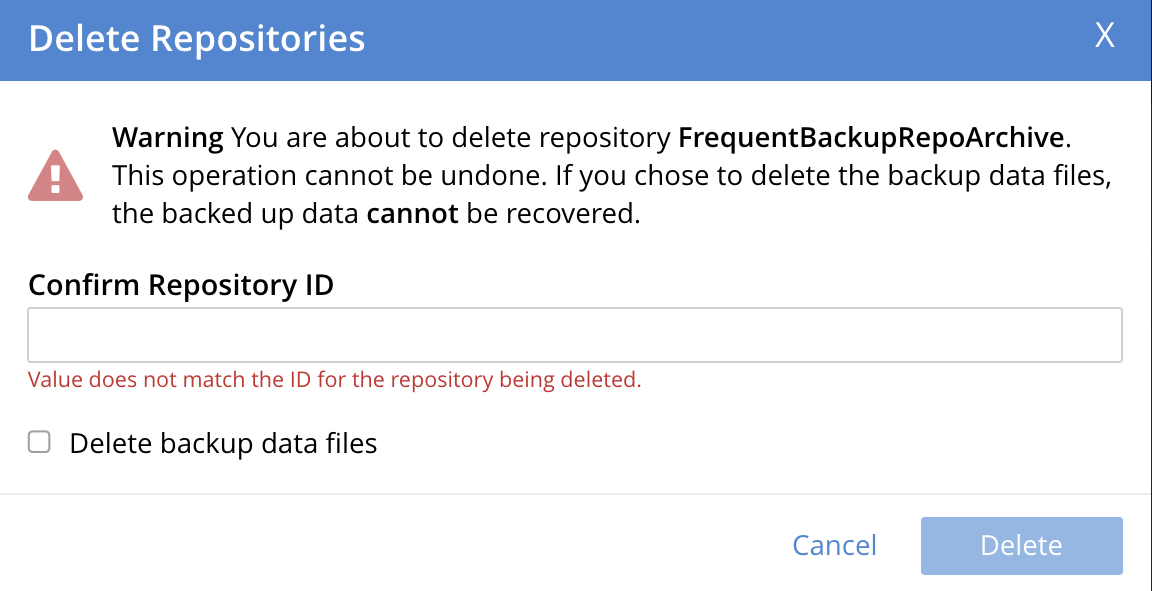
The dialog provides two options for deletion. If the Delete backup data files checkbox is checked, the deletion is irreversible: the archived information no longer exists on disk. If the checkbox is unchecked (which is the default), the deleted archive’s contents continue to exist on disk, even though no longer explicitly tracked by the Backup Service, and so can be recovered subsequently; as described below, in Import Repositories.
To delete the archive while allowing the contents to continue to exist on disk, enter the name of the archive in the Confirm Repository ID field, leave the Delete backup data files checkbox unchecked, and left-click on Delete. Subsequently, the archived repository is no longer maintained by the Backup Service, and no longer appears in the Archived Repositories panel.
Import Repositories
A repository not currently managed by the Backup Service can be imported into the service, by means of the Backup UI. For example, a repository that was archived and subsequently deleted can be imported back into the service, provided that its on-disk files were not explicitly deleted (see Delete Repositories, above, for information on deleting repositories while preserving on-disk files).
To import a repository, proceed as follows:
-
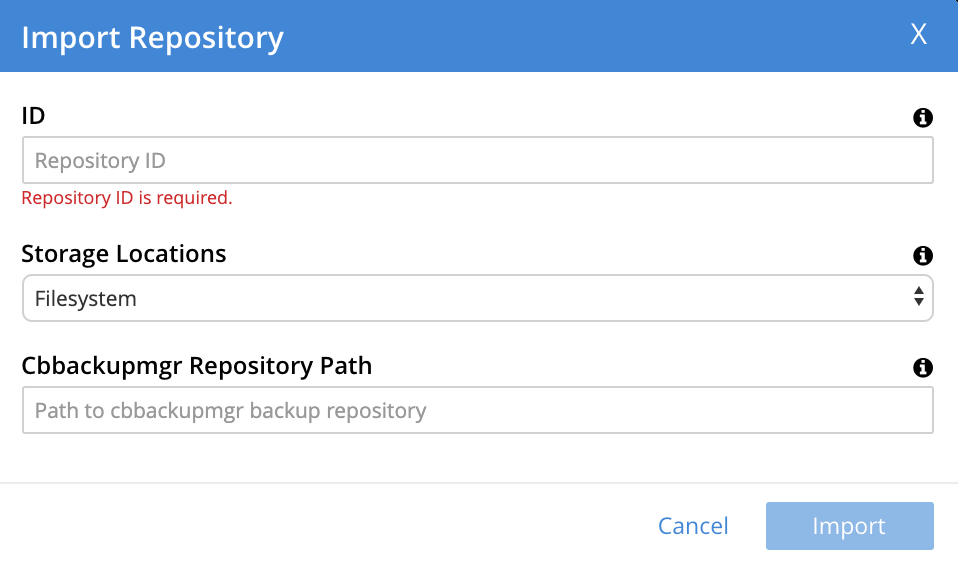
Left-click on the IMPORT tab, at the upper right of the Repositories view of the Backup screen:

This brings up the Import Repository dialog, which appears as follows:
-
Enter appropriate details into the Import Repository dialog.
In the ID field, enter a name for the repository, which will be used once the repository has been imported. The name must be unique across the cluster, can only use the characters
[,],AtoZ,atoz,_and-; and must not start with either_or-.The Storage Location can be specified as Filesystem (the default) or Cloud. For the current example, Filesystem will be used. Note that if Cloud is selected, allowing AWS S3 storage to be used, the dialog expands, and displays additional options: these are described below, in Use Cloud Storage.
In the Cbbackupmgr Repository Path, enter the path of the repository to be imported. If necessary, locate on disk the folder within which the repository resides:
Locate the repository within its parent folder, and make a copy of the repository name:

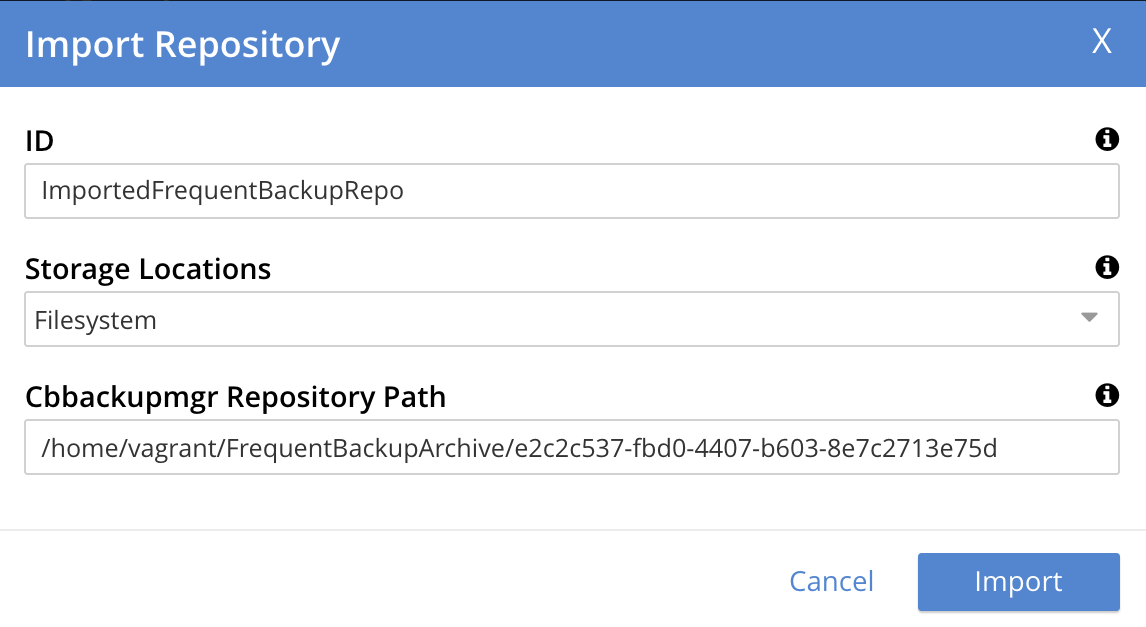
Then, specify the repository name as part of the full file path. The Import Repository dialog now appears as follows:
-
Left-click on the Import button, at the lower right of the dialog. The dialog disappears, and the repository is imported.
-
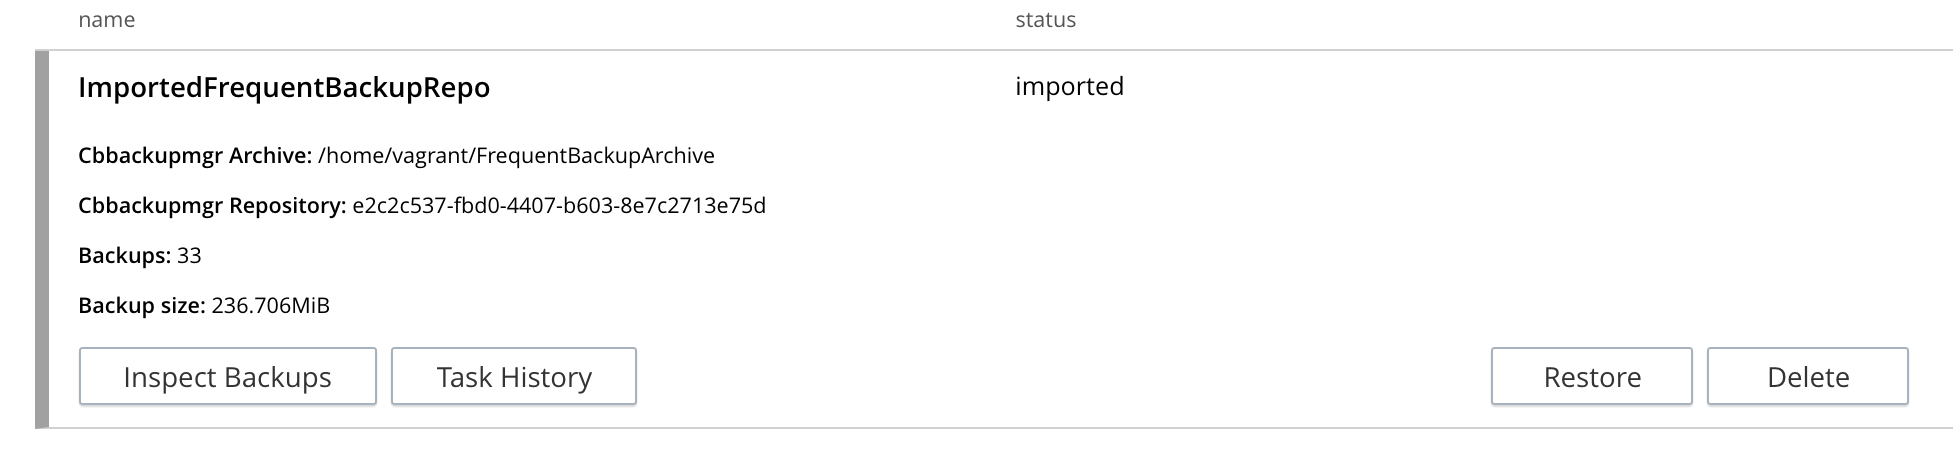
Check the results of the import operation. Access the Repositories view of the Backup screen, and observe the Imported Repositories panel:

For further details, left-click on the row to make it expand vertically:
Inspect Plans
All plans created for the Backup Service can be reviewed, by left-clicking on the Plans tab, on the upper, horizontal navigation bar of the Backup screen:

This displays the Backup screen’s Plans view:

The plan displays, in the name column, the name of every current plan; under the instances column, an integer that represents the number of repositories maintained by means of the plan identified on the current row; and under services, the Couchbase Services whose data is handled by the plan.
To inspect a plan in detail, left-click on its row, to make the row expand vertically. For example:

The displayed details indicate that HourlyBackupPlan contains two tasks: the HourlyBackupTask performs a task of type BACKUP every hour; while the FourthHourMergeTask performs a task of type MERGE every 4 hours, merging all backups from the current day to two days ago..
At the right-hand side of each row, a garbage-can icon is displayed. To delete a plan, left-click on the icon on the row of the plan to be deleted: the plan is deleted immediately, and no longer appears on the Plans screen. (Note that a plan cannot be deleted until all repositories using it are archived or themselves deleted.)
Default Plans
The Backup Service provides two plans by default, which are _daily_backups and _hourly_backups:
-
The _daily_backups plan backs up data for all services, every day. A full backup is performed on Monday, and an incremental on each other day. The previous weeks' backups are merged every Sunday, and the previous 28 days' backups are merged every 28 days.
-
The _hourly_backups plan backs up data for all services, ever hour. Every backup is incremental. Each day at midnight, all the previous days' backups are merged. The previous week’s backups are merged every Sunday, and the previous 28 days' backups are merged every 28 days.
Review Scheduling-Options
Backup-Service scheduling options are provided per task, on the Select Plan dialog; which is provided as part of the sequence for repository-definition, after the administrator has left-clicked on the ADD REPOSITORY tab, at the upper right of the Repositories view of the Backup screen. See Schedule Backups, for details.
The task-definition panel provided for each task appears by default as follows:
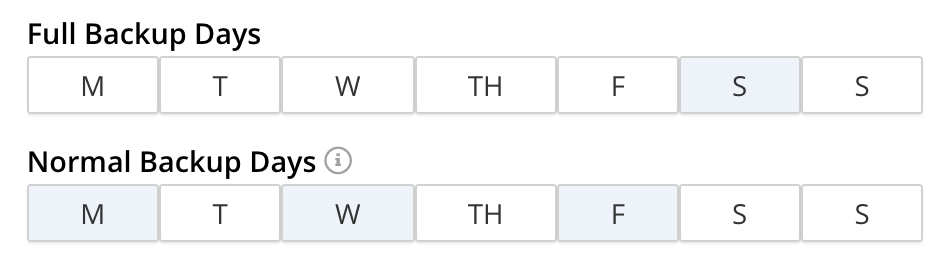
The default, Weekly Calendar option refers to use of the two, interactive, days-of-the-week selectors that appear under Full Backups and Normal Backups (a normal backup being an incremental backup). The day-by-day frequency of each kind of backup can thus be determined by left-clicking on the appropriate days. For example, the following selection would indicate that a full backup should occur on Saturday, every week; and an incremental build should occur every week on each of the following days: Monday, Wednesday, and Friday.
A Weekly Calendar schedule means that one backup happens daily. The time of the daily backup can be specified by means of the Time panel. No merge can be scheduled, nor can backups be scheduled more frequently.
Alternatively scheduled merges and backups can be configured by accessing the control at the left-hand side of the Period field:

The pull-down menu thus displayed contains three kinds of scheduling option. One is the default, Weekly Calendar. Another is by means of time-units: which are Minutes, Hours, Days, and Weeks. If a unit is specified, an appropriate integer must be entered into the Frequency field, to indicate the number of time-units that must elapse between repetitions of the task. If Minutes are specified, only the minutes portion of the time entered into the Time field is used — as the starting point, every hour, for the task sequence; with the task being repeated throughout the hour as many times as specified in the Frequency field. If Hours are specified, the task is first performed at the time specified in the Time field, and then repeated as specified in the Frequency field. If Days or Weeks are specified, the task is performed as scheduled, at the time specified in the Time field. (A full example of using Minutes as time-units is provided above, in Schedule Backups.)
A third option is by means of days: such as Monday, Tuesday, and so on. If a day is selected, an appropriate integer must be entered into the Frequency field, to indicate the number of instances of the day’s occurrence that should elapse before the task is performed. For instance, if Monday and 3 are specified, the task is performed on the first Monday, then two Mondays elapse, and then the task is performed again on the fourth Monday; and so on. The time at which the task is commenced is that specified in the Time field.
Use Cloud Storage
Cloud storage can be used for backups. However, cloud storage cannot be used for merges. If a merge is scheduled for cloud storage, the Backup Service skips the task. An immediate merge cannot be triggered for cloud storage.
During the input-sequence for repository-creation, storage for the repository can be specified. See Schedule Backups, for an example of using the local filesystem. Alternatively, cloud storage can be selected, from the Storage Locations field of the Select Plan dialog. When the selection is made, press Next, and the dialog expands as follows:
-
Fill in a unique
IDfor the Repository ID. -
Select the
Bucketfor the backup. -
For the
Storage Locations, selectCloudfrom the drop-down list. The dialog will expand to show the cloud options. -
Fill in the location of the
Staging Directory. This is the local location that will be used to store temporary data whilst the backup is in operation. Generally, the staging area should be large enough to hold 10% of your dataset (the minimum amount should be 50 GB). -
Depending on the
Provideryou select from the drop-down list (AWS,Azure, orGCP), you will have a number of different option: with AWS and Azure, you can simply fill in the presented dialog box with the cloud service details; GCP will require you to obtain credentials from the Google service, which you then use to fill in the dialog. Both options are presented below.
-
AWS / Azure
-
GCP
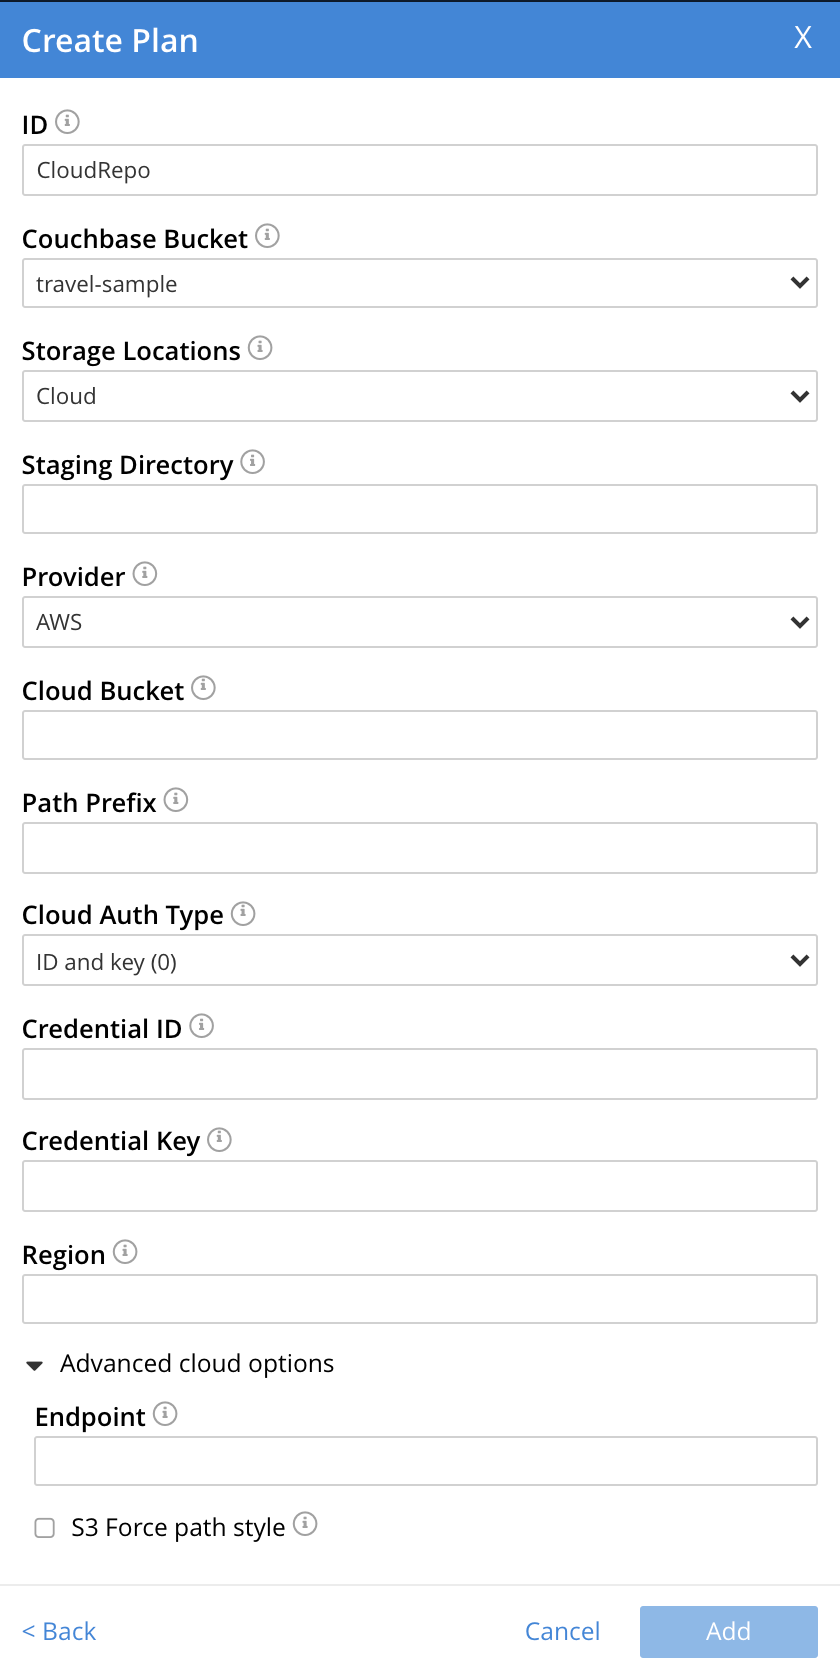
The fields are as follows:
- Staging Directory
-
A directory on the local file system that is large enough to accommodate approximately 10% of the data set that is to be backed up. A minimum of 50 GB is recommended. The pathname of the location must be accessible to all nodes in the cluster that are running the Backup Service, but the location itself must not be shared by NFS or any equivalent protocol. Instead, the location must be a non-shared directory on the local file system for the node.
- Provider
-
To use either S3 or S3-compatible storage, select AWS.
- Cloud Bucket
-
The bucket in the cloud to which data will be backed up.
- Path Prefix
-
The path of the archive, within the cloud bucket. This should take the form
/path/inside/the/bucket. - Cloud Auth Type
-
The type of authentication to be used when communicating with the cloud provider. The options are ID and key (which means that an ID and key will indeed be required for communication to be successful) and Instance metadata service (which means that credentials will be sought from the metadata service running in the node’s virtual machine). Each option assumes that appropriate configuration procedures for the cloud environment have been followed.
- Credential ID
-
The credential ID for the store. For AWS, this is the access key id. If Instance metadata service has been specified as the value for Cloud Auth Type, this field is inapplicable and is no longer displayed.
- Credential Key
-
The secret key for the store. For AWS, this is the AWS secret access key. If Instance metadata service has been specified as the value for Cloud Auth Type, this field is inapplicable, and is no longer displayed.
- Region
-
The AWS Region for the repository. For example,
us-east-1,us-west-2.
Under Advanced cloud options, the Endpoint field accepts an optional endpoint, used to connect to AWS; and overriding the endpoint used by the cloud-provider.
If checked, the S3 Force path style checkbox ensures that the AWS path style used is the earlier (rather than the more recent, which is not supported by all S3 compatible object stores).
Before setting up the GCP cloud backup, you will first need to get an Oauth token and a refresh token associated with your GCP service. To do this, follow these steps.
-
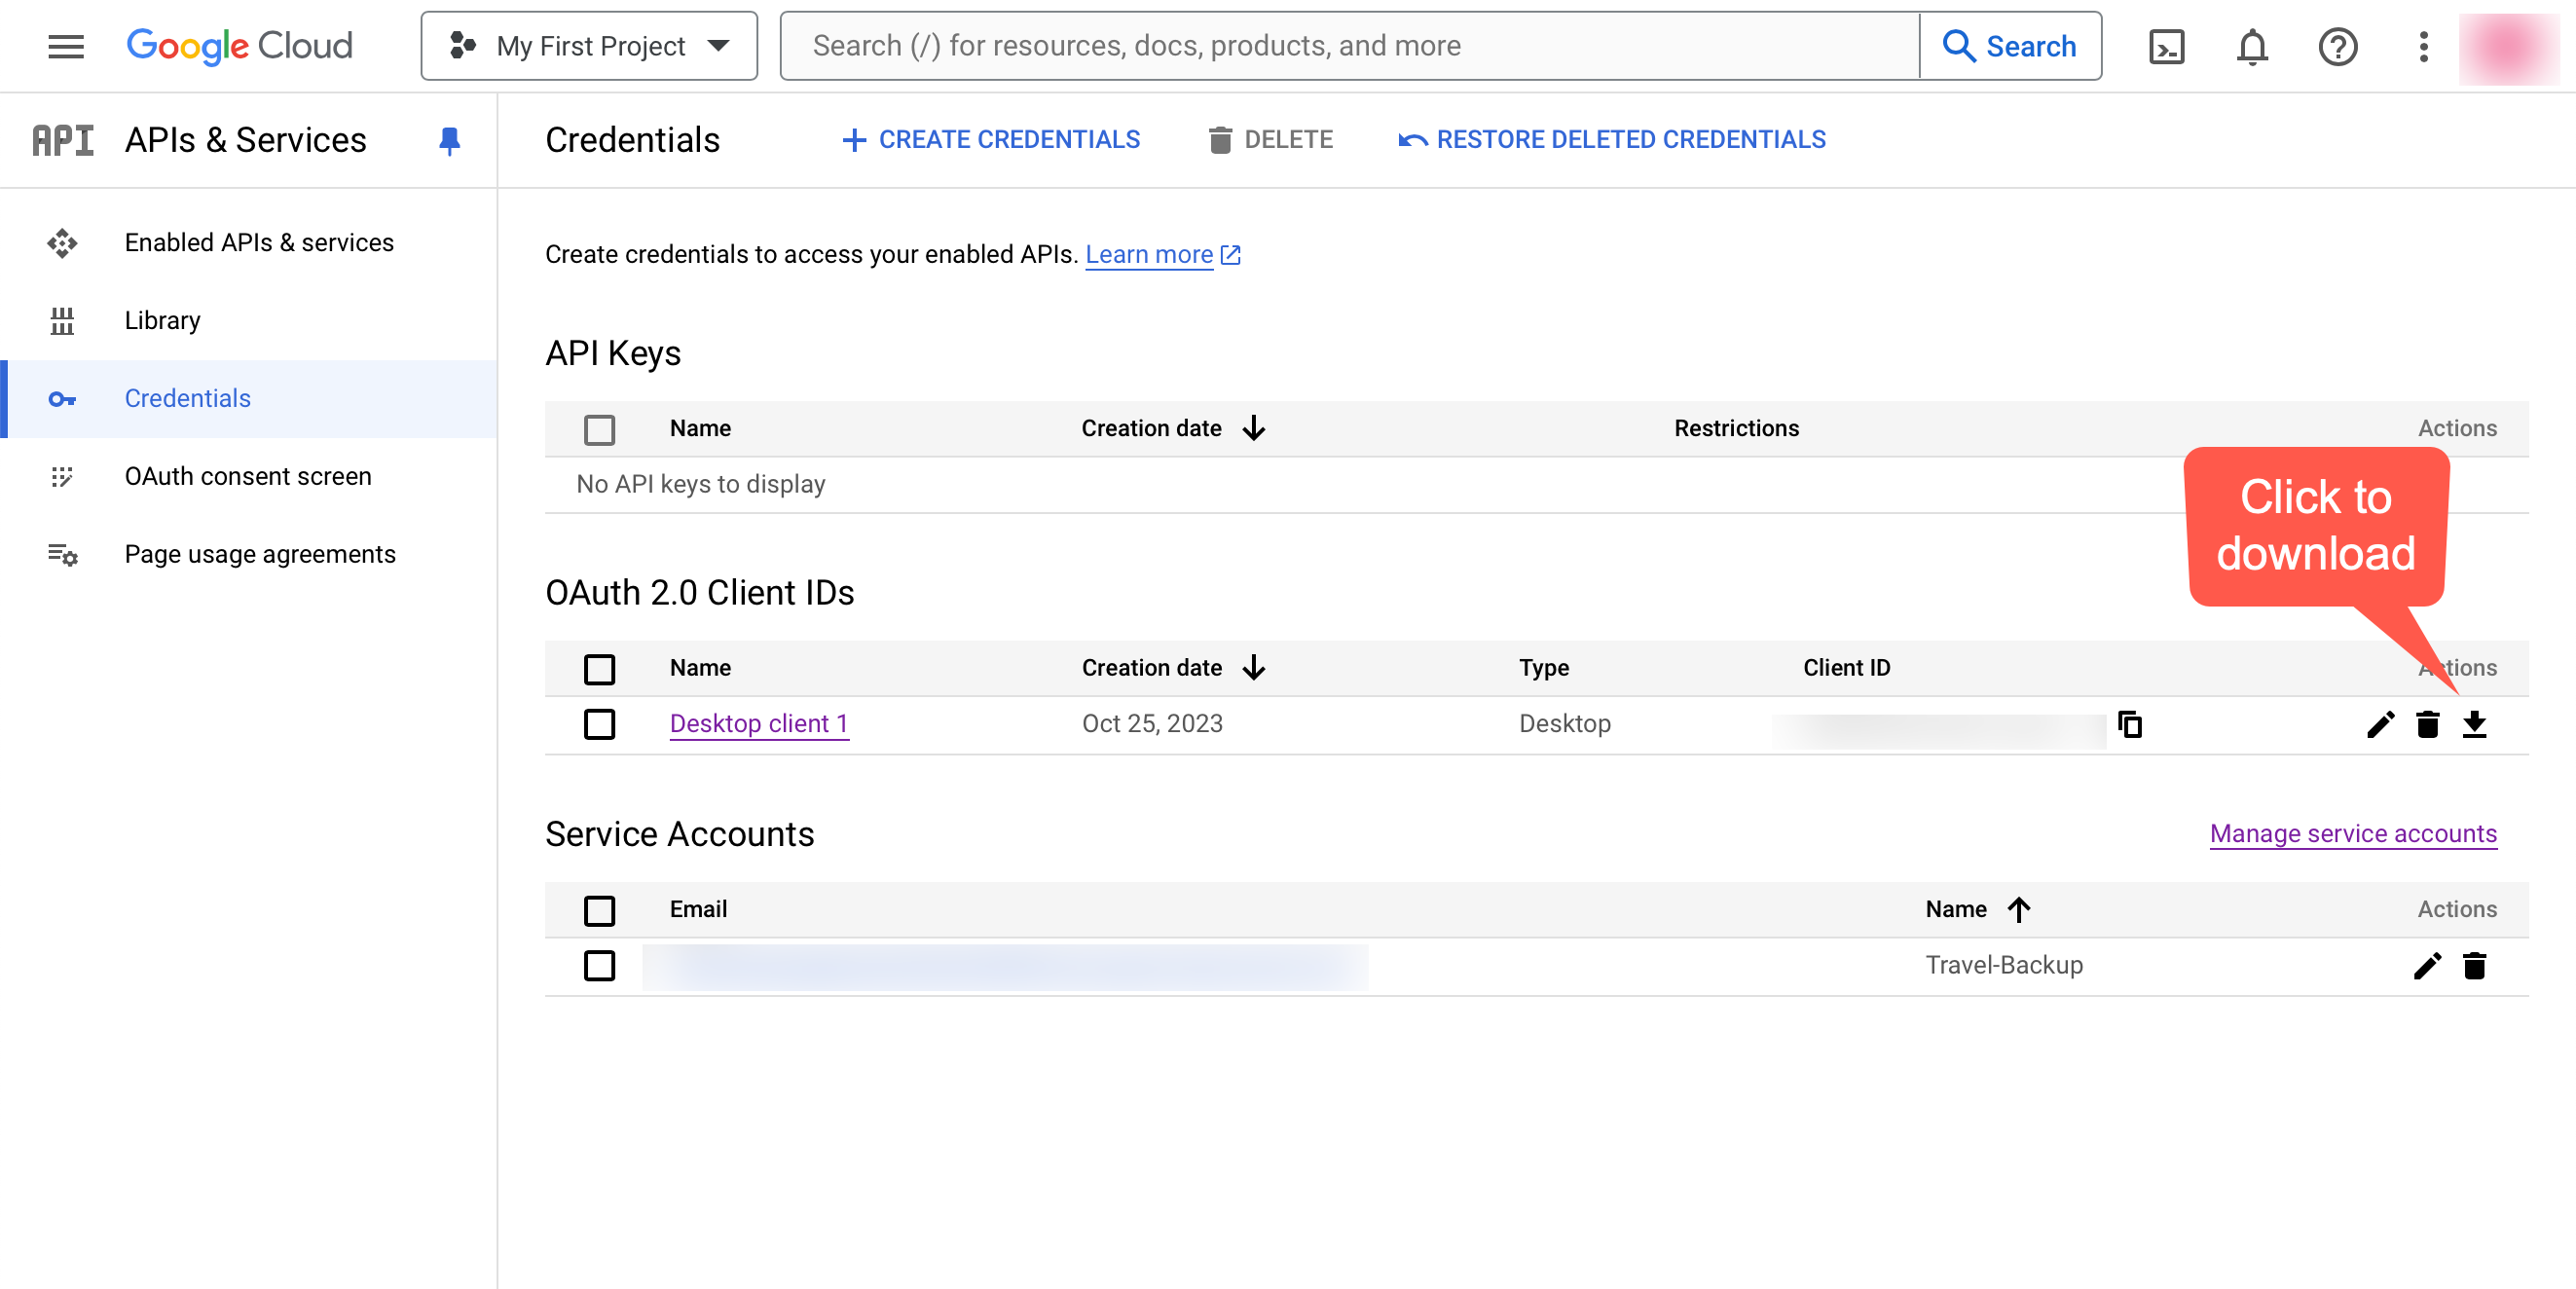
Retrieve the client id and the client secret.
-
Access the console under your GCP account, select
-
Create an`Oauth` token for use with the Couchbase backup service.
-
Create a service account for use with the Couchbase backup service.
-
Select the Oauth Client ID you wish to use and click the Download link. From the resulting dialog, download the JSON file which contains the client ID and the client secret. The file contains the client information you will need for the next step:
{
    "installed": {
        "client_id": "<client_id>",
        "project_id": "<project_id>",
        "auth_uri": "https://accounts.google.com/o/oauth2/auth",
        "token_uri": "https://oauth2.googleapis.com/token",
        "auth_provider_x509_cert_url": "https://www.googleapis.com/oauth2/v1/certs",
        "client_secret": "<client_secret>",
        "redirect_uris": [
            "http://localhost"
        ]
    }
}
-
-
Retrieve the
OAUTHcredentials.Use the
client_idand theclient_secretobtained in the previous section as parameters in a shell command that will return the refresh token for the backup service. This involves interrogating the GCP service to extract a refresh token for your OAuth client ID.-
Create a shell script containing the following commands:
CLIENT_ID= "<client_id>" CLIENT_SECRET="<client_secret>" SCOPE="https://www.googleapis.com/auth/devstorage.read_write" ENDPOINT="https://accounts.google.com/o/oauth2/v2/auth" URL="$ENDPOINT?client_id=$CLIENT_ID&response_type=code&scope=$SCOPE&access_type=offline&redirect_uri=http://localhost:12345" open $URL -
Save the script with a
.shextension (e.g.,oauth.sh) -
Execute the
chmodcommand to make the script executable.chmod u+x ./oauth.sh -
Now execute the script.
./oauth.shThe script will open your default browser; you can copy the
oauthcredential from the string in the browser URL input field.You may need to click through a few pages, until you see https:localhost:12345in the URL field.
Copy the string denoted by the
codefield for use in the next section.
-
-
Generate the Refresh Token
Now, you will create a short shell script, using te oauth credentials you retrieved in the previous section.
-
Create a new shell script for generating the refresh token.
CLIENT_ID= "<client_id>"
CLIENT_SECRET= "<client_secret>"
AUTH_CODE= "<oauth_code>"
curl -s -X POST https://www.googleapis.com/oauth2/v4/token --data-urlencode "client_id=$CLIENT_ID" --data-urlencode "client_secret=$CLIENT_SECRET" --data-urlencode "code=$AUTH_CODE" --data-urlencode "redirect_uri=http://localhost:12345" --data-urlencode "grant_type=authorization_code"
Fill in the
client_idand the theclient_secretyou retrieved from this section, and theoauthtoken you generated here. -
Save the script with an
.shextension (e.g.,refresh.sh). -
Execute the
chmodcommand to make the script executable.chmod u+x ./refresh.sh -
Execute the script.
./refresh.shYou will receive a response written to the console that contains the refresh token. Make a note of the refresh token.
{ "access_token": "xxxxxxxxxxxxxxxxxxxxxxxxxxxxxxxxxxxx", "expires_in": 3599, "refresh_token": "xxxxxxxxxxxxxxxxxxxxxxxxxxxxxxxxxxx", "scope": "https://www.googleapis.com/auth/devstorage.read_write", "token_type": "Bearer" } -
Use the information gathered above to fill in the cloud service plan details.
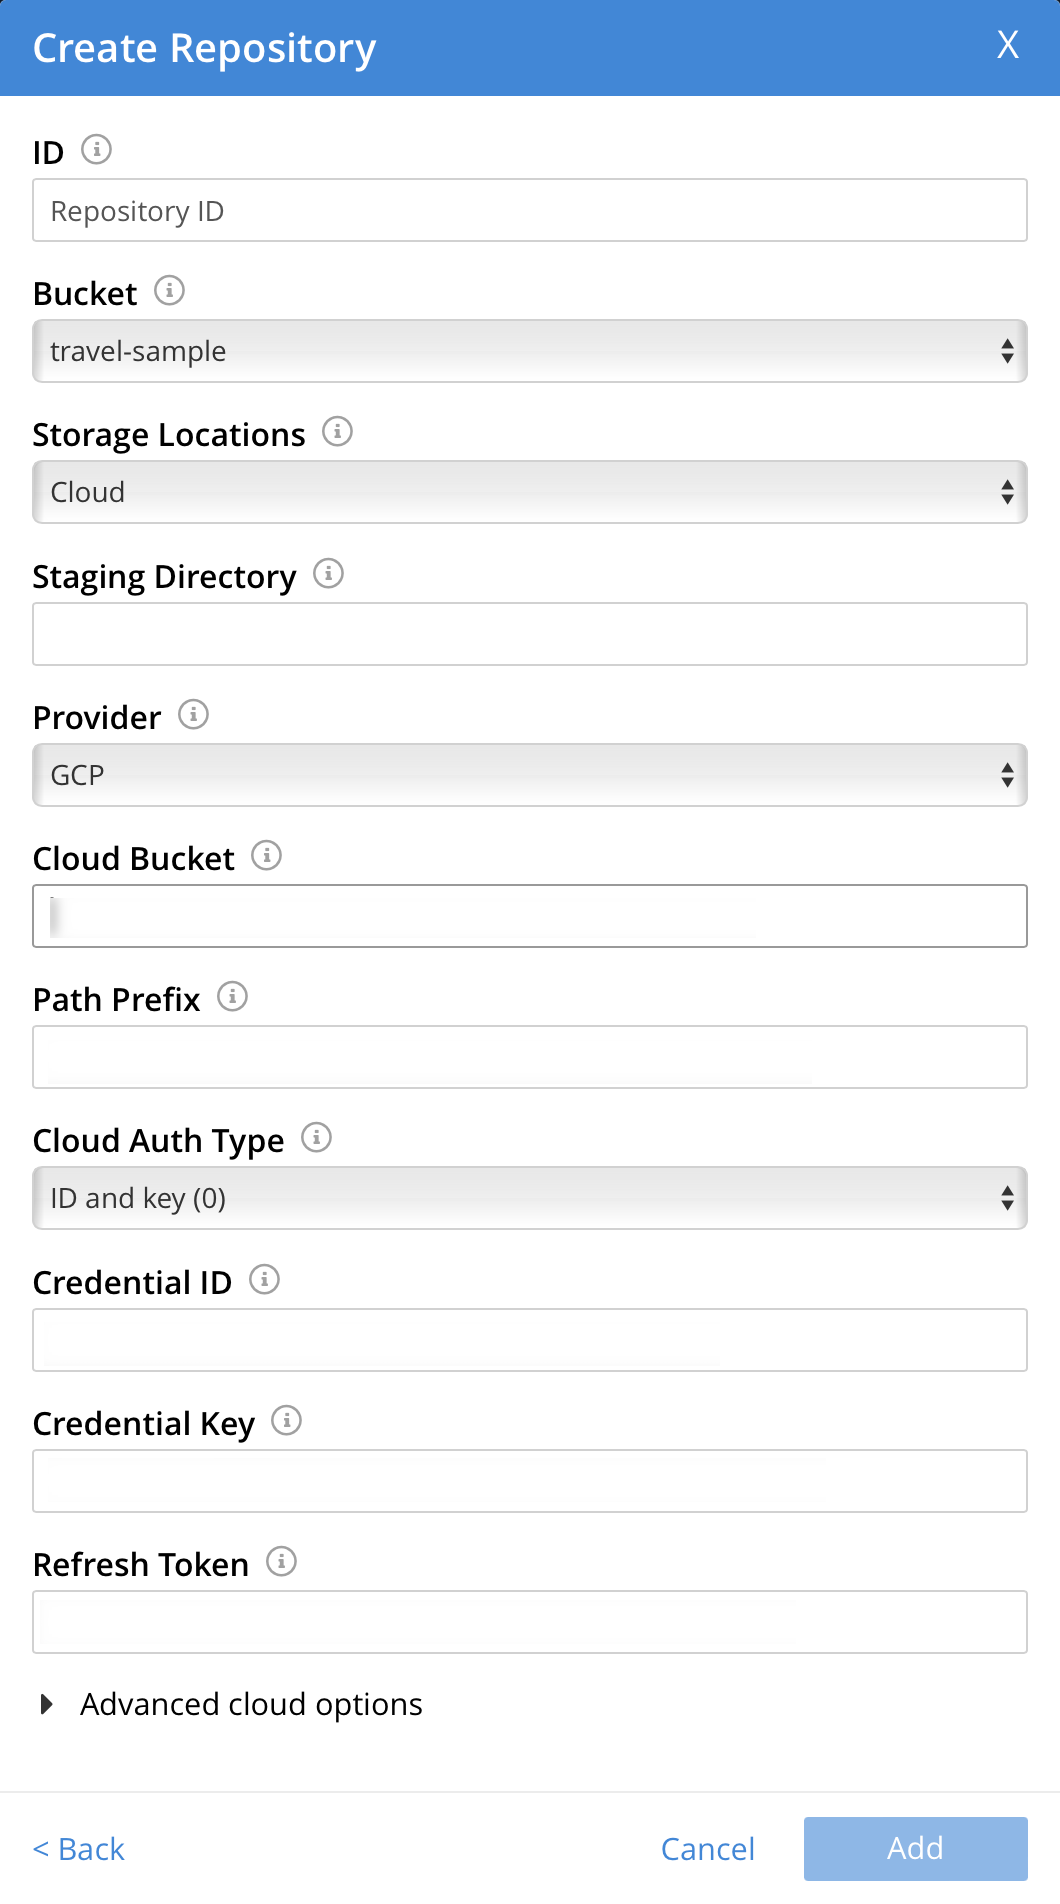
- ID
-
A unique name assigned to the backup repository.
- Bucket
-
The name of the bucket you wish to back up.
- Storage Location
-
This should remain set to
cloudfor cloud storage. - Staging Directory
-
A directory on the local file system that is large enough to accommodate approximately 10% of the data set that is to be backed up. A minimum of 50 GB is recommended.
- Provider
-
This should remain set as
GCP. - Cloud Bucket
-
The name of the bucket on the
GCPservice you’re backing up to. - Cloud Auth Type
-
This can be either
ID and KeyorInstance Metadata Service.For the
Instance Metadata Serviceyou will need to configure your GCP VM service account so that the VM instance can read and write to the cloud storage bucket.You will require a different set of options depending on which one cloud authentication type you choose:
IdandKeyMetadata Service
If you’re using a GCP virtual machine to hold your backup, then you can make use of the GCP VM service account with the
Metadata Serviceauthorization type.-
Ensure that the service account that are using on Google Cloud has
Access scopesset toSet access for each API.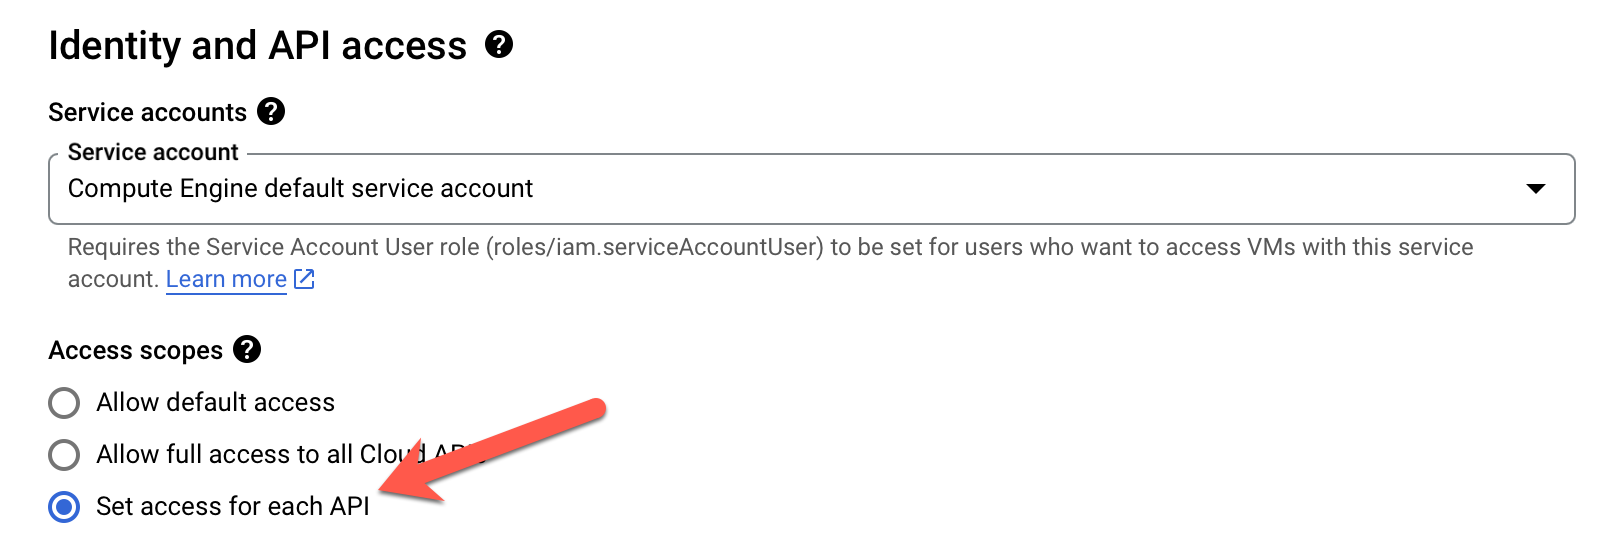
-
When
Access scopesset, you will be provided with a list of scopes which can be changed to set the value for each of the GCP scopes. Ensure that you have changed theStoragescope toRead/Write.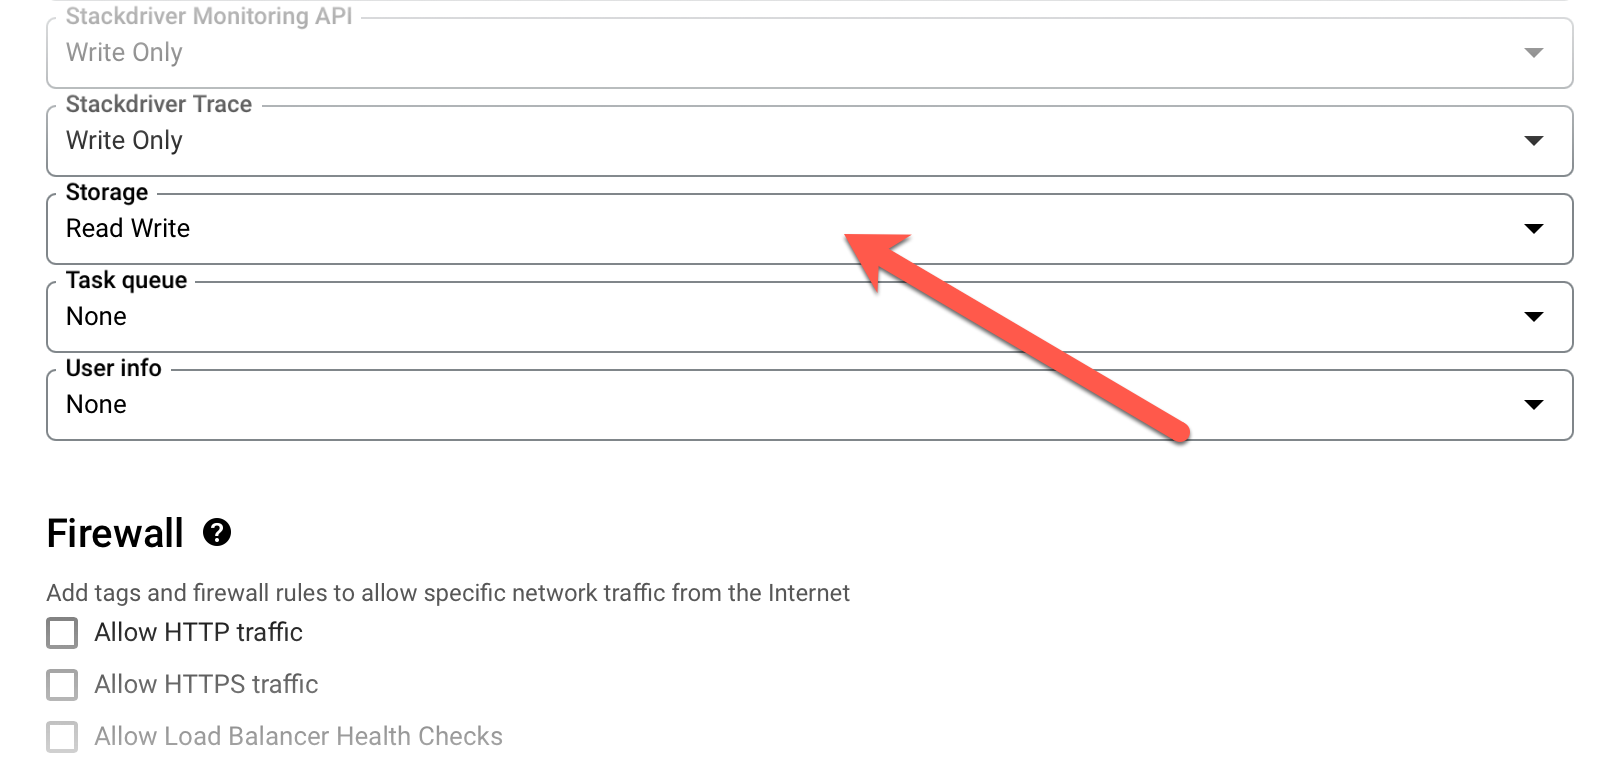
-
-
Using the REST API
The Backup Service can be configured and used by means of the REST API. For reference pages on each supported endpoint, see Backup Service API.