General
General settings allow configuration of cluster name, memory quotas, storage modes, and node availability for the cluster; and of advanced settings for the Index and Query Services.
Examples on This Page
Full and Cluster Administrators can configure general settings by means of Couchbase Web Console, the CLI, or the REST API.
Configure General Settings with the UI
The appearance of the General screen is as follows:

The panels and their UI elements are described below.
Cluster Name
The Cluster Name is the name that was given during initial setup. This name can be changed at any time. The interactive field appears as follows:

Memory Quotas
The amount of memory available to each service, on every node. The combination of assigned values is not permitted to exceed the total memory available on the most memory-constrained node.
The panel appears as follows:
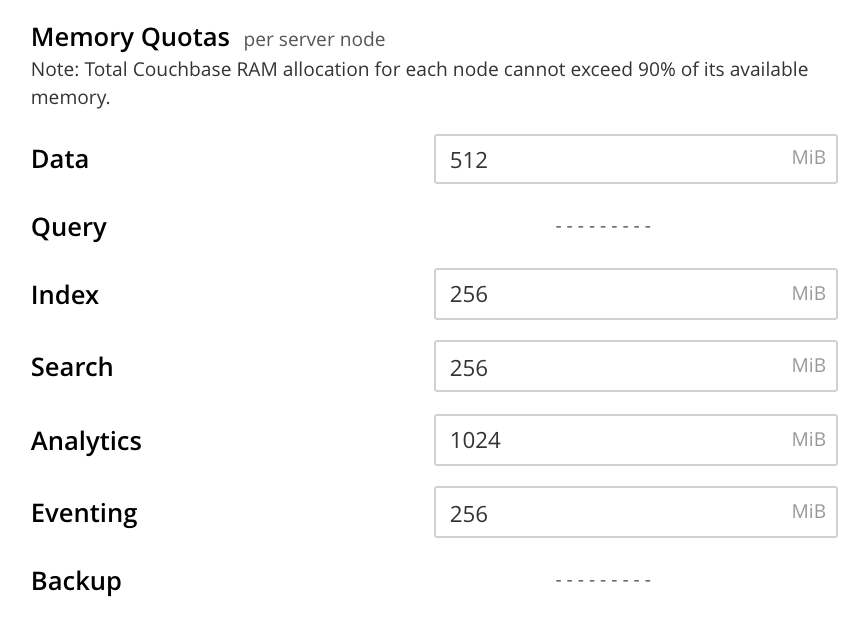
The displayed, configurable options are:
-
Data Service. The memory allocation for the Data Service, per node. The minimum allocation must be equal to or greater than the sum of all per bucket memory-allocations on the node.
-
Index Service. The buffer cache size for the Index Service. The specified amount of memory is pre-allocated as soon as the Index Service starts up. It is then shared with all indexes created on the node. The total memory-usage of the indexer process will be the buffer cache size plus the size of various internal data structures and queues.
-
Search Service. The memory allocation for the Search Service, per node.
-
Analytics Service. The memory allocation for the Analytics Service, per node.
-
Eventing Service. The memory allocation for the Eventing Service, per node.
Note that neither the Query Service nor the Backup Service requires memory-allocation.
Current Version
This panel displays the current version of Couchbase Server, and can be used to indicate whether updates are available. It appears as follows:
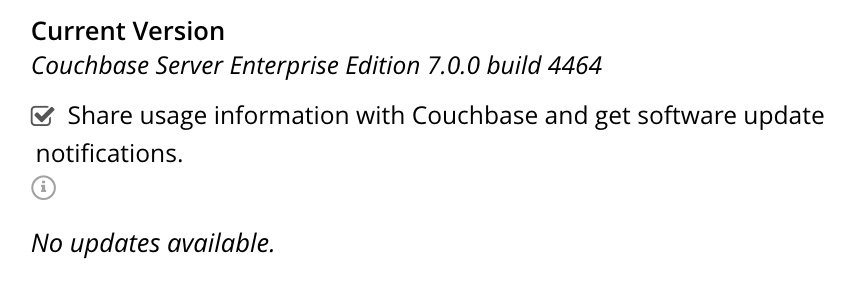
The Share usage information with Couchbase and get software update notifications checkbox is checked by default: this means that Couchbase Web Console will display adjacent notifications whenever a new version of Couchbase Server is available. If the checkbox is unchecked, notifications are not provided.
Additionally, if the checkbox is checked, Couchbase Web Console communicates with Couchbase Server to ascertain the following information, which is then transmitted to Couchbase:
-
The server-version of the current installation.
-
Information about data-size and performance.
-
The cluster-configuration, including which services are deployed.
Note that data is transmitted to Couchbase from the browser accessing the web console, not from the cluster itself. The update-notification process works anonymously: data cannot be tracked. No identifiable information (such as bucket names, bucket data, design-document names, or hostnames) is transmitted.
Node Availability
The options in the Node Availability panel control whether and how Automatic Failover is applied. For detailed information on policy and constraints, see Automatic Failover.
The panel appears as follows:
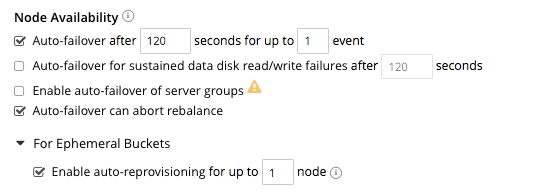
The following checkboxes are provided:
-
Enable auto-failover after x seconds for up to y event: After the timeout period set here as x seconds has elapsed, an unresponsive or malfunctioning node is failed over, provided that the limit on actionable events set here as y has not yet been reached. Data replicas are promoted to active on other nodes, as appropriate. This feature can only be used when three or more nodes are present in the cluster. The number of seconds to elapse is configurable: the default is 120; the minimum permitted is 5; the maximum 3600. This option is selected by default.
-
Enable auto-failover for sustained data disk read/write failures after z seconds: After the timeout period set here as z seconds has elapsed, a node is failed over if it has experienced sustained data disk read/write failures. The timeout period is configurable: the default length is 120 seconds; the minimum permitted is 5; the maximum 3600. This checkbox can only be checked if Enable auto-failover after x seconds for up to y event has also been checked.
-
Enable auto-failover of server groups: Server-group failover is enabled. This checkbox (which can only be checked if Enable auto-failover after x seconds for up to y event has also been checked) should only be checked if three or more server groups have been established, and capacity is available to absorb the combined load of all potentially failed-over groups. For information on groups, see Server Group Awareness.
-
Can abort rebalance. Whether a rebalance, in progress at the time the node become unresponsive, can be aborted; in order to perform the auto-failover. This option is selected by default. For further information, see Auto-Failover During Rebalance.
The Node Availability panel also contains a For Ephemeral Buckets option. When opened, this provides an Enable auto-reprovisioning checkbox, with a configurable number of nodes. Checking this ensures that if a node containing active Ephemeral buckets becomes unavailable, its replicas on the specified number of other nodes are promoted to active status as appropriate, to avoid data-loss. Note, however, that this may leave the cluster in an unbalanced state, requiring a rebalance.
Auto-Failover and Durability
Couchbase Server provides durability, which ensures the greatest likelihood of data-writes surviving unexpected anomalies, such as node-outages. The auto-failover maximum should be established to support guarantees of durability. See Durability, for information.
Rebalance Settings
Rebalance redistributes data, indexes, event processing, and query processing among available nodes. For an overview, see Rebalance. Fully open, the panel appears as follows:
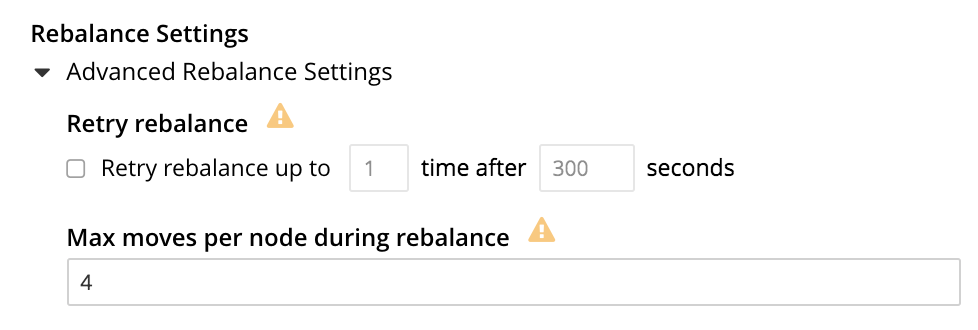
The Retry rebalance option allows rebalance to be retried, in cases where it has failed. Check the checkbox, to enable. The specifiable, maximum number of retries must be in the range of 1 to 3, inclusive. The specifiable, maximum number of seconds must be in the range of 5 to 3600, inclusive.
Note that this option should not be enabled if the cluster is managed by Couchbase Autonomous Operator, or if custom scripts are already being used to trigger rebalance. Note also that no administrative tasks should be attempted when rebalance-retries are pending. However, pending rebalance-retries can be cancelled: see Automated Rebalance-Failure Handling, for information.
The Max moves per node during rebalance option establishes the maximum number of concurrent vBucket moves permitted on every individual node.
The minimum value for the parameter is 1, the maximum 64, the default 4.
For information, see Limiting Concurrent vBucket Moves.
Data Settings
The settings in this area control the numbers of threads that are allocated per node by Couchbase Server to the reading and writing of data, respectively. The maximum thread-allocation to each is 64, the minimum 4.
A high thread-allocation may improve performance on systems whose hardware-resources are commensurately supportive (for example, where the number of CPU cores is high). In particular, a high number of writer threads on such systems may significantly optimize the performance of durable writes: see Durability, for information.
Note, however, that a high thread-allocation might impair some aspects of system-performance on less appropriately resourced nodes. Consequently, changes to the default thread-allocation should not be made to production systems without prior testing.
Left-clicking on the Advanced Data Settings tab displays radio buttons for Reader Thread Settings and Writer Thread Settings:
| The Reader Thread Settings and the Writer Thread Settings only apply to disk-based buckets. Changing these setting will have no effect on clusters that contain only ephemeral (memory-based) buckets. |
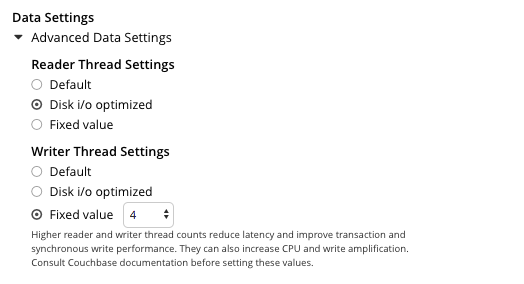
Each group has the same, three radio buttons, which are as follows:
-
Default. The number of threads allocated is set to a balanced value which is reasonable for most workloads.
-
Disk i/o optimized. The number of threads allocated is equal to the number of CPU cores for the node.
-
Fixed value. The number of threads allocated is equal to the value selected from the pull-down menu.
A good rule of thumb is to set each of readers and writers equal to the queue depth of the underlying IO subsystem (i.e. readers = queue_depth and writers = queue_depth).
However, for best performance it is recommended to benchmark with different settings and pick the one that best meets the throughput and latency requirements in your environment.
Query Settings
Left-clicking on the Advanced Query Settings tab displays interactive fields whereby the Query Service can be configured. The top section of the panel appears as follows:
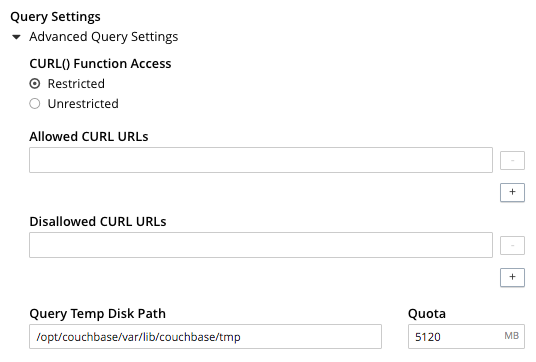
Specify either Unrestricted or Restricted, to determine which URLs are permitted to be accessed by the curl function.
If Unrestricted (the default) is specified, all URLs can be accessed.
If Restricted is specified, the UI expands, to display configurable fields into which the URLs allowed and disallowed can be entered.
The Query Temp Disk Path field allows specification of the path to which temporary files are written, based on query activities. The maximum size of the target can be specified, in megabytes.
Additional Query settings are provided in the lower section of the panel:
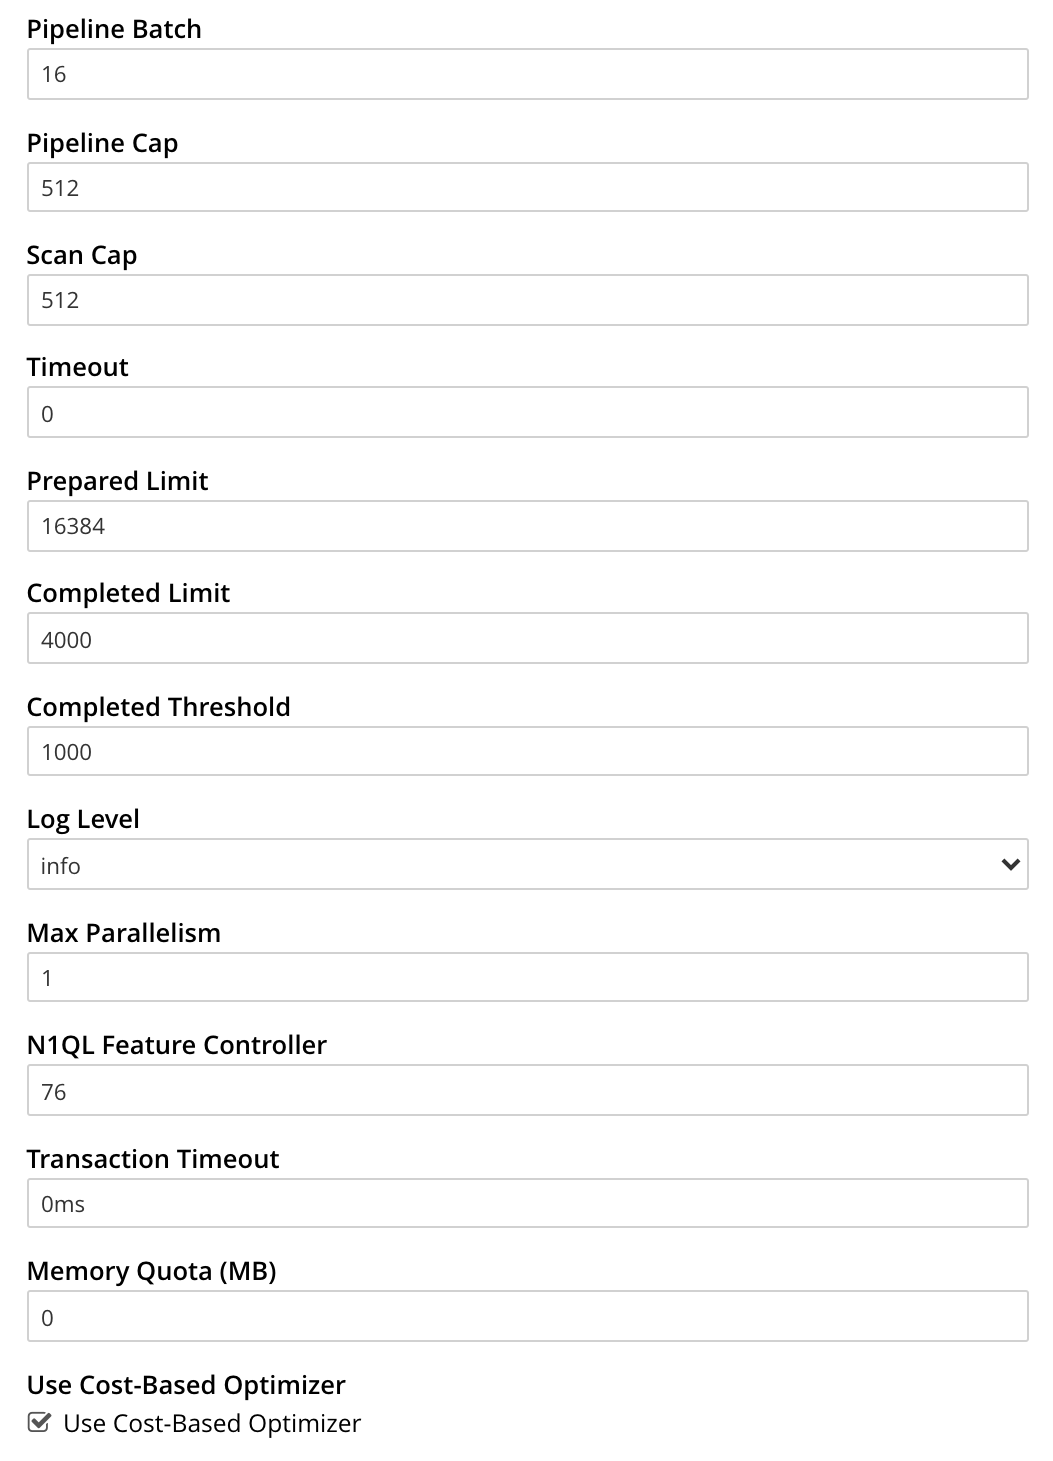
-
Pipeline Batch: The number of items that can be batched for fetches from the Data Service.
-
Pipeline Cap: The maximum number of items that can be buffered in a fetch.
-
Scan Cap: The maximum buffered channel size between the indexer client and the Query Service, for index scans.
-
Timeout: The maximum time to spend on a request before timing out.
-
Prepared Limit: The maximum number of prepared statements to be held in the cache.
-
Completed Limit: The number of requests to be logged in the completed requests catalog.
-
Completed Threshold: The completed-query duration (in milliseconds) beyond which the query is logged in the completed requests catalog.
-
Log Level: The log level used in the logger.
-
Max Parallelism: The maximum number of index partitions for parallel aggregation-computing.
-
N1QL Feature Controller: Provided for technical support only.
-
Transaction Timeout: The number of milliseconds to elapse before a transaction times out.
-
Memory Quota: The amount of memory, in megabytes, allocated to the processing of a query.
When checked (as it is by default), the Use Cost-Based Optimizer checkbox specifies that the cost-based optimizer is used for queries: when the checkbox is unchecked, the optimizer is not used.
For additional details on all the Query settings in the lower section of the panel, refer to Settings and Parameters.
Index Storage Mode
This panel provides radio buttons whereby the storage mode for indexes can be selected. The panel appears as follows:
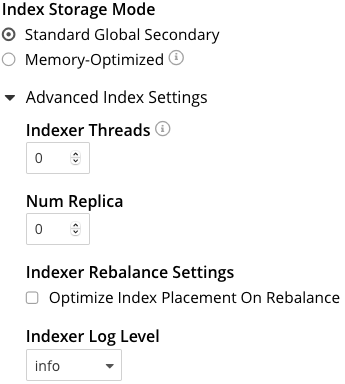
The options are Memory Optimized Index Storage, and Standard Index Storage.
Advanced Settings for indexes are also provided:
-
Indexer Threads. The number of dedicated threads used by the Index Service. The number can be increased on multi-core machines. The default is 0.
-
Num Replica. The default number of index replicas to be created by the Index Service whenever
CREATE INDEXis invoked. For further details, refer to Index Replication. -
Indexer Rebalance Settings When the Optimize Index Placement On Rebalance checkbox is checked, Couchbase Server redistributes indexes when rebalance occurs, in order to optimize performance. If the checkbox is unchecked (which is the default), such redistribution does not occur. For further details, refer to Rebalancing the Index Service.
-
Indexer Log Level. Adjust the logging level. The options are:
Silent,Fatal,Error,Warn,Info,Verbose,Timing,Debug, andTrace. The default isInfo.
Configure General Settings with the CLI
To configure name and memory, index storage, and auto-failover via CLI, use the appropriate CLI command; as described below.
Note that no CLI support is provided for configuring query settings.
As an alternative, see Configure General Settings with the REST API, below.
Additionally, for information on URL access lists via the N1QL CURL() function, see CURL Function.
Name and Memory Settings via CLI
Name and memory settings are established with the setting-cluster command.
/opt/couchbase/bin/couchbase-cli setting-cluster \
--cluster 10.143.192.101:8091 \
--username Administrator \
--password password \
--cluster-ramsize 256 \
--cluster-name 10.143.192.101 \
--cluster-index-ramsize 256 \
--cluster-fts-ramsize 512 \
--cluster-eventing-ramsize 256 \
--cluster-analytics-ramsize 1024
This establishes the cluster-name as 10.143.192.101, the memory allocation for Data and Index Services each as 256 megabytes, and the memory allocation for each other service as zero.
If successful, the call produces the following output:
SUCCESS: Cluster settings modifiedNote that settings for an individual server may be retrieved with the server-info command, the output for which can be filtered, as appropriate, by grep:
/opt/couchbase/bin/couchbase-cli server-info \
-c 10.143.192.101 -u Administrator -p password | grep fts
This returns the setting for ftsMemoryQuota:
"ftsMemoryQuota": 512,Index Storage Settings via CLI
Index storage can be configured with the setting-index command.
/opt/couchbase/bin/couchbase-cli setting-index \
-c 10.143.192.101:8091 \
-u Administrator \
-p password \
--index-log-level info \
--index-stable-snapshot-interval 40000 \
--index-memory-snapshot-interval 150 \
--index-storage-setting default \
--index-threads 8 \
--index-max-rollback-points 10
This establishes the logging level as info, the stable snapshot interval at 40 seconds, the memory snapshot at 150 milliseconds, and the storage setting as default (which means standard, rather than memory optimized).
The number of threads to be used is established as 8, and the maximum number of rollback points to 10.
For information on the significance of these values see setting-index.
If successful, the call produces the following output:
SUCCESS: Indexer settings modifiedSoftware-Update Settings via CLI
Software update-notifications can be configured by means of the setting-notification command.
/opt/couchbase/bin/couchbase-cli setting-notification \
-c 10.143.192.101 -u Administrator -p password \
--enable-notifications 1
A value of 1 for --enable-notifications enables update-notifications. A value of 0 disables.
If successful, the command produces the following output:
SUCCESS: Notification settings updatedAuto-Failover Settings via CLI
Auto-failover can be configured with the setting-autofailover command.
/opt/couchbase/bin/couchbase-cli setting-autofailover \
-c 10.143.192.101:8091 \
-u Administrator \
-p password \
--enable-auto-failover 1 \
--auto-failover-timeout 120 \
--enable-failover-of-server-groups 1 \
--max-failovers 2 \
--can-abort-rebalance 1
This enables auto-failover, with a timeout of 120 seconds, and an event-maximum of 2.
It also enables failover server groups, and specifies, by means of the --can-abort-rebalance flag, that if a node becomes unresponsive during a rebalance, that node can be failed over automatically, and the rebalance thereby aborted.
If successful, the command returns the following output:
SUCCESS: Auto-failover settings modifiedFor a detailed description of auto-failover settings, policy, and constraints, see Automatic Failover.
Query Settings via CLI
You can set all of the cluster-level query settings, except for the CURL access control settings, using the setting-query command.
To get the current cluster-level query settings, use the --get option:
/opt/couchbase/bin/couchbase-cli setting-query \
-c 10.143.192.101:8091 \
-u Administrator \
-p password \
--get
To set cluster-level query settings, for example the log level and the maximum parallelism, use the --set option:
/opt/couchbase/bin/couchbase-cli setting-query \
-c 10.143.192.101:8091 \
-u Administrator \
-p password \
--set \
--log-level debug \
--max-parallelism 4
For additional details on the cluster-level query settings, refer to Settings and Parameters.
Rebalance Settings via CLI
To obtain the cluster’s current rebalance settings by means of the CLI, use the setting-rebalance command, with the --get option:
/opt/couchbase/bin/couchbase-cli setting-rebalance \
-c 10.143.192.101 \
-u Administrator \
-p password \
--get
If successful, the command returns the current rebalance settings:
Automatic rebalance retry disabled
Retry wait time: 300
Maximum number of retries: 2
To modify the current rebalance settings, use the --set option; and specify appropriate values for the --max-attempts and --wait-for flags:
/opt/couchbase/bin/couchbase-cli setting-rebalance \
-c 10.143.192.101 \
-u Administrator \
-p password \
--set \
--max-attempts 3 \
--wait-for 200
If successful, the command displays the following success message:
SUCCESS: Automatic rebalance retry settings updatedFor more information, see the reference page Configure Rebalance Retries.
XDCR Process Setting via CLI
To configure the number of XDCR processes for the node, use the setting-xdcr command, with the --max-processes option:
/opt/couchbase/bin/couchbase-cli setting-xdcr \
-c 10.143.192.101 \
-u Administrator \
-p password \
--max-processes 5
If successful, the command returns the following message:
SUCCESS: Global XDCR settings updatedConfigure General Settings with the REST API
Multiple REST API methods are provided to support configuration of general settings. These are described below.
Name and Memory Settings via REST
To establish name and memory settings, use the /pools/default method.
curl -v -X POST -u Administrator:password \
http://10.143.192.101:8091/pools/default \
-d clusterName=10.143.192.101 \
-d memoryQuota=256 \
-d indexMemoryQuota=256 \
-d ftsMemoryQuota=256 \
-d cbasMemoryQuota=1024 \
-d eventingMemoryQuota=512
This establishes the cluster’s IP address as its name, and assigns memory-quotas to the Data, Index, Search, Analytics, and Eventing Services.
Note that when used with GET, /pools/default returns configuration-settings.
The output can be filtered, by means of a tool such as jq:
curl -s -u Administrator:password \
http://10.143.192.101:8091/pools/default | jq '.ftsMemoryQuota'
If successful, this returns the value of the key ftsMemoryQuota:
256Software-Update Settings via REST
Software update-notifications can be configured by means of the /setting/stats command.
curl -v -X POST -u Administrator:password \
http://10.143.192.101:8091/settings/stats \
-d sendStats=true
This establishes that software-update notifications should be send.
To prevent the sending of notifications, set the value of sendStats to false.
Node Availability Settings via REST
To establish node availability settings, use the /settings/autoFailover method.
curl -v -X POST -u Administrator:password \
http://10.143.192.101:8091/settings/autoFailover \
-d enabled=true \
-d timeout=120 \
-d failoverOnDataDiskIssues[enabled]=false \
-d failoverOnDataDiskIssues[timePeriod]=120 \
-d failoverServerGroup=true \
-d maxCount=2 \
-d canAbortRebalance=true
This enables auto-failover, with a timeout of 120 seconds, and a maximum failover-count of 2.
It also specifies, by means of canAbortRebalance, that if a node becomes unresponsive during a rebalance, that node can be failed over automatically, and the rebalance thereby aborted.
Additionally, failover is enabled in the event of suboptimal disk responsiveness, with a time-period of 120 seconds specified.
For more information on these options, see the descriptions provided above, for the UI.
Additionally, the /settings/autoReprovision method can be used; to specify that if a node containing active Ephemeral buckets becomes unavailable, its replicas on the specified number of other nodes are promoted to active status as appropriate, to avoid data-loss.
curl -v -X POST -u Administrator:password \
http://10.143.192.101:8091/settings/autoReprovision \
-d enabled=true \
-d maxNodes=1
This enables auto-reprovisioning, specifying 1 as the maximum number of nodes.
Index Settings via REST
To establish index settings, use the /settings/indexes method.
curl -v -X POST -u Administrator:password \
http://localhost:8091/settings/indexes \
-d indexerThreads=4 \
-d logLevel=verbose \
-d maxRollbackPoints=10 \
-d storageMode=plasma \
-d memorySnapshotInterval=150 \
-d stableSnapshotInterval=40000
This establishes the storage mode for indexes as plasma.
It also establishes a verbose logging level, and a total of 4 index threads.
For detailed information on these and other settings, see the REST reference page for the method, at Set GSI Settings.
If successful, the call returns a JSON object, which provides values for all current index settings:
{
  "redistributeIndexes": false,
  "numReplica": 0,
  "indexerThreads": 4,
  "memorySnapshotInterval": 150,
  "stableSnapshotInterval": 40000,
  "maxRollbackPoints": 10,
  "logLevel": "verbose",
  "storageMode": "plasma"
}
Data Settings via REST
To set the number of reader and writer threads for Couchbase Server, use the POST /pools/default/settings/memcached/global HTTP method and endpoint, as follows:
curl -v -X POST -u Administrator:password \
http://10.143.192.101:8091/pools/default/settings/memcached/global \
-d num_reader_threads=12 \
-d num_writer_threads=8
This sets the number of reader threads to 12, and the number of writer threads to 8.
If successful, the call returns an object whose values confirm the settings that have been made:
{"num_reader_threads":12,"num_writer_threads":8}See Threading for an overview of reader and writer threads. Also see the REST API reference page, Setting Thread Allocations.
Query Settings via REST
To set the directory for temporary query data, and establish its size-limit, use the /settings/querySettings method.
curl -v -X POST -u Administrator:password \
http://localhost:8091/settings/querySettings \
-d 'queryTmpSpaceDir=/tmp' \
-d 'queryTmpSpaceSize=2048'
This specifies that the directory for temporary query data should be /tmp; and that the maximum size should be 2048 megabytes.
If successful, this call returns a JSON document featuring all the current query-related settings, including access-control:
{
  "queryTmpSpaceDir": "/tmp",
  "queryTmpSpaceSize": 2048,
// ...
  "queryCurlWhitelist": {
    "all_access": false,
    "allowed_urls": [],
    "disallowed_urls": []
  }
}
The document’s values indicate that the specified values for directory and size have been established; and that the current setting for access-control restricts access to all, with no exceptions.
To specify particular URLs as allowed and disallowed, use the /settings/querySettings/curlWhitelist method:
curl -v -X POST -u Administrator:password \
http://localhost:8091/settings/querySettings/curlWhitelist \
-d '{"all_access": false,
     "allowed_urls": ["https://company1.com"],
     "disallowed_urls": ["https://company2.com"]}'
A JSON document is specified as the payload for the method.
The document’s values indicate that https://company1.com is allowed, and https://company2.com is disallowed.
If successful, the call returns a JSON document that confirms the modified settings:
{
  "all_access": false,
  "allowed_urls": [
    "https://company1.com"
  ],
  "disallowed_urls": [
    "https://company2.com"
  ]
}
For additional information, refer to Cluster Query Settings API.
Rebalance Settings via REST
By means of the REST API, both rebalance retries and maximum concurrent moves per node can be configured.
Rebalance Retries via REST
To obtain the cluster’s current settings for rebalance retries by means of the REST API, use the GET /settings/retryRebalance HTTP method and URI, as follows:
curl -X GET -u Administrator:password \
http://10.143.192.101:8091/settings/retryRebalance
If successful, the command returns the following object:
{"enabled":true,"afterTimePeriod":200,"maxAttempts":3}This output shows that rebalance retry is enabled, with 200 seconds required to elapse before a retry is attempted, and a maximum of 3 retries possible.
To change the rebalance settings, use the POST method with the same URI, specifying appropriate values:
curl -X POST -u Administrator:password \
http://10.143.192.101:8091/settings/retryRebalance \
-d enabled=false \
-d afterTimePeriod=100 \
-d maxAttempts=2
If successful, the command returns the following object:
{"enabled":false,"afterTimePeriod":100,"maxAttempts":2}This verifies that rebalance retry has been disabled, the required period between retries changed to 100 seconds, and the maximum number of retries changed to 2.
For more information on getting and setting the rebalance retry status, see Configure Rebalance Retries, Get Rebalance-Retry Status, and Cancel Rebalance Retries.
Maximum Concurent vBucket Moves via REST
To inspect the current maximum number of concurrent vBucket moves permitted for every node, use the GET /settings/rebalance HTTP method and URI, with the rebalanceMovesPerNode parameter, as follows:
curl -v -X GET http://10.143.201.101:8091/settings/rebalance \
-u Administrator:password
This returns an object, confirming the current setting as being 4 (which is the default value):
{"rebalanceMovesPerNode":4}
To set a new value for the parameter use the POST method with the same URI, and with the rebalanceMovesPerNode parameter.
Note that the minimum value is 1, and the maximum 64.
curl -v -X POST http://10.143.201.101:8091/settings/rebalance \
-u Administrator:password \
-d rebalanceMovesPerNode=10
If successful, the call returns an object confirming the new setting:
{"rebalanceMovesPerNode":10}
For more information, see the REST reference page Limiting Concurrent vBucket Moves.
XDCR Process Setting via REST
To determine how many XDCR processes are configured per node, use the GET /settings/replications HTTP method and URI, as follows.
Note that this example pipes the output to the jq program, to facilitate readability.
curl -X GET -u Administrator:password \
http://10.143.192.101:8091/settings/replications | jq '.'
If successful, the command returns the following object:
{
  "checkpointInterval": 600,
  "compressionType": "Auto",
  "desiredLatency": 50,
  "docBatchSizeKb": 2048,
  "failureRestartInterval": 10,
  "filterBypassExpiry": false,
  "filterDeletion": false,
  "filterExpiration": false,
  "goGC": 100,
  "goMaxProcs": 4,
  "logLevel": "Info",
  "networkUsageLimit": 0,
  "optimisticReplicationThreshold": 256,
  "priority": "High",
  "sourceNozzlePerNode": 2,
  "statsInterval": 1000,
  "targetNozzlePerNode": 2,
  "workerBatchSize": 500
}
The configured number of threads is the value to goMaxProcs; which is currently 4.
To change this value, use the POST method with the same URI, specifying the required number of processes as the value to the --goMaxProcs option:
curl -X POST -u Administrator:password \
http://10.143.192.101:8091/settings/replications \
-d goMaxProcs=5 | jq '.'
If successful, this returns the following object:
{
  "checkpointInterval": 600,
  "compressionType": "Auto",
  "desiredLatency": 50,
  "docBatchSizeKb": 2048,
  "failureRestartInterval": 10,
  "filterBypassExpiry": false,
  "filterDeletion": false,
  "filterExpiration": false,
  "goGC": 100,
  "goMaxProcs": 5,
  "logLevel": "Info",
  "networkUsageLimit": 0,
  "optimisticReplicationThreshold": 256,
  "priority": "High",
  "sourceNozzlePerNode": 2,
  "statsInterval": 1000,
  "targetNozzlePerNode": 2,
  "workerBatchSize": 500
}
This output indicates that the value of goMaxProcs has been appropriately incremented.
For more information, see the reference page Managing Advanced XDCR Settings.

